
As I sift through vibrant sprinkles and chocolate aromas, a memory of Halloween excitement fills my heart. These Easy Cauldron Cookies, shaped like whimsical little cauldrons, are the perfect way to bring some magic to your kitchen this spooky season. With a simple cake mix base, these treats come together quickly and are just waiting for your creative touch! They’re not only a hit with kids but also serve as a fun-filled baking activity for the whole family. Imagine soft, chewy cookie cups, filled with a luscious green buttercream that looks like a bubbling potion. Perfect for parties or cozy nights in, these cute cauldron cookie cups are sure to be a crowd-pleaser. Curious to see how you can make these enchanting treats come to life? Let’s get started!
Why Are These Cauldron Cookie Cups Special?
Whimsical Design: Shaped like cute cauldrons, these cookie cups are not only delicious but also a visual treat that sparks joy during Halloween.
Quick and Easy: With a cake mix base, you’ll whip these up in no time, making them perfect for last-minute baking or fun family activities.
Customizable Fillings: Whether you prefer frosting, candies, or even chocolate ganache, the possibilities for creativity are endless, just like the options for our Halloween Cookies Chocolatey!
Kid-Friendly Fun: Kids will love decorating their cauldrons with spooky sprinkles and candy eyeballs, creating personalized treats that ignite even more excitement for the season.
Party Ready: Ideal for Halloween gatherings, school events, or cozy nights in, these treats are sure to impress guests of all ages! Plus, check out our recipe for Cheesecake Stuffed Cookies for another sweet twist!
Cute Cauldron Cookie Cups Ingredients
-
For the Cookie Cups
• Devil’s Food Cake Mix – This chocolatey base sets the stage for sweet and rich flavors; feel free to swap it with a different chocolate cake mix for a tasty twist.
• Large Eggs – These are essential for binding the cookie cups together, ensuring they hold their shape beautifully.
• Canola or Vegetable Oil – Adds moisture to keep the cups tender and delicious; you can try melted coconut oil for a tropical flair.
• Black Food Coloring – An optional addition that enhances the dark color of your cookie cups for a spookier look. -
For the Buttercream Frosting
• Unsalted Butter – Key for achieving that creamy texture; stick with butter for optimal flavor rather than margarine.
• Powdered Sugar – Provides sweetness and smoothness for the frosting; remember to sift it for a lump-free finish.
• Vanilla Extract – A must for adding depth to the frosting flavor; almond extract can serve as a fragrant alternative.
• Salt – A pinch elevates the sweetness and balances the flavors beautifully.
• Milk – Use to adjust the buttercream’s consistency for easy piping; non-dairy milk, like almond milk, works wonderfully too.
• Green Food Coloring – To achieve that enchanting potion-like appearance in your buttercream; have fun with different shades! -
For Decoration
• Round Green Sprinkles, Halloween Sprinkles – These are optional but add a festive flair that kids will adore!
• Candy Eyeballs, Pretzel Sticks – Fun toppings that complete the cauldron look; swap pretzels for cookie sticks for an equally charming effect.
With these delightful ingredients, you’re well on your way to creating the cutest cauldron cookie cups this Halloween!
Step‑by‑Step Instructions for Cute Cauldron Cookie Cups
Step 1: Prep Oven and Pans
Begin by preheating your oven to 350°F (175°C). While the oven warms up, grab three mini muffin pans and grease them lightly with cooking spray or butter. This will prevent the cookie cups from sticking and ensure they release easily once baked.
Step 2: Mix Cookie Base
In a large mixing bowl, combine one box of Devil’s Food Cake Mix, two large eggs, half a cup of canola or vegetable oil, and the optional black food coloring. Stir everything together with a spatula or wooden spoon until the mixture is smooth and well-blended, ensuring no dry cake mix remains.
Step 3: Shape and Bake
Using a cookie scoop or tablespoon, scoop half-tablespoon-sized amounts of the cookie dough into each greased muffin cup. Gently press down with your fingers to flatten the tops. Bake in the preheated oven for 8-10 minutes, or until the edges are set and just beginning to crack, signaling they’re ready for the next step.
Step 4: Create Indention
Once the cookie cups are out of the oven, immediately take a measuring spoon and press down into the center of each cookie to create a small cup shape. Allow them to cool in the pans for about 10 minutes until they are easier to handle, ensuring they hold their form as they cool.
Step 5: Prepare Buttercream
While your cute cauldron cookie cups cool, prepare the vibrant green buttercream. In a mixing bowl, beat one stick of softened unsalted butter until creamy. Gradually add about four cups of sifted powdered sugar along with one teaspoon of vanilla extract and a pinch of salt, mixing until smooth. Add milk a tablespoon at a time until you reach your desired piping consistency, then fold in your green food coloring.
Step 6: Fill Cookie Cups
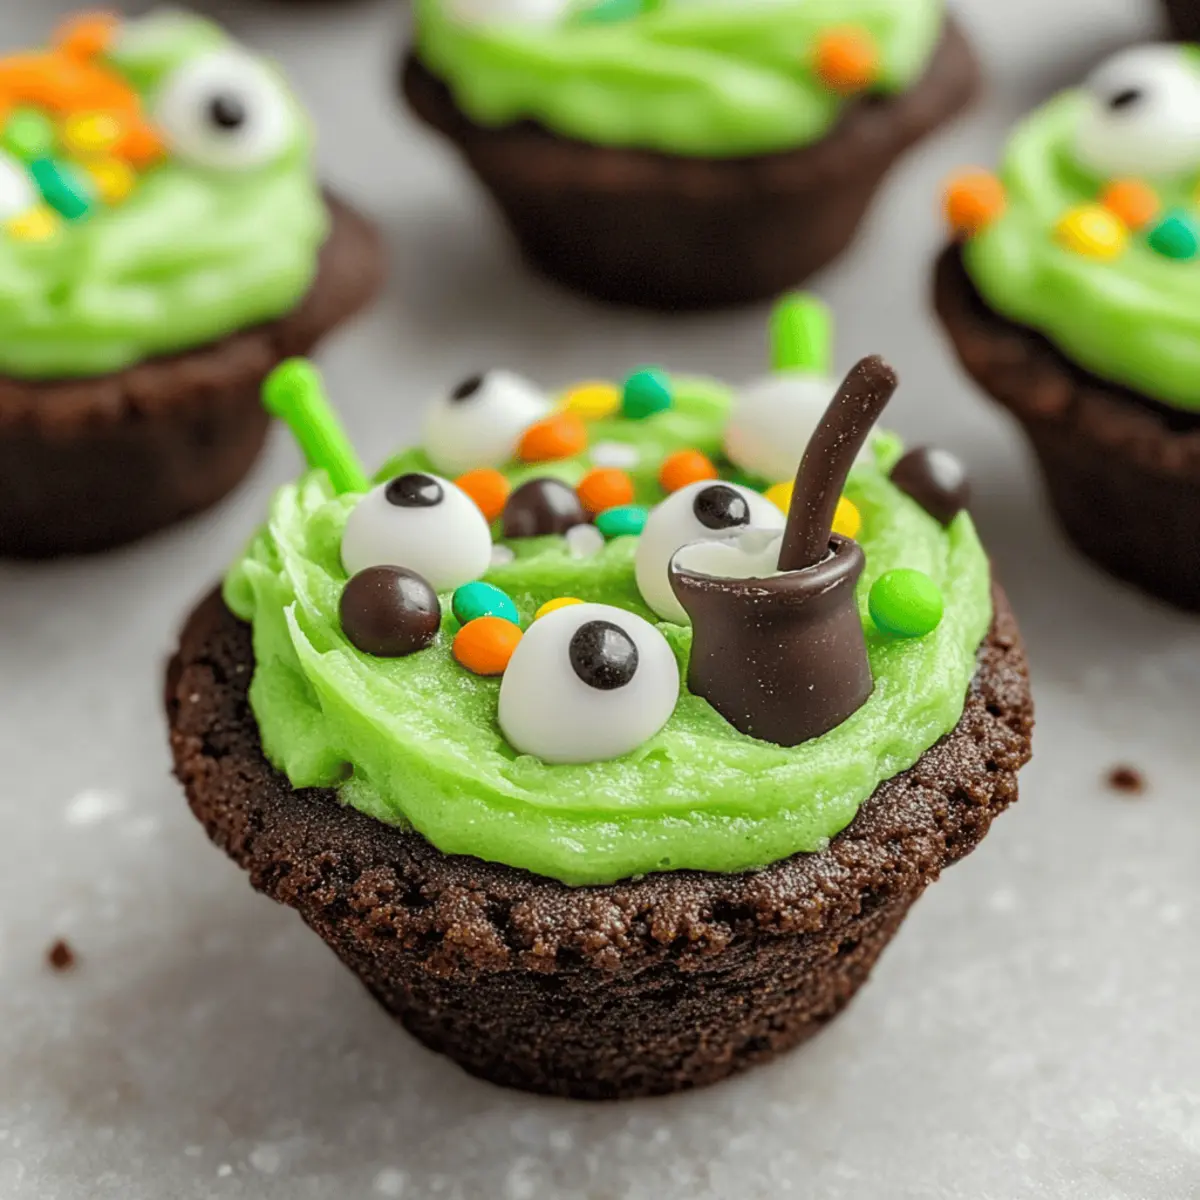
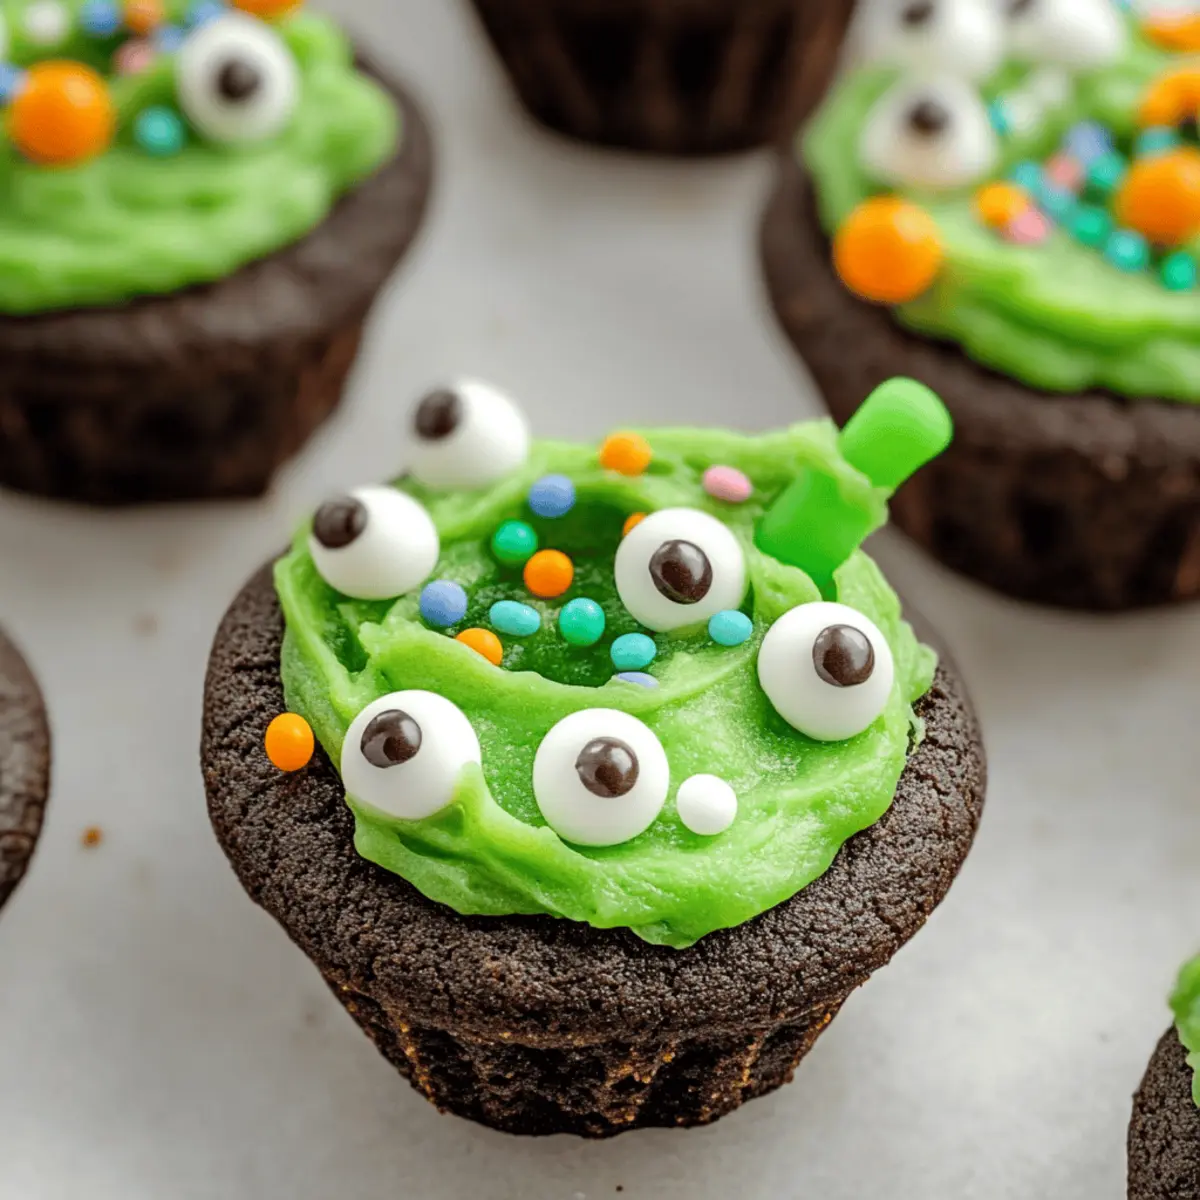
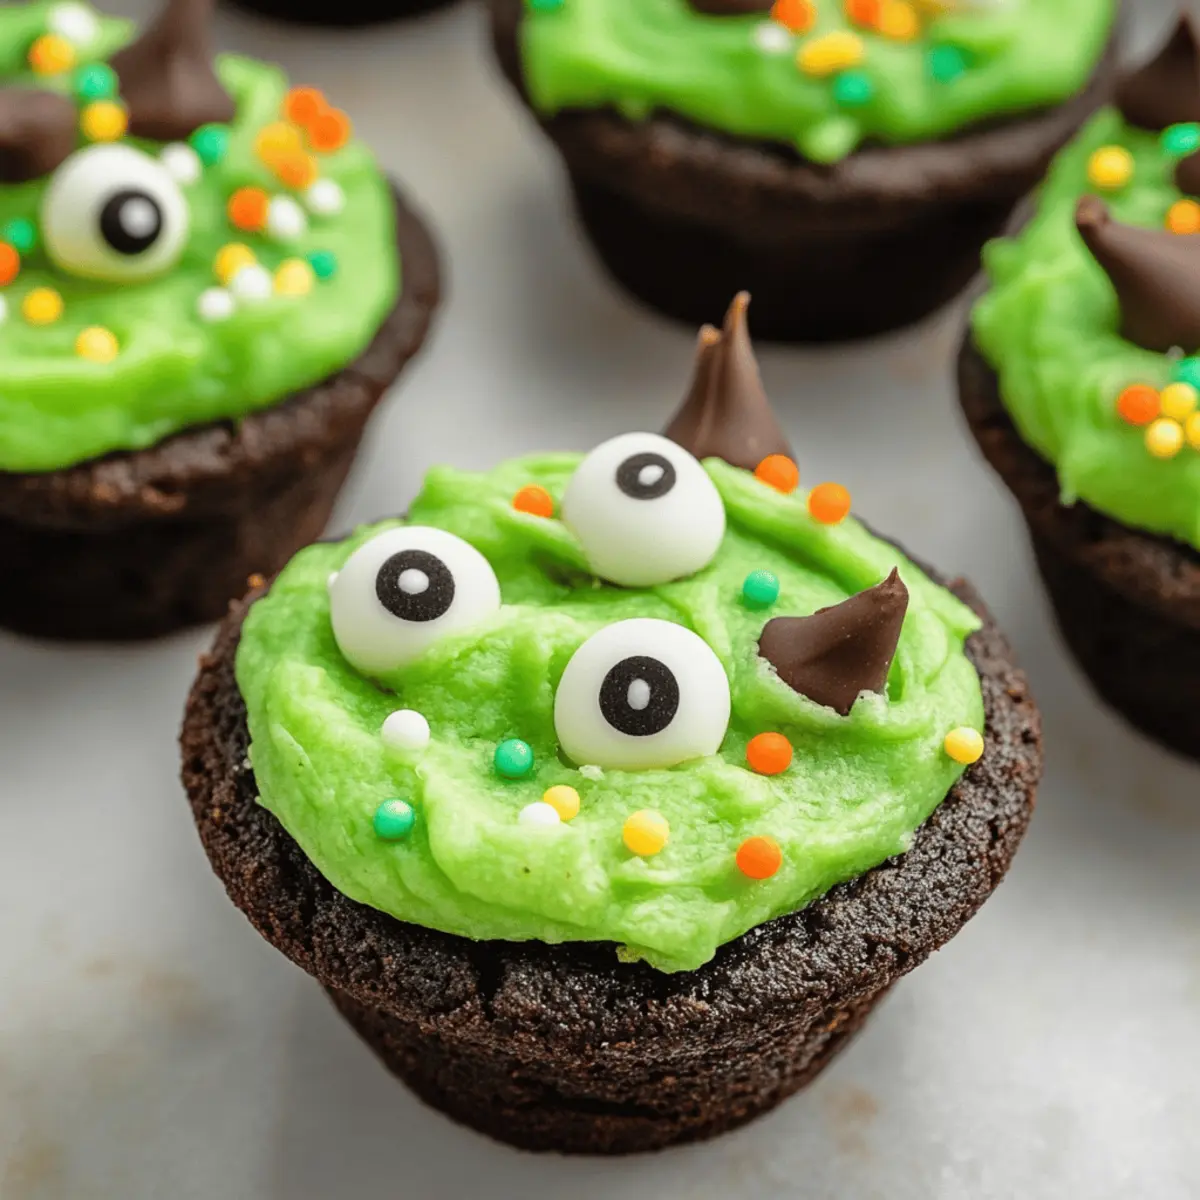
Once the cookie cups have completely cooled, take your buttercream and transfer it into a piping bag fitted with a round tip. Carefully pipe the green buttercream into each cookie cup, filling them generously to create the look of a bubbling potion.
Step 7: Decorate
Finish off your festive Cute Cauldron Cookie Cups by sprinkling round green and Halloween-themed sprinkles on top of the buttercream for a delightful touch. To make them extra enchanting, add candy eyeballs and insert half pretzel sticks into the frosting for cute cauldron stirrers. Enjoy creating your spooky treats!
Cute Cauldron Cookie Cups Variations
Feel free to mix things up and add your own twist to these delightful treats! Each variation allows you to play with flavors and textures, making your baking experience even more enjoyable.
-
Brownie Base: Use mini brownie bites instead of cookie mix for a fudgier, more decadent treat. The rich chocolate flavor will have everyone coming back for seconds!
-
Cream Cheese Frosting: Swap the traditional buttercream for cream cheese frosting for a tangy contrast that balances sweet flavors beautifully. It’s an unexpected delight that pairs perfectly with chocolate.
-
Different Colors: Get creative with your frosting! Try using vanilla frosting tinted with vibrant Halloween colors like purple or orange for a festive appearance that captures the season’s spirit.
-
Stuffed Cookie Cups: Fill your cauldron cups with fun surprises! Add caramel, chocolate ganache, or even fruity jams inside before dolloping on the frosting for a flavor explosion.
-
Cookie Crumble Topping: For an added crunch, crush some cookies and sprinkle them on top of the frosting before adding candy eyeballs. This twist introduces a delightful texture to each bite.
-
Heat it Up: For those who like a spicy kick, include a pinch of cayenne or chili powder in your cookie dough. It adds a unique twist to the traditional sweet flavor that adventurous eaters will love.
-
Chocolate Drizzle: After decorating with frosting, drizzle melted chocolate over the tops for an extra layer of indulgence. This adds a gorgeous finish that’s sure to impress.
-
Nutty Addition: Fold in chopped nuts, like walnuts or pecans, into the cookie dough for a crunchy element. It creates a delightful contrast to the soft cookie cups and rich frosting.
Explore these variations to find your favorites! And if you’re in the mood for more spooky treats, check out our delightful Halloween Cookies Chocolatey or try the indulgent Cheesecake Stuffed Cookies for some extra sweetness!
Tips for the Best Cute Cauldron Cookie Cups
-
Perfect Oven Temperature: Always preheat your oven to 350°F to ensure even baking. If your oven runs hot, check cookies a minute early to avoid over-baking.
-
Uniform Sizing: Use a cookie scoop to ensure all cookie cups are the same size; this helps them bake uniformly and creates a more polished look.
-
Cool Completely: Make sure cookie cups are fully cool before filling them with buttercream. This prevents melting and ensures a neat appearance.
-
Sift the Powdered Sugar: For a smooth buttercream frosting, always sift your powdered sugar. This step guarantees a creamy texture for your Cute Cauldron Cookie Cups.
-
Explore Flavor: Feel free to experiment with different flavored cake mixes or frostings, like peanut butter or lemon cupcakes, for unique variations on these festive treats!
-
Creative Decorations: Let your imagination run wild! Use assorted candies, edible glitter, or themed sprinkles to give your cauldron cookie cups a personal touch.
What to Serve with Cute Cauldron Cookie Cups
Imagine the laughter and chatter of loved ones gathering around festive treats, where each bite of your cute cauldron cookie cups sparks joy and delicious memories.
- Spooky Punch: A fun, fizzy drink with a twist of lime juice, sparkling water, and floating gummy worms creates a playful party atmosphere.
- Ghostly Cupcakes: Light vanilla cupcakes topped with swirls of ghostly white frosting perfectly complement the rich chocolate of the cookie cups. Their delicate sweetness balances out the treats beautifully.
- Candy Corn Mix: A colorful mix of candy corn and nuts adds a crunchy sweet contrast to the soft texture of the cookie cups, making it a fun snack that screams Halloween.
- Fruity Sorbet: Serve a scoop of lime or orange sorbet for a refreshing twist that cleanses the palate and complements the sweetness of the cookies perfectly.
- Chocolate Milkshake: Indulge with a thick, chocolatey milkshake; its creamy texture paired with the rich chocolate flavor of the cookie cups is heavenly!
- Pumpkin Spice Latte: Get cozy with a warm pumpkin spice latte; the spices enhance the holiday vibe while providing a comforting contrast to the gooey buttercream.
- Caramel Apple Slices: Sweet, crisp apple slices drizzled with caramel create an enticing mix of fruity freshness and sweet decadence, adding a lovely crunch to your dessert spread.
- Halloween Cheese Board: A creative cheese platter with spooky-themed cheeses and crackers provides a savory balance, inviting guests to enjoy bites between the sweet treats.
- Mummy Dog Bites: Mini hot dogs wrapped in crescent roll dough resembling little mummies offer a playful and savory touch to the festive table alongside your cookie cups.
Make Ahead Options
These Cute Cauldron Cookie Cups are perfect for busy home cooks looking to save time during the Halloween season! You can prepare the cookie cups up to 24 hours in advance; simply bake them and store in an airtight container at room temperature to maintain their softness. The buttercream frosting can be made up to 3 days ahead; refrigerate it in an airtight container, and when you’re ready to serve, simply re-whip to restore its creamy texture. To finish, pipe the buttercream into the cooled cookie cups and decorate just before serving for the best visual appeal. With a little advance prep, you can enjoy delightful treats with minimal effort!
How to Store and Freeze Cute Cauldron Cookie Cups
Room Temperature: Keep the cookie cups in an airtight container at room temperature for up to 3-4 days. Ensure they are completely cooled before storing to maintain freshness.
Fridge: If you have leftover filled cookie cups, refrigerate them for up to 1 week. Allow them to sit at room temperature for a few minutes before serving for best flavor.
Freezer: For long-term storage, freeze undecorated cookie cups in an airtight container for up to 3 months. Thaw them in the fridge and frost before serving.
Reheating: If you prefer warm treats, reheat the cookie cups in the microwave for about 10-15 seconds, but avoid reheating after they’ve been decorated to preserve the frosting’s texture.
Cute Cauldron Cookie Cups Recipe FAQs
How do I choose the best cake mix for my cauldron cookie cups?
I recommend using a Devil’s Food Cake Mix for rich chocolate flavor, but you can also opt for any chocolate cake mix you love. Just ensure that it’s a quality brand; the flavor will shine through in your cute cauldron cookie cups!
What is the best way to store decorated cookie cups?
Store your filled Cute Cauldron Cookie Cups in an airtight container at room temperature for up to 3-4 days. If you have leftovers, refrigerating them can extend freshness up to a week. Just be sure to bring them back to room temperature before serving for the best taste experience!
Can I freeze cookie cups after baking?
Absolutely! To freeze your Cute Cauldron Cookie Cups, let them cool completely first. Then, place them in an airtight container, separating layers with parchment paper to avoid sticking, and freeze for up to 3 months. When you’re ready to enjoy them, simply thaw in the fridge, then frost before serving.
What should I do if my cookie cups are too crumbly?
If your cookie cups turn out crumbly, it may be due to insufficient binding; double-check that you included both eggs and enough oil. Be sure to mix your batter until just combined and follow the baking time closely. If you still find they’re falling apart, a touch more oil added to the mixture can help retain moisture.
Are there any allergy concerns I should be aware of?
Absolutely! Many components in your Cute Cauldron Cookie Cups, such as eggs and dairy from butter, may cause allergies. If you’re baking for someone with allergies, consider using egg replacers and non-dairy butter. Always check ingredient labels for potential allergens like gluten or nuts if you’re using specialty cake mixes.

Cute Cauldron Cookie Cups for a Spooky Sweet Treat
Ingredients
Equipment
Method
- Preheat your oven to 350°F (175°C) and grease three mini muffin pans.
- Combine Devil's Food Cake Mix, eggs, oil, and black food coloring in a mixing bowl.
- Scoop half-tablespoon amounts into greased muffin cups and flatten tops. Bake for 8-10 minutes.
- Create a cup shape in each cookie with a measuring spoon while still warm. Cool in pans for 10 minutes.
- Beat butter for the buttercream, add sugar, vanilla, salt, and milk, adjusting for consistency and fold in green food coloring.
- Pipe the buttercream into cooled cookie cups, filling generously.
- Sprinkle with green and Halloween-themed sprinkles and add candy eyeballs and pretzel sticks for decoration.
Leave a Reply