
Picture a sunny afternoon where creativity meets nutrition in the most delightful way—welcome to the world of Banana Sushi! This easy, no-cook treat combines the natural sweetness of bananas with endless topping options, making it a fantastic, kid-friendly snack. What’s even better? It’s a quick solution for busy parents and a fun activity that turns snack time into a playful culinary adventure. Whether rolled in chia seeds or sprinkled with colorful rice krispies, each bite is a delicious way to make fruits more appealing, ensuring everyone at the table stays happily satisfied. Are you ready to discover the simple steps to this charming creation? Let’s dive in!
Why Is Banana Sushi So Fun?
Unleash Creativity: Let your kids become little chefs by personalizing their Banana Sushi creations with various toppings.
Quick and Easy: No cooking or baking necessary—perfect for busy days!
Healthy Indulgence: Packed with potassium and fiber, it’s a guilt-free treat that satisfies sweet cravings.
Versatile Variations: Add your favorite toppings like chia seeds or crushed nuts for a delightful twist!
Crowd-Pleasing: Bring joy to snack time with this playful, visually appealing delight—perfect for parties or afternoon snacks! If you’re also looking for more delicious banana ideas, check out my Banana Baked Oatmeal or try this delightful Banana Chocolate Chip recipe for additional inspiration!
Banana Sushi Ingredients
Get ready to roll with these simple ingredients!
For the Base
• Banana – Use ripe bananas for optimal sweetness and easier manipulation.
For the Sticky Topping
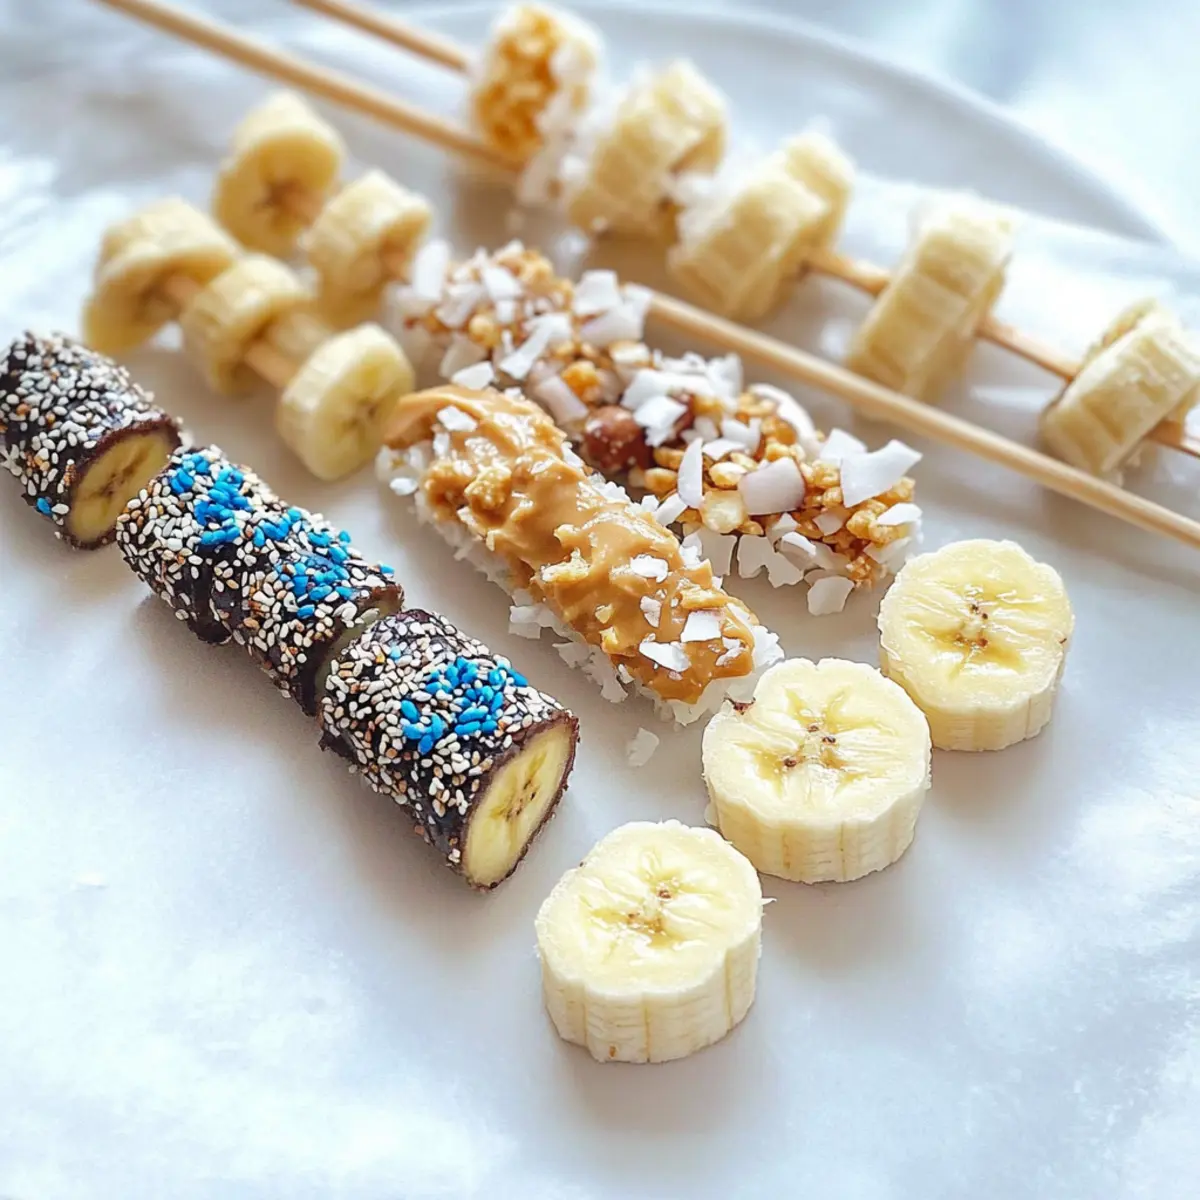
• Peanut Butter – Acts as a delicious adhesive; swap for sun butter for nut allergies.
• Melted Chocolate – Offers a rich flavor; choose dark chocolate for a more intense taste.
For the Coatings
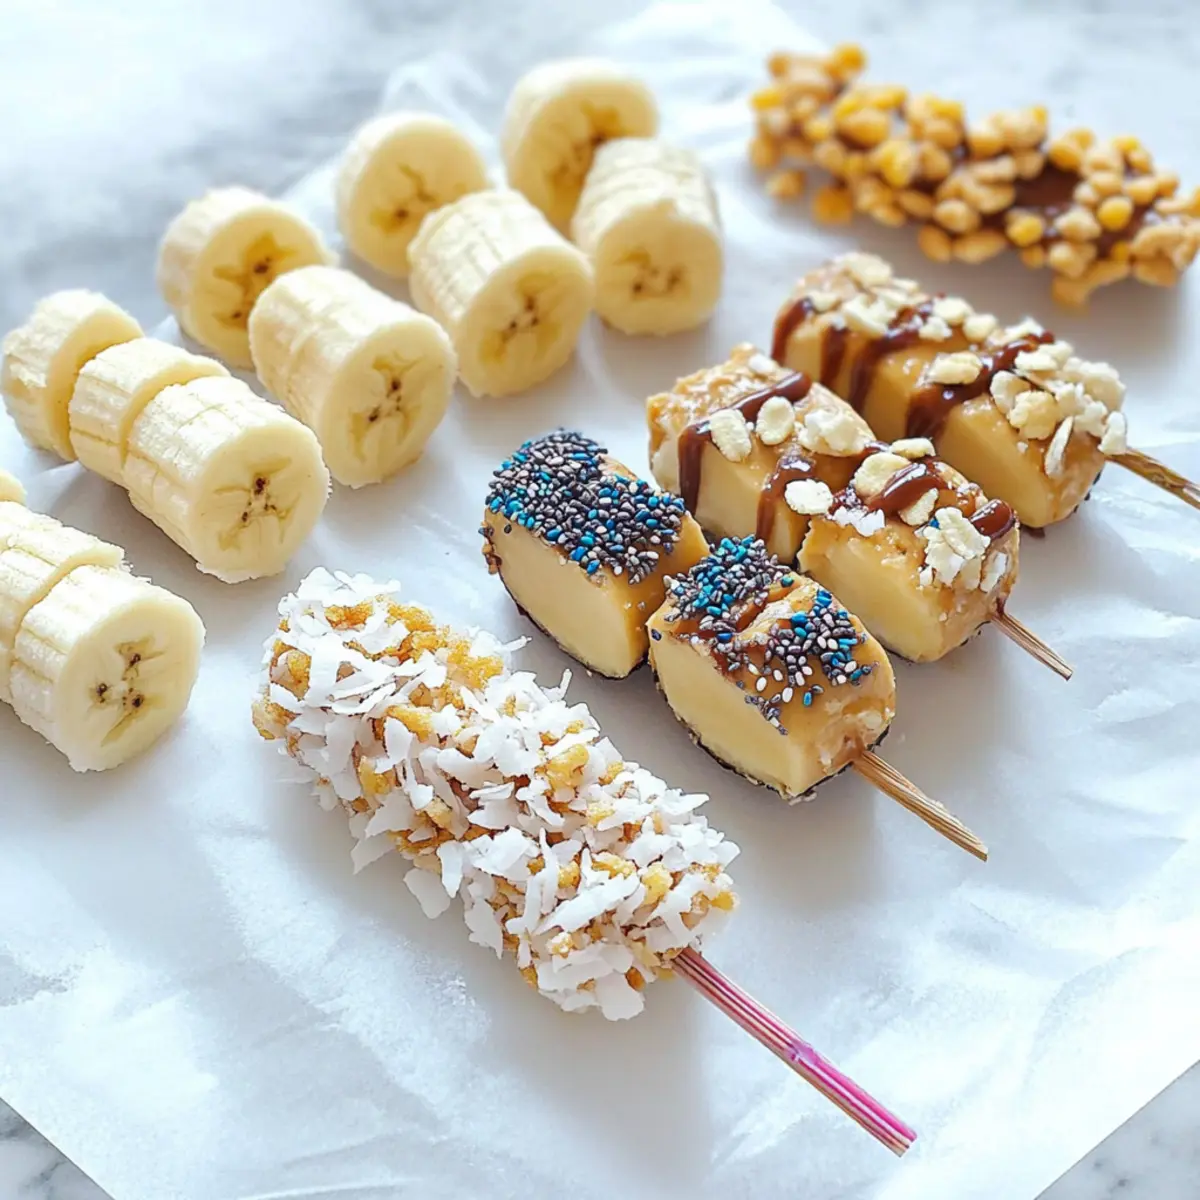
• Chia Seeds – A nutritious option that adds crunch and fiber to your Banana Sushi.
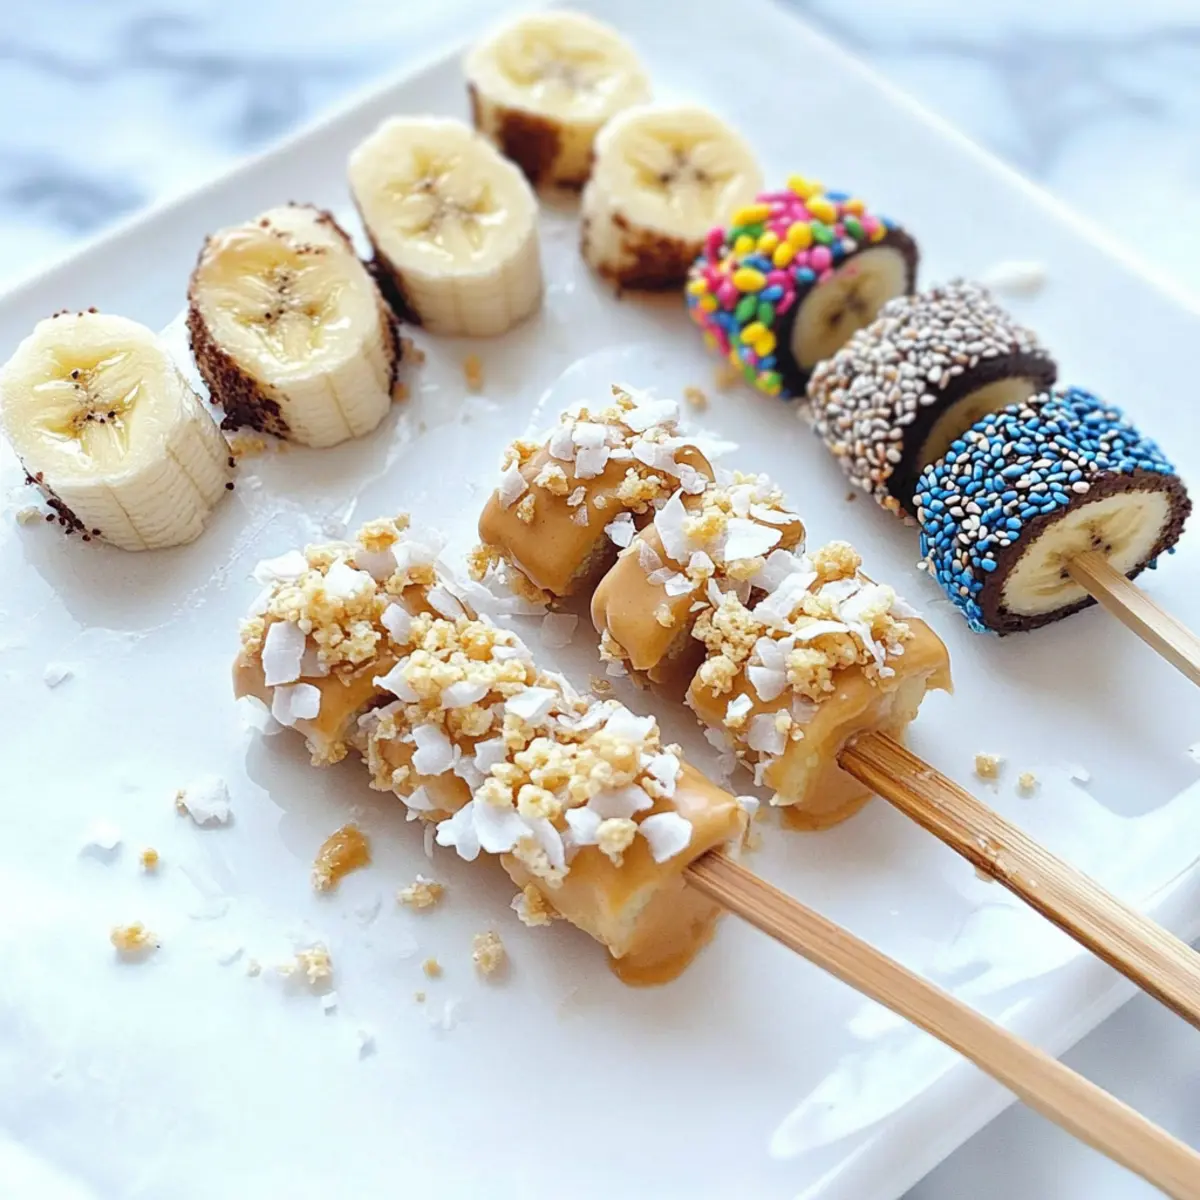
• Sprinkles – Brighten up your sushi and make it extra fun for kids!
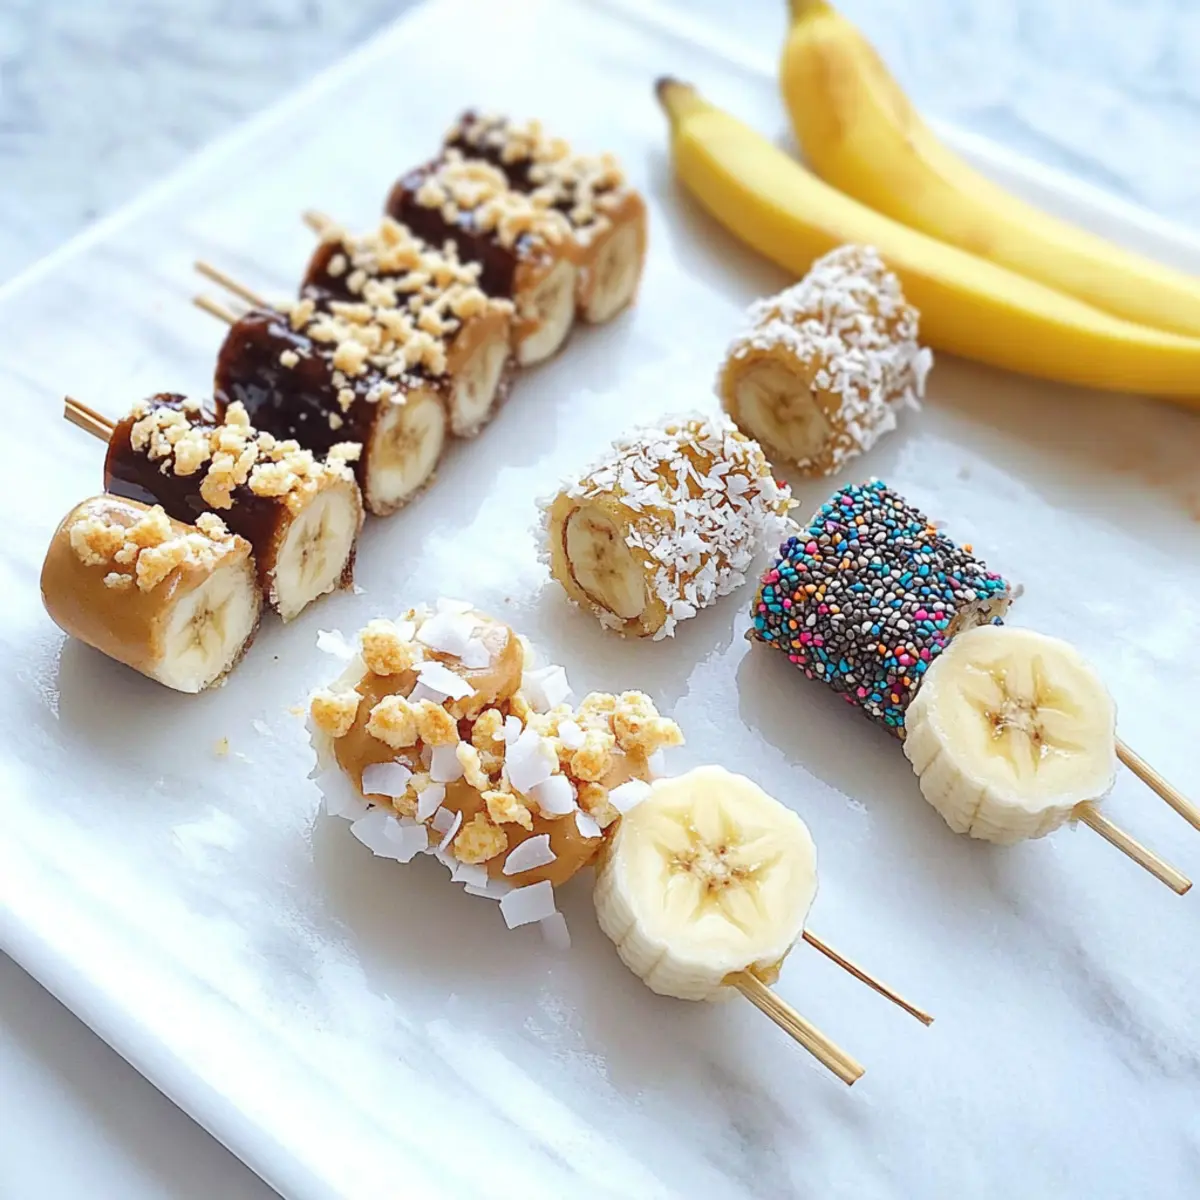
• Shredded Coconut – Adds a tropical flair and a chewy texture.
• Rice Krispies – For a delightful crispy bite that brings a satisfying crunch.
• Crushed Nuts or Granola – Experiment with favorite toppings to personalize your snack!
Create your very own beautiful Banana Sushi that will make both kids and parents smile!
Step‑by‑Step Instructions for Banana Sushi
Step 1: Prepare the Banana
Start by peeling a ripe banana and placing it on a clean cutting board. The soft, creamy texture of a ripe banana will make it easier to manipulate and spread toppings on. Ensure you choose a banana that’s firm yet slightly soft for the best balance between sweetness and stability as you create your Banana Sushi.
Step 2: Apply the Sticky Topping
Using a butter knife or a small spatula, generously spread your chosen sticky topping—like peanut butter or melted chocolate—over the entire surface of the banana. Aim for an even coat that covers all sides, ensuring a perfect adhesive surface for the toppings ahead. This should take about 1–2 minutes and will help all the coatings stick nicely.
Step 3: Add Your Coatings
Sprinkle or roll the sticky banana in your selected coatings—such as chia seeds, sprinkles, or shredded coconut. Take your time to ensure the banana is fully coated, creating delightful textures and flavors. A good coating will add crunch and visual appeal, turning your Banana Sushi into a fun, vibrant snack that is visually enticing for kids.
Step 4: Slice and Serve
Once your banana is fully coated, carefully slice it into bite-sized pieces using a sharp knife. Each piece should showcase the colorful toppings and feel firm but tender between your fingers. Serve immediately on a plate or platter, presenting this playful Banana Sushi to your family, and watch as smiles appear all around!
Step 5: Enjoy an Engaging Experience
For an added twist, encourage children to use chopsticks to pick up the Banana Sushi pieces. This fun engagement will make the tasting experience even more exciting and helps develop their motor skills. Relish in the joy of sharing this healthy, creative treat along with laughter and delight, making each bite a memorable adventure!
Variations & Substitutions for Banana Sushi
Let your creativity run wild and customize your Banana Sushi with these fun and tasty ideas!
-
Chia Seed Sushi: Roll your banana in a layer of chia seeds for a nutritious twist that’s packed with omega-3s.
-
Rice Krispie Crunch: Swap in crispy rice cereal for a playful crunch that kids will love; it’s like a cereal treat on a banana!
-
Dairy-Free Delight: Use coconut yogurt instead of peanut butter for a creamy, dairy-free base that adds a tropical flavor.
-
Fruit-Filled Fun: Add thin slices of strawberries or kiwi on top of your coatings to make it a fruit fiesta that’s refreshing and colorful.
-
Chocolate Drizzle: Instead of spreading melted chocolate, drizzle it in an artistic pattern over the coated banana for a gorgeous presentation and a sweet burst of flavor.
-
Heat It Up: Sprinkle a little cinnamon or chili powder for a surprising kick; the spice balances beautifully with the banana’s sweetness and can create an exciting flavor profile.
-
Nutty Banana Sushi: Use crushed nuts as a topping; they add delightful texture and provide healthy fats, making every bite satisfying.
-
Granola Twist: For added crunch and sweetness, roll your banana in granola instead of sprinkles; it’s like breakfast and dessert in one!
With these creative ideas, your Banana Sushi can be as unique as your imagination, ensuring every snack time is an adventure! If you’re looking for other fun banana recipes, don’t miss trying out my delicious Banana Baked Oatmeal or the delightful Banana Chocolate Chip for more inspiration!
Expert Tips for Banana Sushi
• Choose Ripe Bananas: Opt for ripe bananas, as they have the perfect texture and sweetness, making the Banana Sushi more enjoyable.
• Even Topping Application: Spread the sticky topping evenly to ensure the coatings stick well; an uneven layer could lead to toppings falling off.
• Keep Bananas Fresh: To avoid browning, serve immediately or store covered in the fridge if making ahead. This keeps your Banana Sushi looking fresh!
• Fun Variations: Experiment with different toppings like yogurt or alternative sweeteners to suit dietary needs while keeping your Banana Sushi exciting.
• Check Allergies: Always verify for nut allergies when serving to multiple children, ensuring everyone can enjoy this healthy snack adventure safely!
How to Store and Freeze Banana Sushi
Fridge: Store uneaten Banana Sushi in an airtight container for up to 2 days to maintain freshness and prevent browning.
Freezer: For an extra treat, freeze banana slices coated in toppings for up to 1 month. They make a delicious, cold snack!
Reheating: If serving previously frozen Banana Sushi, allow it to thaw in the fridge or at room temperature before enjoying, as the texture is best when cool and not soggy.
Make-Ahead Tips: Prepare the components ahead of time and assemble just before serving for the best taste and texture in your Banana Sushi!
What to Serve with Easy No-Cook Banana Sushi
Treat your family to a delightful meal that balances fun and nutrition, perfect for any time of day.
- Fresh Fruit Salad: A vibrant mix of seasonal fruits adds a refreshing contrast and more natural sweetness alongside the creamy banana.
- Smoothie Bliss: Pair your Banana Sushi with a creamy, fruit-forward smoothie for a deliciously satisfying and nutritious drink.
- Greek Yogurt Dip: This tangy and protein-rich dip enhances the guilt-free experience and adds a creamy element that complements the banana.
- Nutty Granola: A side of crunchy granola introduces a satisfying crunch and a wholesome, nutty flavor that pairs beautifully.
- Mini Veggie Platter: Crisp veggies provide a crunchy and wholesome counterpoint, keeping your snack table bright and colorful.
- Chocolate Milk: A rich, indulgent treat like chocolate milk elevates the fun factor of this healthy snack, creating a delightful combo.
- Nut Butter Dippers: For an extra boost of protein, serve an assortment of nut butters for dipping, making each bite even more delicious!
- Muffin Bites: Warm, fluffy muffin bites, like banana or blueberry, would complete the experience and add a comforting, soft texture.
- Herbal Tea: A soothing cup of herbal tea can be a delightful way to balance the sweetness, making it perfect for a calming afternoon.
Make Ahead Options
Preparing Banana Sushi in advance is a wonderful way to save time on busy days! You can slice the bananas up to 2 hours before serving and keep them in an airtight container in the refrigerator. To prevent browning, lightly coat the banana slices with a bit of lemon juice. Additionally, you can pre-portion your toppings, such as chia seeds, sprinkles, or melted chocolate, into small bowls. When it’s time to enjoy, simply roll the banana slices in your chosen toppings and assemble them on a plate. This makes a quick and delightful snack that’s just as delicious as if you made it fresh!
Banana Sushi Recipe FAQs
What type of bananas should I use for Banana Sushi?
I recommend using ripe bananas for the best sweetness and texture. Look for bananas that are firm yet slightly soft, which will make them easier to spread your toppings on without falling apart. Avoid overripe bananas that have dark spots all over, as they can be too mushy for this fun snack!
How do I store leftover Banana Sushi?
To keep your Banana Sushi fresh, store any uneaten pieces in an airtight container in the fridge for up to 2 days. This helps prevent browning and keeps the toppings intact. Just remember, the sooner you enjoy them, the better they’ll taste!
Can I freeze Banana Sushi for later?
Absolutely! To freeze Banana Sushi, slice your coated bananas and place them in a single layer on a parchment-lined baking sheet. Freeze them for about 1 to 2 hours until solid, then transfer the pieces to an airtight container or freezer bag. They can be stored in the freezer for up to 1 month. When you’re ready to indulge, simply thaw them in the fridge or enjoy them as a cold treat straight from the freezer!
What toppings work best for Banana Sushi?
The beauty of Banana Sushi lies in its versatility! You can use a variety of coatings such as chia seeds for added crunch, chocolate for a sweet touch, or even sprinkles to make it more fun for kids. If you’re catering to dietary restrictions, alternatives like sun butter instead of peanut butter or yogurt instead of chocolate are great options to ensure everyone can enjoy this delightful treat!
Are there any allergy considerations for this recipe?
Yes, it’s important to be aware of nut allergies when preparing Banana Sushi, especially if serving to children. Always check with parents or guardians before including nut-based toppings like peanut butter. You can easily swap it out with seed butters or fruity yogurt for a safe yet delicious alternative that’s suitable for everyone!
How long does Banana Sushi stay fresh once prepared?
Banana Sushi is best enjoyed fresh, but if you must prepare it a bit ahead of time, keep it covered in the fridge, and it will be good for about 2 days. Just be mindful that the bananas may brown slightly, so it’s best to serve them as soon as possible for the most vibrant presentation.
Delightful Banana Sushi: A Fun, Healthy Snack Adventure!
Ingredients
Equipment
Method
- Step 1: Prepare the Banana - Start by peeling a ripe banana and placing it on a clean cutting board.
- Step 2: Apply the Sticky Topping - Spread your chosen sticky topping over the entire surface of the banana.
- Step 3: Add Your Coatings - Sprinkle or roll the sticky banana in your selected coatings.
- Step 4: Slice and Serve - Carefully slice the banana into bite-sized pieces.
- Step 5: Enjoy an Engaging Experience - Encourage children to use chopsticks for an added twist.
Leave a Reply