
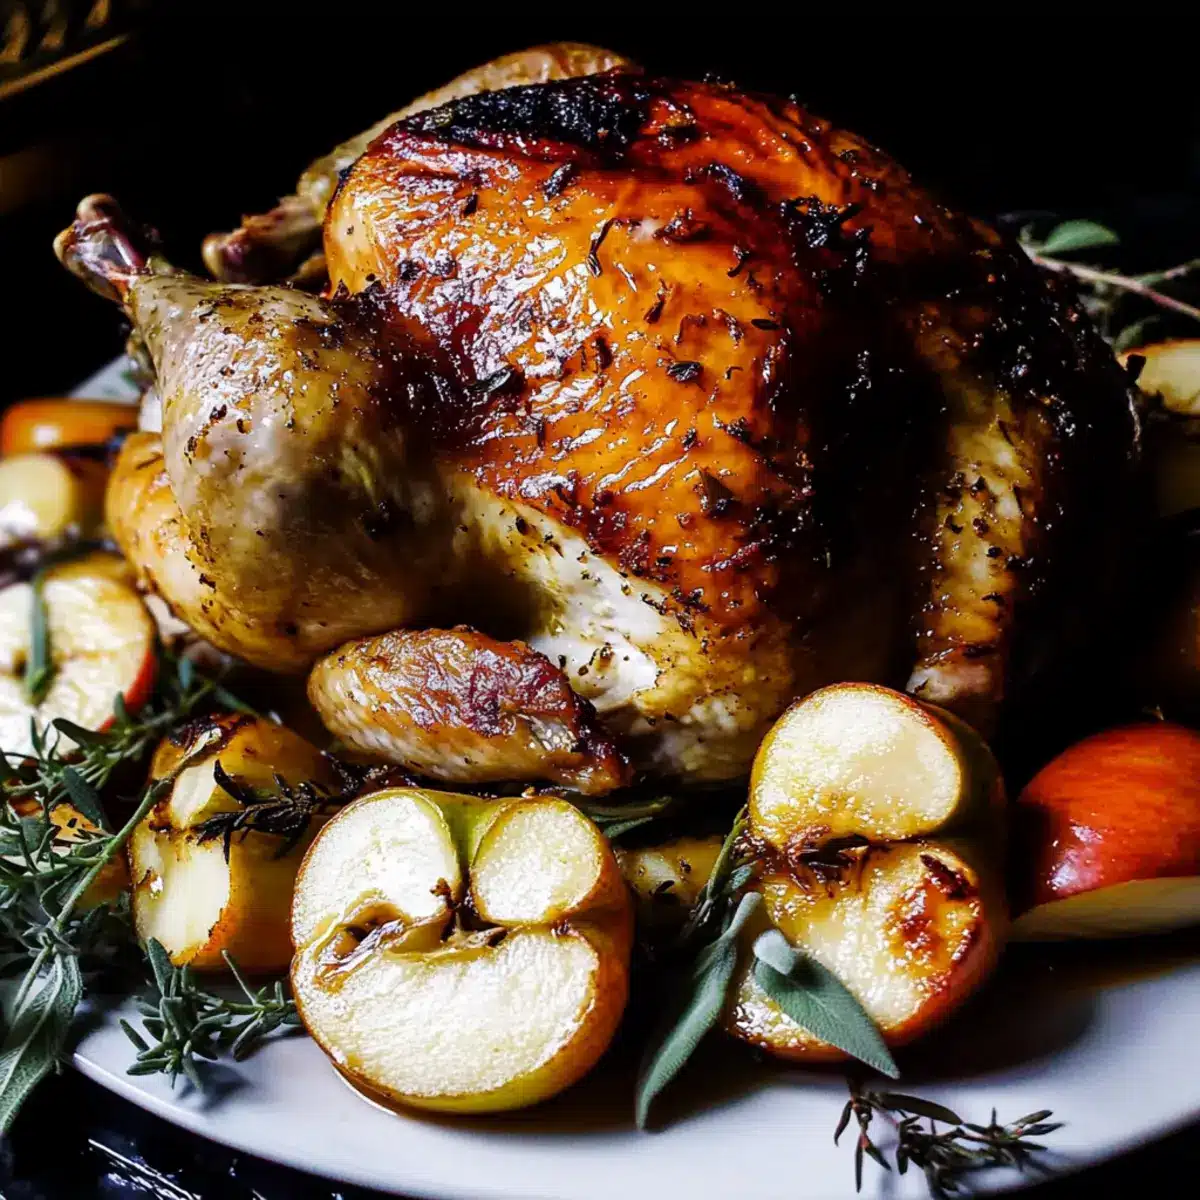
The comforting aroma of apple cider wafts through the kitchen, instantly transforming any ordinary day into a culinary fall celebration. Today, I’m thrilled to share my Cider Brined Roast Chicken with Maple Glaze—a dish that not only wows your dinner guests but also makes for a cozy Sunday family meal. The magic lies in the brining process that infuses the chicken with a touch of sweetness and the herbal notes of thyme and sage, yielding juicy, flavorful meat with crispy, golden skin. Plus, it’s a fantastic way to elevate your roast chicken game while keeping the prep time surprisingly straightforward. Whether it’s Thanksgiving or a casual gathering, this recipe guarantees to please and fills your home with warmth. Are you ready to make your kitchen the heart of autumn feasting?
Why is Cider Brined Roast Chicken a Must-Try?
Irresistible Flavor: The combination of apple cider, fresh herbs, and a maple glaze brings a sweet, savory twist to your traditional roast.
Easy Brining Method: Don’t worry if you’re new to brining; this recipe takes just a bit of prep time to deliver incredible results.
Perfect for Gatherings: Whether it’s for a holiday feast or a cozy family dinner, this dish is bound to impress your guests with its show-stopping presentation.
Versatile Serving Options: Pair it with roasted vegetables or a fresh salad for complete ease. You can even use the leftover chicken in delicious dishes like our Garlic Parmesan Chicken for midweek meals!
Comforting Aroma: As it roasts, your kitchen will fill with a warm, inviting scent, making it hard not to get excited.
Get ready to enjoy a dish that’s not only simple to prepare but also perfect for creating magical moments around your dining table!
Cider Brined Roast Chicken Ingredients
• Get ready to create a delicious and tender center-stage dish!
For the Brine
• 2 L water – This serves as the base for your flavorful brine.
• 6 ½ cups apple cider, divided – Imparts a sweet, apple flavor that beautifully enhances the chicken; can substitute with any fruit cider for a twist.
• 1 cup kosher salt – Essential for creating moisture and seasoning; halve the amount if using table salt.
• ½ cup brown sugar – Adds a delightful sweetness to the brine.
• 12-14 sprigs fresh thyme, divided – Brings aromatic flavor; feel free to substitute with fresh rosemary for a different herbaceous note.
• 1 tbsp peppercorns – Provides a mild spice that balances the sweetness.
• 1 L ice water – Used to cool down the brine after heating.
For the Chicken
• 6-7 lb roaster chicken – The star ingredient; ensure freshness for the best juiciness.
• ½ cup butter, softened – Helps make a rich, flavorful compound butter.
• 3 sprigs fresh sage, divided – Lends additional flavor; can be swapped with more thyme if desired.
• 1 orange – Offers aromatic zest and is perfect for stuffing the cavity.
• ½ tsp pepper, divided – Adds seasoning; adjust to your taste preference.
• 1 tbsp olive oil – Used to coat the roasting pan and prevent sticking.
For Roasting
• 1 onion – Serves as an aromatic base that adds depth to the dish.
• 3 garlic cloves – Infuses wonderful flavor into the roast.
• 3 Gala apples – Adds a sweet, flavor-packed touch; substitute with similar firm apples for variety.
For the Glaze and Gravy
• 2 tbsp maple syrup – Provides sweetness for the glaze; honey works as a great alternative.
• ⅓ cup flour – Thickens the pan gravy; essential for a luscious sauce.
• Extra chicken broth or apple cider – Helpful for adjusting gravy consistency to your liking.
Now you have everything you need to create an unforgettable Cider Brined Roast Chicken that will leave your family and friends raving! Enjoy the process and the delightful aromas that will fill your kitchen.
Step‑by‑Step Instructions for Cider Brined Roast Chicken
Step 1: Brine Preparation
In a large pot, combine 2 liters of water, 4 cups of apple cider, kosher salt, brown sugar, a bundle of thyme, and peppercorns. Heat the mixture over medium heat, stirring until the salt and sugar dissolve completely, which will take about 5-7 minutes. Remove from heat, then cool the brine by adding 1 liter of ice water—this ensures the brine is ready for the chicken without cooking it.
Step 2: Brining Chicken
Once the brine is cooled, submerge your 6-7 lb roaster chicken breast-side down into the brine, making sure it is fully covered. Cover the pot with a lid or plastic wrap and refrigerate for 12 to 24 hours, allowing the chicken to absorb the flavors and moisture from the cider brine, which will yield a succulent result.
Step 3: Air Dry Chicken
After brining, carefully remove the chicken from the brine and pat it dry with paper towels to ensure a crispy skin. Place the chicken on a rack and let it sit at room temperature for about 1 hour. This air-drying step is crucial for achieving that golden crispiness during roasting and also helps the skin brown beautifully.
Step 4: Compound Butter Preparation
While the chicken is drying, prepare the compound butter by mixing ½ cup of softened butter with chopped thyme, sage, orange zest, and a pinch of pepper in a bowl. Stir until well-combined, creating a flavored butter mixture that will later enhance the rich taste of your Cider Brined Roast Chicken and keep it moist while roasting.
Step 5: Roasting Pan Setup
Preheat your oven to 350°F (175°C). Drizzle olive oil in a large roasting pan, spreading it evenly to prevent sticking. Layer the bottom of the pan with sliced onion, orange slices, garlic, and additional fresh herbs, creating a flavorful aromatic base for the chicken which will infuse the dish with delightful notes as it roasts.
Step 6: Prepare Chicken
Carefully place the chicken on a roasting rack inside the prepared pan. Rub the compound butter generously over the chicken, ensuring every crease is covered for maximum flavor. Stuff the cavity with half an orange and some fresh herbs. This not only optimizes flavor but also contributes to the moistness of the meat during cooking.
Step 7: Initial Roast
Pour 1 cup of apple cider into the bottom of the roasting pan to keep the chicken moist while cooking. Place the pan in the preheated oven and roast for about 1 hour. Keep an eye on the chicken; it should start to turn a lovely golden brown. If it darkens too quickly, tent it loosely with foil to prevent burning.
Step 8: Add Apples
After 1 hour of roasting, take the pan out and nestle halved Gala apples around the chicken. Brush the apples and exposed chicken skin with melted butter for added richness. Return the pan to the oven and roast for an additional 30-45 minutes, until the chicken is perfectly browned and the internal temperature reads 165°F (75°C).
Step 9: Prepare Glaze
In a small saucepan, simmer the remaining 2 ½ cups of apple cider over medium heat until it’s reduced by half, which should take about 10-15 minutes. Stir in 2 tablespoons of maple syrup and an additional tablespoon of butter, creating a sweet, glossy glaze to brush over the chicken following the initial roasting.
Step 10: Final Roasting
Once the chicken has reached the desired temperature, take it out of the oven and generously brush the reduction glaze all over the chicken. Return it to the oven for an additional 10-15 minutes, allowing the glaze to caramelize beautifully on the surface, adding both flavor and a gorgeous sheen to your Cider Brined Roast Chicken.
Step 11: Pan Gravy Preparation
After the chicken is done roasting, transfer the pan juices to a measuring cup and strain out any solids. In the empty roasting pan, make a roux by melting some of the leftover fat and mixing it with ⅓ cup of flour over medium heat, cooking it for about 1-2 minutes. Gradually add the strained pan juices, simmering until thickened for a delectable gravy.
Step 12: Serve
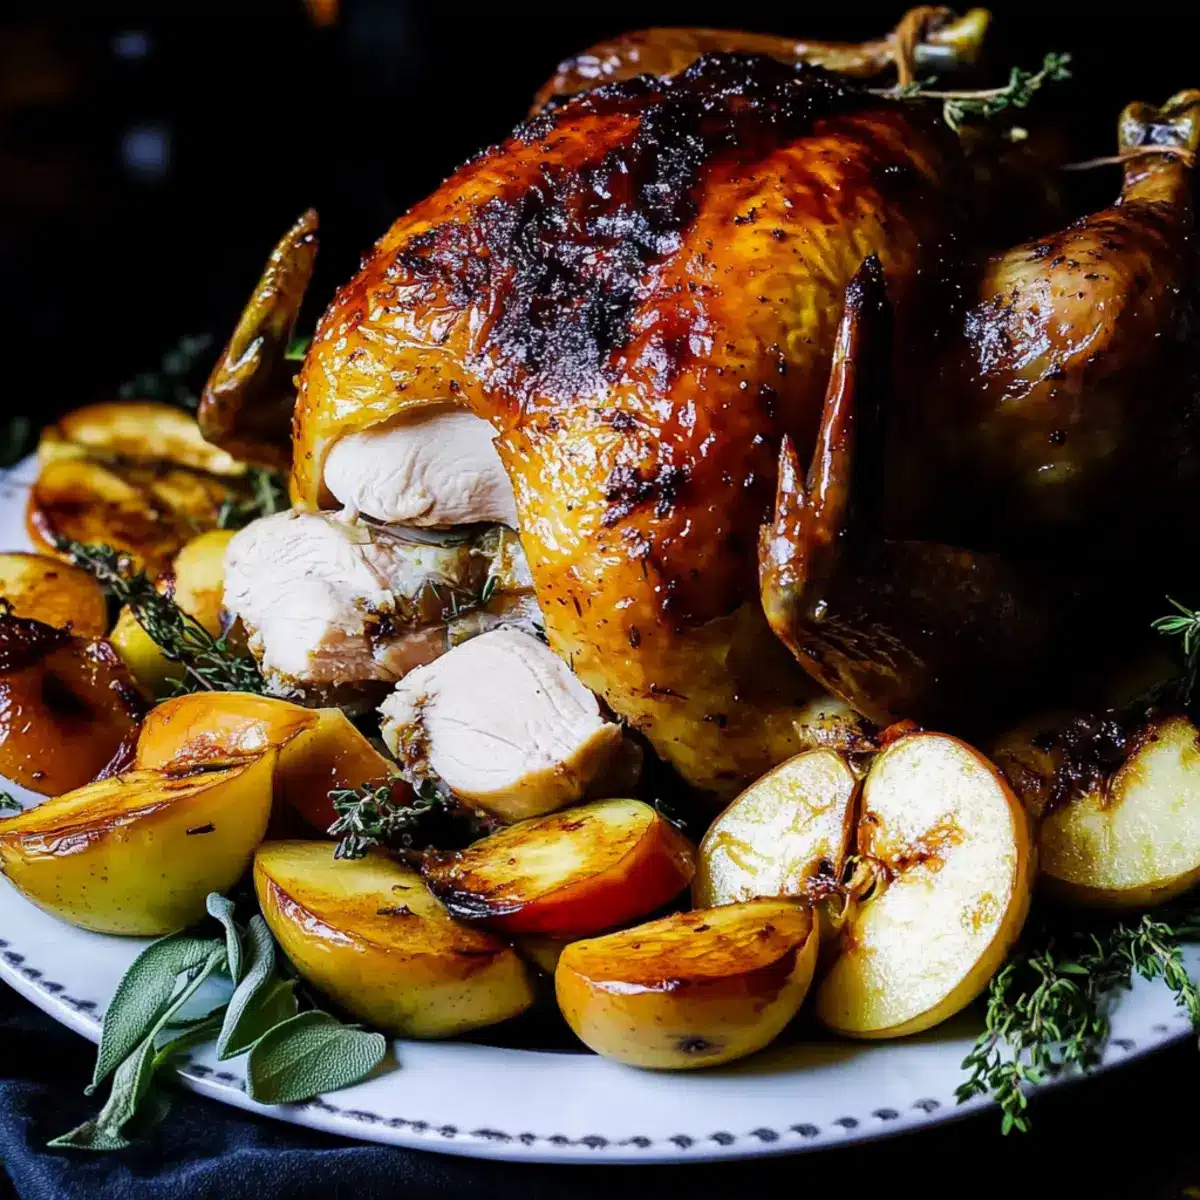
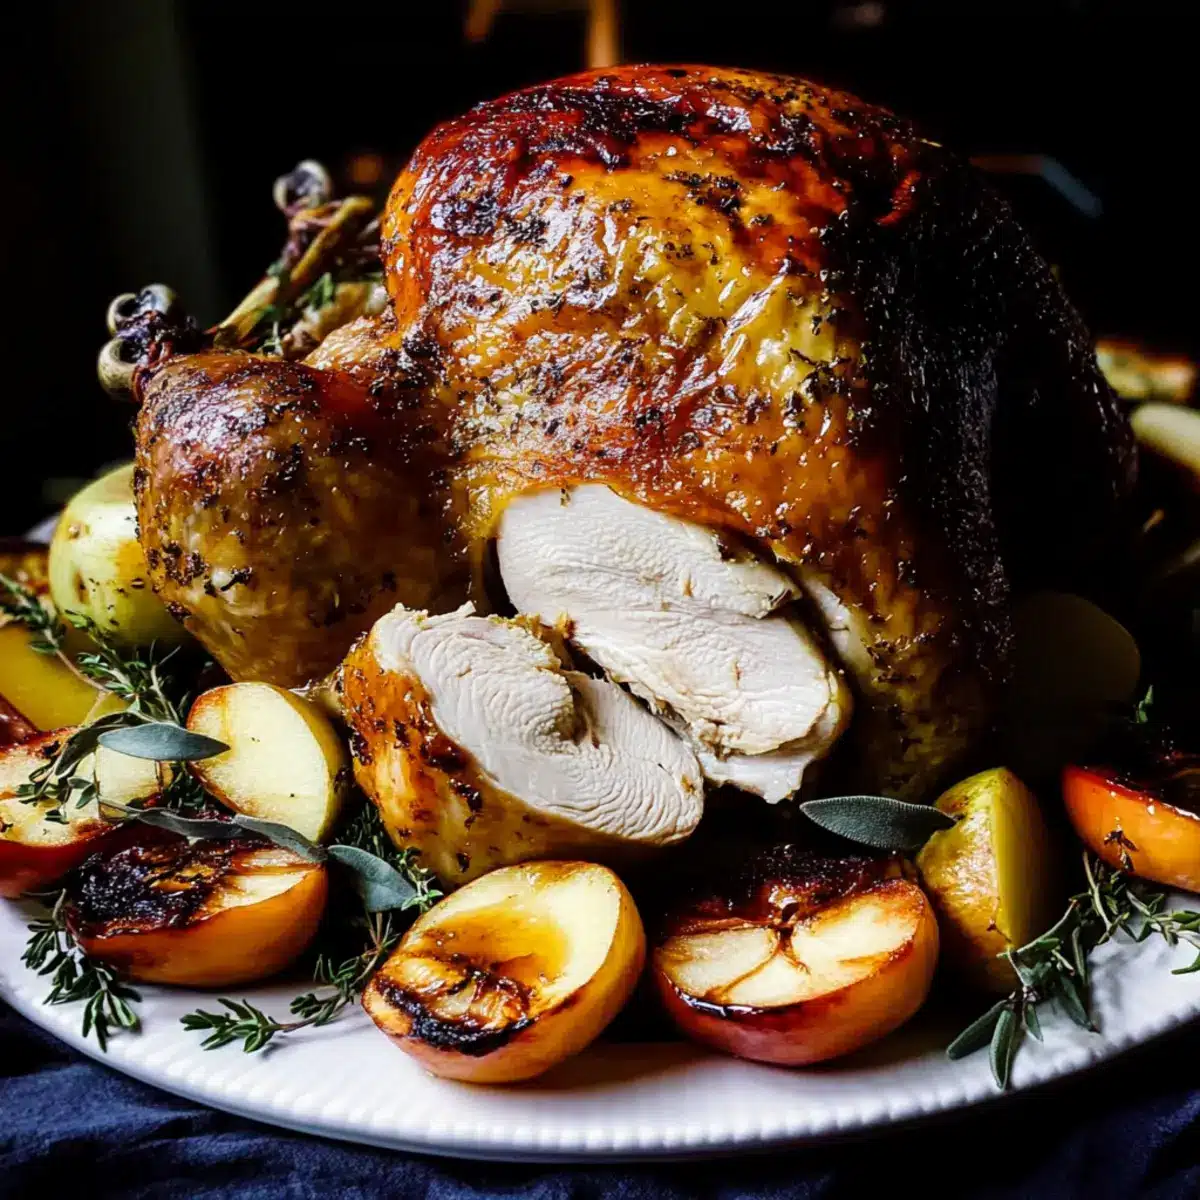
Now it’s time to carve your beautifully roasted Cider Brined Roast Chicken. Arrange the tender chicken on a platter, surrounded by the caramelized apples, and drizzle with the savory gravy. This stunning presentation will surely impress your guests, making your meal a memorable celebration of flavor and warmth.

Cider Brined Roast Chicken Variations
Customize your Cider Brined Roast Chicken to match your taste preferences or dietary needs with these flavorful ideas!
-
Fruit Swap: Use Granny Smith apples instead of Gala for a tart and tangy twist that brightens each bite.
-
Herb Variety: Try substituting with rosemary or oregano for your compound butter to introduce different herbal notes, perfect for variety seekers.
-
Whole Turkey: For larger gatherings, swap the chicken for turkey—adjust cooking times, but enjoy the same succulent flavors.
-
Maple Alternative: Replace the maple syrup with honey in the glaze for a deeper, more floral sweetness that complements the dish beautifully.
-
Spice It Up: Add red pepper flakes or a pinch of cayenne to the brine for a subtle heat that balances the sweetness wonderfully.
-
Cider Variety: Instead of apple cider, experiment with pear cider to create a unique flavor profile that still keeps that fruity essence.
-
Nutty Flavor: Stir in some finely chopped pecans or walnuts into the roast pan for a brilliant crunch alongside the tender chicken and apples.
-
Cook Method: For a twist on technique, try smoking the chicken on a BBQ for a deliciously smoky flavor that pairs beautifully with the sweetness of the brine.
Feel free to mix and match any of these ideas to craft your perfect Cider Brined Roast Chicken. And for more culinary inspiration, check out my Butter Chicken Easily or Thai Coconut Chicken recipes!
How to Store and Freeze Cider Brined Roast Chicken
Fridge: Store leftover Cider Brined Roast Chicken in an airtight container for up to 3 days. This helps retain moisture and flavor while preventing drying out.
Freezer: For longer storage, wrap the chicken tightly in plastic wrap or aluminum foil, then place it in a freezer-safe bag. It can be frozen for up to 3 months for best quality.
Reheating: Thaw in the fridge overnight before reheating. Warm in the oven at 350°F (175°C) for about 25-30 minutes, or until heated through to maintain its crispy skin.
Leftovers: Use leftover chicken in salads, sandwiches, or soups to enjoy the delicious flavors while reducing food waste.
Expert Tips for Cider Brined Roast Chicken
Cool Brine First: Ensure the brine is completely cooled before adding your chicken; a warm brine can start cooking the meat prematurely.
Baste Regularly: Basting the chicken every 20-30 minutes during roasting will help maintain moisture and enhance flavor.
Use a Thermometer: For the best results, use an instant-read thermometer to check for doneness; ensure it reaches 165°F without touching the bone.
Don’t Skimp on Drying: Allow the brined chicken to air dry for an hour before roasting; this step is key for achieving crispy skin.
Adjust for Browning: If the chicken’s skin is browning too fast, cover it loosely with aluminum foil to prevent burning while it cooks through.
Embrace these tips for your Cider Brined Roast Chicken, and enjoy a delectable dish that will wow your family and friends!
What to Serve with Cider Brined Roast Chicken
Creating a delightful meal around this succulent roast chicken will make your gathering unforgettable.
- Creamy Mashed Potatoes: The rich, buttery texture of mashed potatoes perfectly complements the savory glaze of the chicken.
- Roasted Brussels Sprouts: These crispy, caramelized sprouts offer a lovely contrast to the sweet elements of the dish, adding a delightful crunch. Pair them with a sprinkle of balsamic reduction for an extra flavor boost!
- Apple and Celery Salad: This fresh salad brings a refreshing crunch and lightness to your plate, balancing the richness of the roast chicken beautifully. Toss with a simple vinaigrette for an uplifting touch.
- Savory Stuffing: A warm stuffing filled with herbs and diced apples echoes the flavors of the chicken, making every bite delightful. Consider adding toasted pecans for extra texture.
- Buttered Corn on the Cob: Sweet, juicy corn brings a nostalgic element to your table, and its vibrant color makes for an inviting presentation next to the golden roast.
- Warm Apple Crisp: End your meal on a sweet note with a warm apple crisp topped with vanilla ice cream. The comforting apple flavors tie beautifully back to the roast, inviting seconds!
- Spiced Apple Cider: Serve this warm beverage on the side, playing off the cider used in the roast to create a cohesive, festive feel.
- Homemade Dinner Rolls: Light, fluffy rolls perfect for sopping up gravy create a homemade touch that everyone will appreciate, making your meal feel complete.
Make Ahead Options
These Cider Brined Roast Chicken preparations are perfect for busy cooks looking to save time without compromising flavor! You can brine the chicken up to 24 hours in advance, ensuring it’s fully submerged in the flavorful mixture before refrigerating it. The compound butter can also be prepared 3 days ahead and stored in the refrigerator, just make sure to let it soften a bit before use. When you’re ready to serve, simply air dry the chicken for an hour and follow the roasting instructions. For the best quality, keep the brined chicken refrigerated and cover it to prevent any unwanted odors. With these make-ahead options, you’ll have a delicious meal ready to impress with minimal last-minute fuss!
Cider Brined Roast Chicken Recipe FAQs
How do I select the perfect chicken for roasting?
Absolutely, when choosing a chicken, look for one that feels meaty and is plump. A 6-7 lb roaster chicken is ideal for this Cider Brined Roast Chicken. Avoid any that have dark spots or an unpleasant odor, as these can indicate the chicken is not fresh.
How should I store the leftovers?
To store your leftover Cider Brined Roast Chicken, place it in an airtight container in the fridge. It will stay fresh for up to 3 days, maintaining its flavor and moisture. For longer storage, wrap the chicken tightly in plastic wrap and aluminum foil, then place it in a freezer-safe bag where it can last up to 3 months.
Can I freeze the Cider Brined Roast Chicken?
Yes! To freeze your Cider Brined Roast Chicken, first allow it to cool completely. Wrap it tightly in plastic wrap and then again in aluminum foil to prevent freezer burn. Store in a freezer-safe bag, and it will remain good for up to 3 months. Thaw it in the fridge overnight before reheating for a delicious meal.
What if my chicken is browning too quickly?
Very! If you notice that the chicken is browning too quickly during roasting, cover it loosely with aluminum foil. This will slow down the browning process while allowing the chicken to cook through evenly. Just make sure to remove the foil for the last 10-15 minutes of cooking to get that gorgeous golden finish!
Is there a way to adapt this recipe for dietary restrictions?
Of course! If you’re catering to dietary restrictions, consider using a poultry alternative like turkey, which can work wonderfully with this brining method. If you’re concerned about allergies, make sure to check for any ingredient sensitivities, such as using gluten-free flour for the gravy or omitting certain herbs if necessary.
How can I use the leftover roast chicken?
I often make use of leftover Cider Brined Roast Chicken in various dishes! Shredded chicken works beautifully in salads, sandwiches, or even as a taco filling. You can also toss it into soups or pastas to incorporate those wonderful flavors into weekday meals.
Cider Brined Roast Chicken: Tender and Flavorful Perfection
Ingredients
Equipment
Method
- In a large pot, combine 2 liters of water, 4 cups of apple cider, kosher salt, brown sugar, thyme, and peppercorns. Heat over medium heat, stirring until dissolved for about 5-7 minutes. Cool by adding 1 liter of ice water.
- Submerge your roaster chicken breast-side down into the cooled brine, ensuring it is fully covered. Cover and refrigerate for 12 to 24 hours.
- After brining, remove the chicken from the brine and pat it dry with paper towels. Let it air dry at room temperature for about 1 hour.
- Mix softened butter with chopped thyme, sage, orange zest, and a pinch of pepper until well combined.
- Preheat oven to 350°F (175°C). Drizzle olive oil in a roasting pan. Layer with sliced onion, orange slices, garlic, and herbs.
- Place the chicken on a rack in the prepared pan. Rub compound butter over the chicken, stuff cavity with half an orange and fresh herbs.
- Pour 1 cup of apple cider into the pan. Roast for about 1 hour, monitoring for browning.
- After 1 hour, add halved Gala apples around the chicken and brush with melted butter. Roast for an additional 30-45 minutes, until chicken is browned and reaches 165°F.
- Simmer remaining apple cider in a saucepan until reduced by half, about 10-15 minutes. Stir in maple syrup and butter to create a glaze.
- Brush the chicken with the reduction glaze and return to the oven for another 10-15 minutes to caramelize.
- Transfer pan juices to a measuring cup, strain solids. Create a roux in an empty roasting pan with fat and flour. Gradually add strained juices until thickened.
- Carve the roasted chicken, arrange on a platter with apples, and drizzle gravy.
Leave a Reply