
As I stood in my kitchen, a flicker of nostalgia washed over me, reminding me of childhood moments spent savoring sweet treats. Today, I’m excited to share my Milk Mochi Recipe, a delightful Japanese dessert that’s both simple to make and satisfying to eat. This creamy rice cake captures the essence of milk in every chewy bite, making it a perfect comfort food without the fuss of complex techniques. What’s even better? It’s ready in no time, effortlessly transforming your dessert game and impressing your loved ones. Plus, with options to customize for dietary preferences, it truly caters to everyone’s taste. Ready to whip up this scrumptious delight? Let’s dive in!
Why is Milk Mochi a Must-Try?
Simplicity: This recipe is straightforward, allowing anyone to create a delightful treat with minimal effort and no complex techniques.
Creamy Texture: With the lush taste of milk incorporated, each bite offers a uniquely creamy experience that’s mouthwatering and satisfying.
Customizable: Feel free to swap whole milk for almond or coconut milk for a delicious dairy-free option, making it accessible for various dietary needs.
Quick to Prepare: Get this indulgent dessert ready in no time, perfect for those unexpected sweet cravings or impromptu gatherings.
Sweet Appeal: Its delightful sweetness is bound to impress friends and family, serving as a standout dessert among the usual options like Crock Pot Beef or Butter Chicken Easily.
You won’t just love making this Milk Mochi; you’ll look forward to sharing it time and again!
Milk Mochi Recipe Ingredients
For the Mochi
• Glutinous Rice Flour – This is the star ingredient, providing the essential chewy texture; avoid substitutions for best results.
• Cornstarch – Helps lighten the mochi’s texture; can be swapped with potato starch if needed.
• Sugar – Adds the perfect sweetness to balance the creaminess; start with less if you prefer a subtler taste.
• Corn Oil – Adds a rich mouthfeel; can be replaced with vegetable oil or melted coconut oil for a different essence.
• Whole Milk – Brings creaminess and depth to the mochi; try almond milk or coconut milk for a delightful dairy-free Milk Mochi experience.
For Coating
• Roasted Soybean Flour – Adds a nutty flavor and texture; experiment with toasted glutinous rice flour for a unique twist!
Step‑by‑Step Instructions for Milk Mochi Recipe
Step 1: Combine Ingredients
Begin by gathering a large mixing bowl. In it, combine glutinous rice flour, cornstarch, sugar, corn oil, and whole milk. Whisk these ingredients together thoroughly for about 2–3 minutes until the mixture is smooth and free of lumps. You’ll want a well-blended, creamy batter that glistens in the bowl, signaling it’s ready for cooking.
Step 2: Optional Strain for Texture
If you prefer an ultra-smooth texture for your milk mochi, pour the batter through a fine-mesh sieve into another bowl. This step is optional but recommended for achieving that luxurious mouthfeel. Allow it to strain for a minute, letting any lumps pass through, resulting in a silky-smooth mixture that’s perfect for the next step.
Step 3: Cook the Mixture
Pour the strained mixture into a non-stick pan and set it over low heat. Stir continuously with a spatula for approximately 8–10 minutes, observing as the batter thickens and transforms into a cohesive mass. The mixture will start to pull away from the sides of the pan, indicating it’s time to remove it from the heat.
Step 4: Cool and Knead the Dough
Once removed from the heat, allow the mixture to cool for about 5 minutes. Once warm, put on gloves and knead the dough directly in the pan for around 5 minutes until it becomes elastic and slightly sticky. This step enhances the texture of your Milk Mochi, making it delightfully chewy.
Step 5: Shape the Dough
To shape your mochi, roll the kneaded dough into a long log with a diameter of about 1 inch. Dust the surface with some cooked glutinous rice flour to prevent sticking. As you roll, ensure the dough remains smooth and even, ready for cutting into delightful pieces.
Step 6: Cut into Pieces
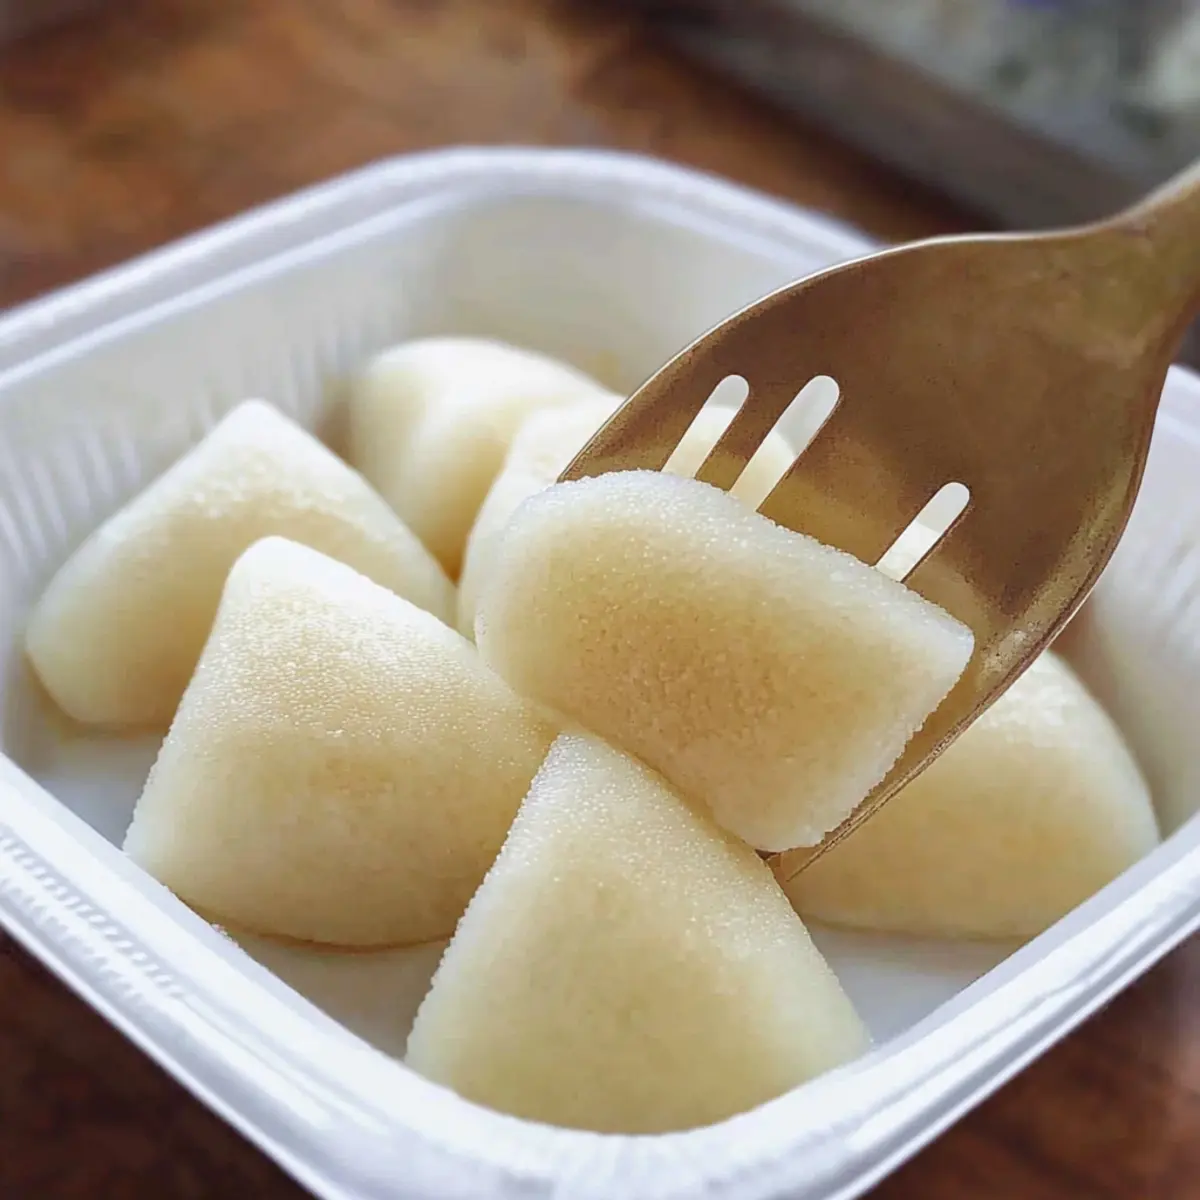
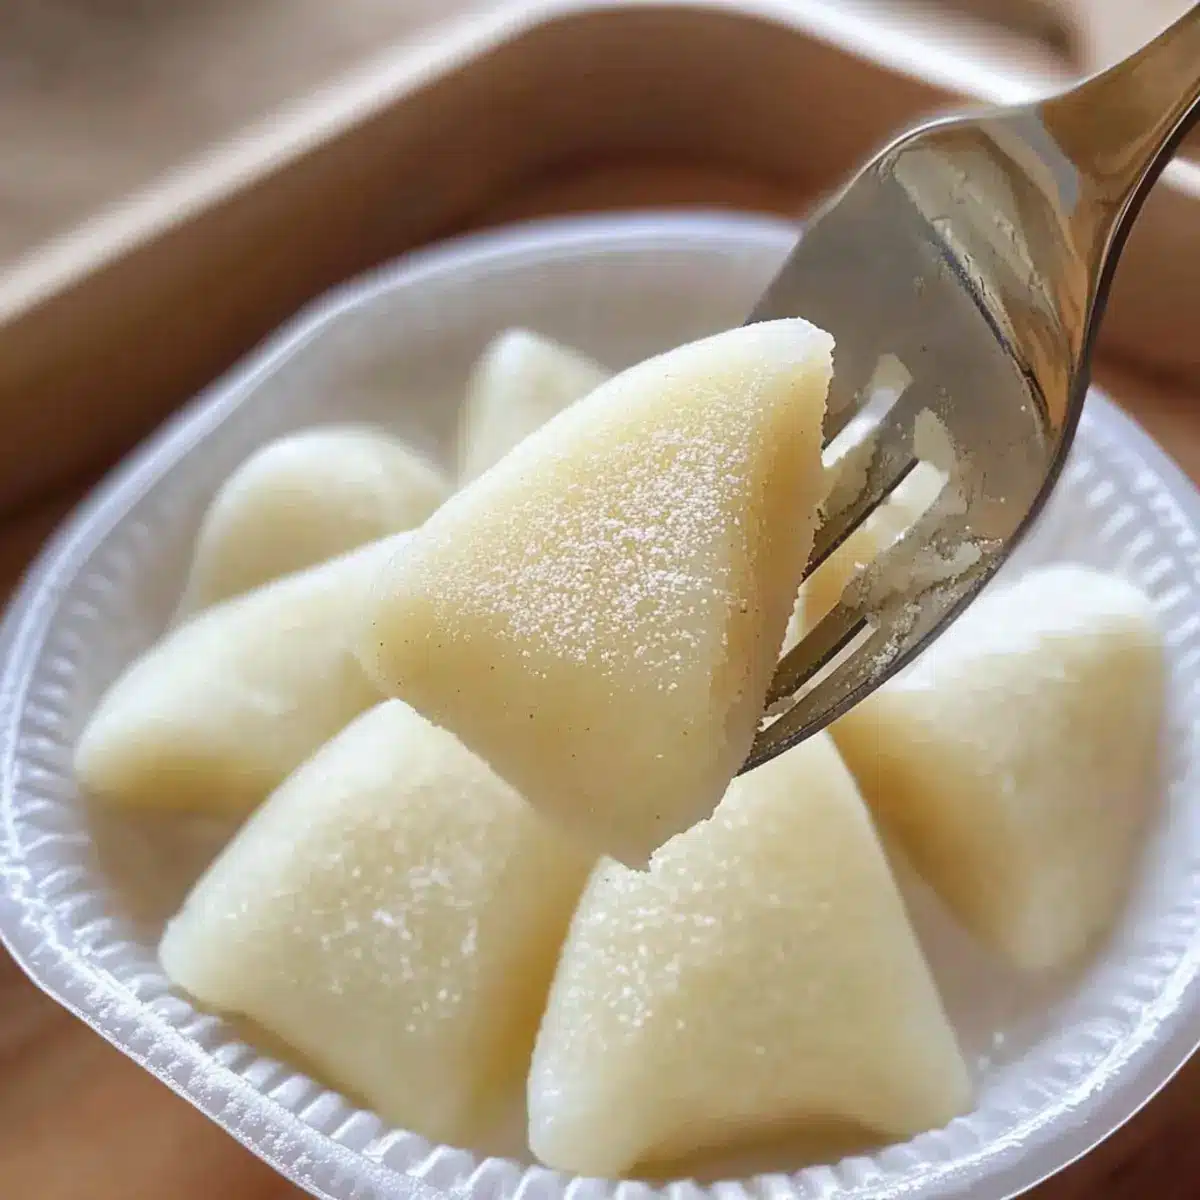
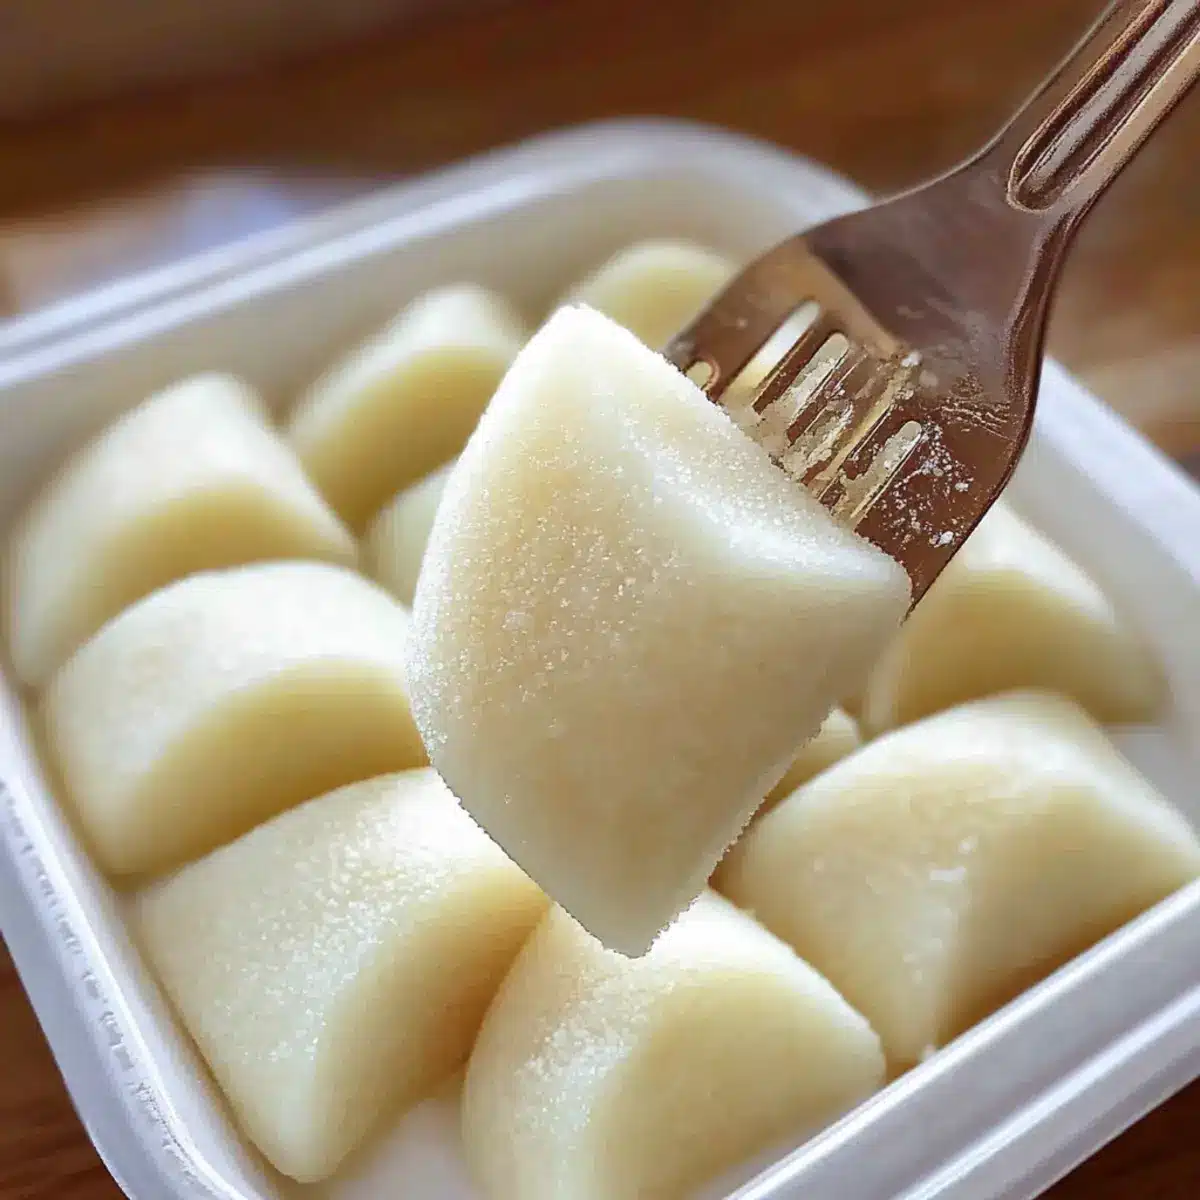
Once shaped, use a sharp knife coated with a bit of cornstarch to slice the dough into your preferred shapes, such as triangles or squares. Aim for pieces that are about 1–2 inches in size, ensuring they maintain an appealing look while making them easy to eat. The enticing softness should be evident even before coating.
Step 7: Coat with Roasted Soybean Flour
Finally, take the cut pieces of Milk Mochi and gently roll them in roasted soybean flour, coating each piece evenly. This adds a nutty flavor and contrast to the sweet, creamy mochi. Arrange your beautifully coated pieces on a serving plate, presenting them as a delightful treat ready for enjoyment.

How to Store and Freeze Milk Mochi
Room Temperature: Store leftover milk mochi in an airtight container for up to 2 days. This way, you can enjoy its chewy texture at its best.
Fridge: For extended freshness, refrigerate milk mochi in an airtight container for up to 1 week. Enjoy it chilled or bring it to room temperature before serving.
Freezer: If you wish to keep the milk mochi for longer, freeze individual pieces wrapped in plastic wrap, then placed in a zip-top bag, for up to 2 months. Thaw overnight in the fridge before enjoying.
Reheating: When ready to eat, let it sit at room temperature or microwave briefly for a few seconds to regain that delightful chewiness.
Make Ahead Options
These Milk Mochi are perfect for meal prep enthusiasts! You can prepare the mochi dough up to 24 hours in advance by following the first five steps of the recipe up to shaping, then storing it in an airtight container at room temperature. To maintain quality, ensure the dough is well-sealed to prevent drying out. When you’re ready to serve, simply dust the shaped dough pieces with roasted soybean flour and let them sit for an additional 10 minutes to soften. Whether it’s for a quick dessert after a busy day or a delightful treat for guests, these make-ahead options save you time while ensuring your Milk Mochi are just as delicious!
Expert Tips for Milk Mochi
-
Knead for Elasticity: Make sure to knead the dough for at least five minutes until it’s elastic. This enhances the chewy texture your milk mochi should have.
-
Watch the Heat: Cook the mixture on low heat to avoid burning and to ensure an even consistency. If you rush, your mochi might end up with a burnt flavor.
-
Straining Matters: If you want a super smooth mouthfeel, don’t skip the optional straining step. It helps remove any lumps that might disrupt your creamy texture.
-
Coat Carefully: When coating your mochi with roasted soybean flour, ensure each piece is evenly covered. This adds flavor and prevents sticking, allowing for an enjoyable eating experience.
-
Experiment with Flavors: Feel free to swap the roasted soybean flour for toasted glutinous rice flour or even cocoa powder for a unique twist on the traditional milk mochi recipe.
What to Serve with Easy Creamy Milk Mochi?
Pairing a delightful dessert with complementary flavors transforms it into an unforgettable meal experience.
-
Green Tea: The earthy tones of green tea balance the sweetness, elevating the tasting experience of the mochi. A warm cup of this comforting brew enhances the creaminess with each sip.
-
Fresh Fruit Salad: A mix of berries and citrus adds brightness and freshness. The juicy, tangy components contrast beautifully with the chewy sweetness of the milk mochi.
-
Matcha Ice Cream: Rich and creamy with a hint of bitterness, matcha ice cream makes for a luxurious pairing. The delightful combination of flavors works harmoniously, making each bite an adventure.
-
Azuki Red Bean Paste: The slightly sweet, earthy flavor of red bean paste adds depth. Spread a layer on your milk mochi for a delicious twist that brings a traditional Japanese touch.
-
Coconut Milk Sauce: A drizzle of sweetened coconut milk over the mochi introduces tropical vibes. The creaminess complements the dessert while adding an exotic flair that everyone will love.
-
Sesame Balls: The crispy texture of sesame balls offers great contrast to the soft, chewy mochi. Their nutty flavor pairs well, creating an enjoyable textural journey in each bite.
-
Chilled Fruit Tarts: Light and refreshing, fruit tarts provide a crunch that contrasts with the mochi’s softness. Choose tarts with custard to mirror the creamy texture for an upgraded dessert experience.
-
Lemonade: A glass of freshly squeezed lemonade provides a zesty counterpoint to savor the sweetness of the milk mochi. The bright and invigorating nature of the drink refreshes the palate between bites.
-
Asian Pear Slices: Crisp and juicy, Asian pear slices introduce a refreshing crunch that balances the mochi’s chewiness. Their subtly sweet flavor complements the dessert while enhancing the overall experience.
Milk Mochi Recipe Variations
Feel free to make this delightful milk mochi your own with some simple adjustments and creative substitutions!
- Dairy-Free: Substitute whole milk with almond or coconut milk for a creamy, dairy-free delight that everyone can enjoy.
- Alternative Coatings: Get adventurous by rolling your mochi pieces in cocoa powder or shredded coconut instead of roasted soybean flour for different flavor profiles.
- Sweetness Levels: Reduce sugar or try a sugar alternative like agave syrup or stevia to play with the sweetness. This allows for a healthier twist on your treat!
- Flavor Infusion: Add extracts like vanilla or coconut to the batter for an extra burst of flavor that elevates your mochi beyond its basics!
- Nutty Twist: Mix in ground nuts such as almond or cashew flour for added texture and a nutty flavor that complements the creaminess beautifully.
- Fruit Enhancements: Incorporate small pieces of diced fruit, like strawberries or mangos, into the dough for a fruity surprise in every bite. The sweetness of the fruit pairs wonderfully with the creamy mochi.
- Spicy Kick: Add a pinch of chili powder or cayenne pepper for a surprising heat that balances the sweetness. It creates an intriguing flavor contrast that’s sure to surprise and delight!
- Chocolate Delight: Melt some chocolate and swirl it into the mochi mixture to create a chocolate version of this classic dessert, adding a rich and decadent twist that’s hard to resist.
With these variations, your milk mochi can transform into something fresh and new for any occasion. Remember, the joy of cooking comes from personal touches, so don’t be afraid to get creative!
Milk Mochi Recipe FAQs
How ripe does the glutinous rice flour need to be?
Glutinous rice flour doesn’t spoil like fresh produce, but it should be kept in a cool, dry place. For the best results, use flour that hasn’t been open for more than six months to a year.
How do I store leftover milk mochi?
To keep your milk mochi fresh, store it in an airtight container at room temperature for up to 2 days. If you have more, you can refrigerate it for up to 1 week, ensuring it retains its delightful texture.
Can I freeze milk mochi, and how do I do it?
Absolutely! To freeze milk mochi, wrap each individual piece tightly in plastic wrap and place them in a zip-top freezer bag. They can be stored in the freezer for up to 2 months. When you’re ready to enjoy, allow them to thaw in the fridge overnight, then bring them to room temperature or microwave briefly to regain their chewiness.
What should I do if my milk mochi is too sticky during preparation?
If your mochi dough is sticky and difficult to handle, sprinkle a little bit of cooked glutinous rice flour or cornstarch on your hands and the work surface while shaping the dough. This helps prevent sticking and makes it easier to work with. Just remember, a slight stickiness is normal for proper mochi!
Are there any dietary considerations for milk mochi?
Yes! If you’re looking for a dairy-free option, you can replace whole milk with almond milk or coconut milk. Also, ensure your coatings like roasted soybean flour are suitable for your dietary needs. Always check for allergies related to specific ingredients!
Can I adjust the sweetness of my milk mochi?
Certainly! If you prefer a less sweet treat, start with a smaller amount of sugar. You can always add more to taste after mixing the ingredients. Alternatively, consider using a sugar substitute if you’re looking to reduce sugar intake without sacrificing flavor.
Creamy Milk Mochi Recipe: Simple Delight in Every Bite
Ingredients
Equipment
Method
- Combine glutinous rice flour, cornstarch, sugar, corn oil, and whole milk in a mixing bowl. Whisk thoroughly for 2-3 minutes until smooth.
- Optional: Strain the batter through a fine-mesh sieve into another bowl for an ultra-smooth texture.
- Pour the mixture into a non-stick pan and cook on low heat, stirring continuously for 8-10 minutes until thickened.
- Remove from heat and cool for 5 minutes. Knead the dough in the pan for about 5 minutes until elastic and slightly sticky.
- Shape the dough into a log about 1 inch in diameter, dusting with glutinous rice flour to prevent sticking.
- Cut the shaped dough into pieces about 1-2 inches in size with a sharp knife coated in cornstarch.
- Roll the cut pieces in roasted soybean flour, ensuring each piece is evenly coated, and arrange on a serving plate.
Leave a Reply