
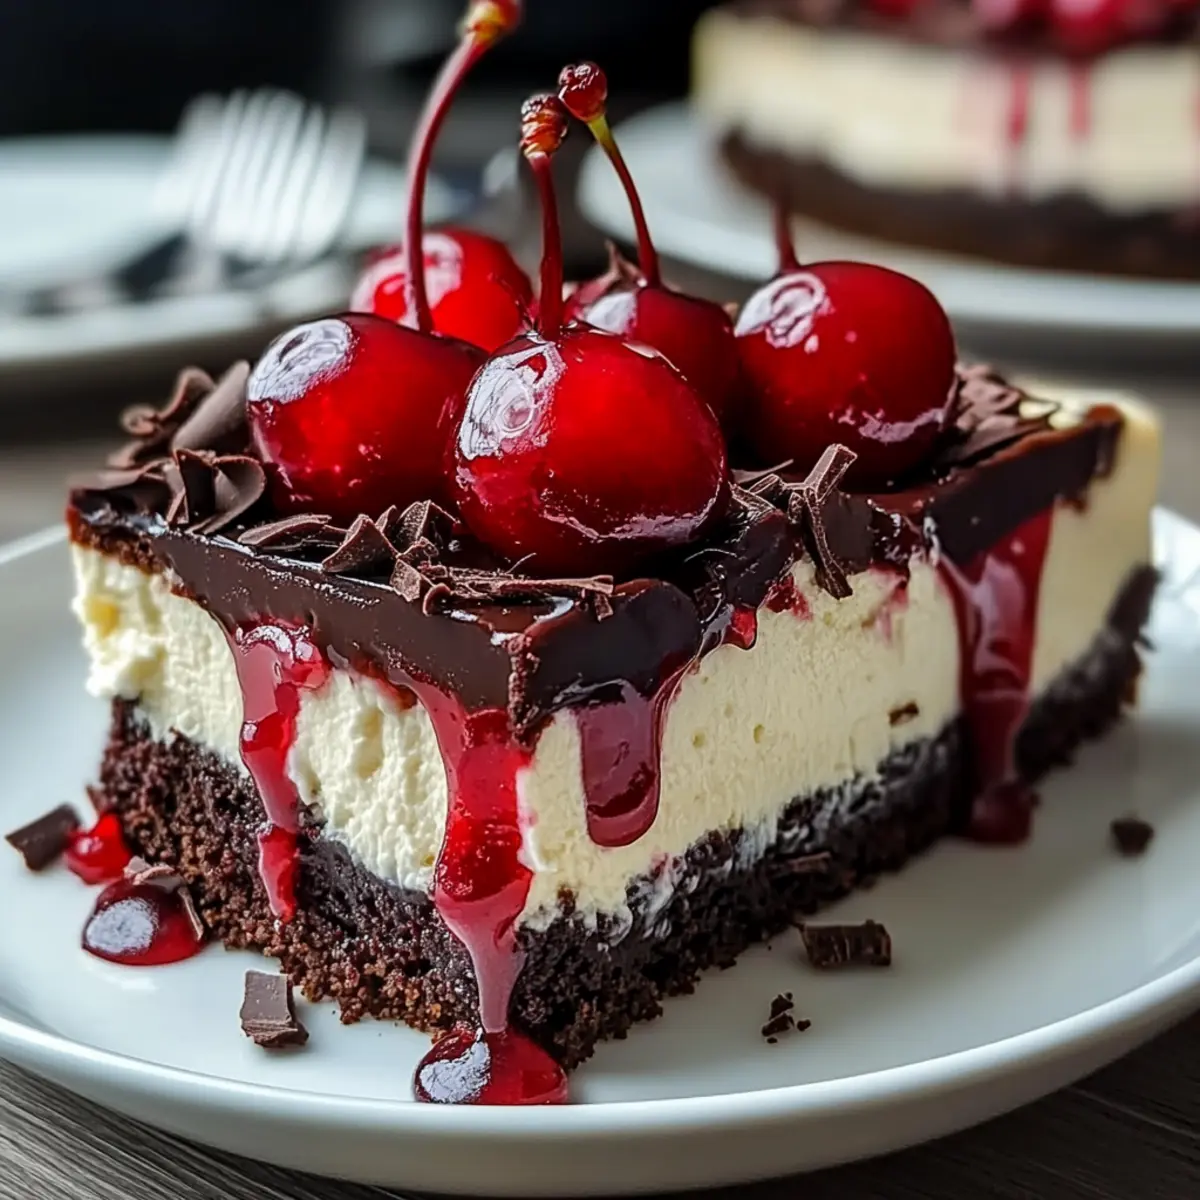
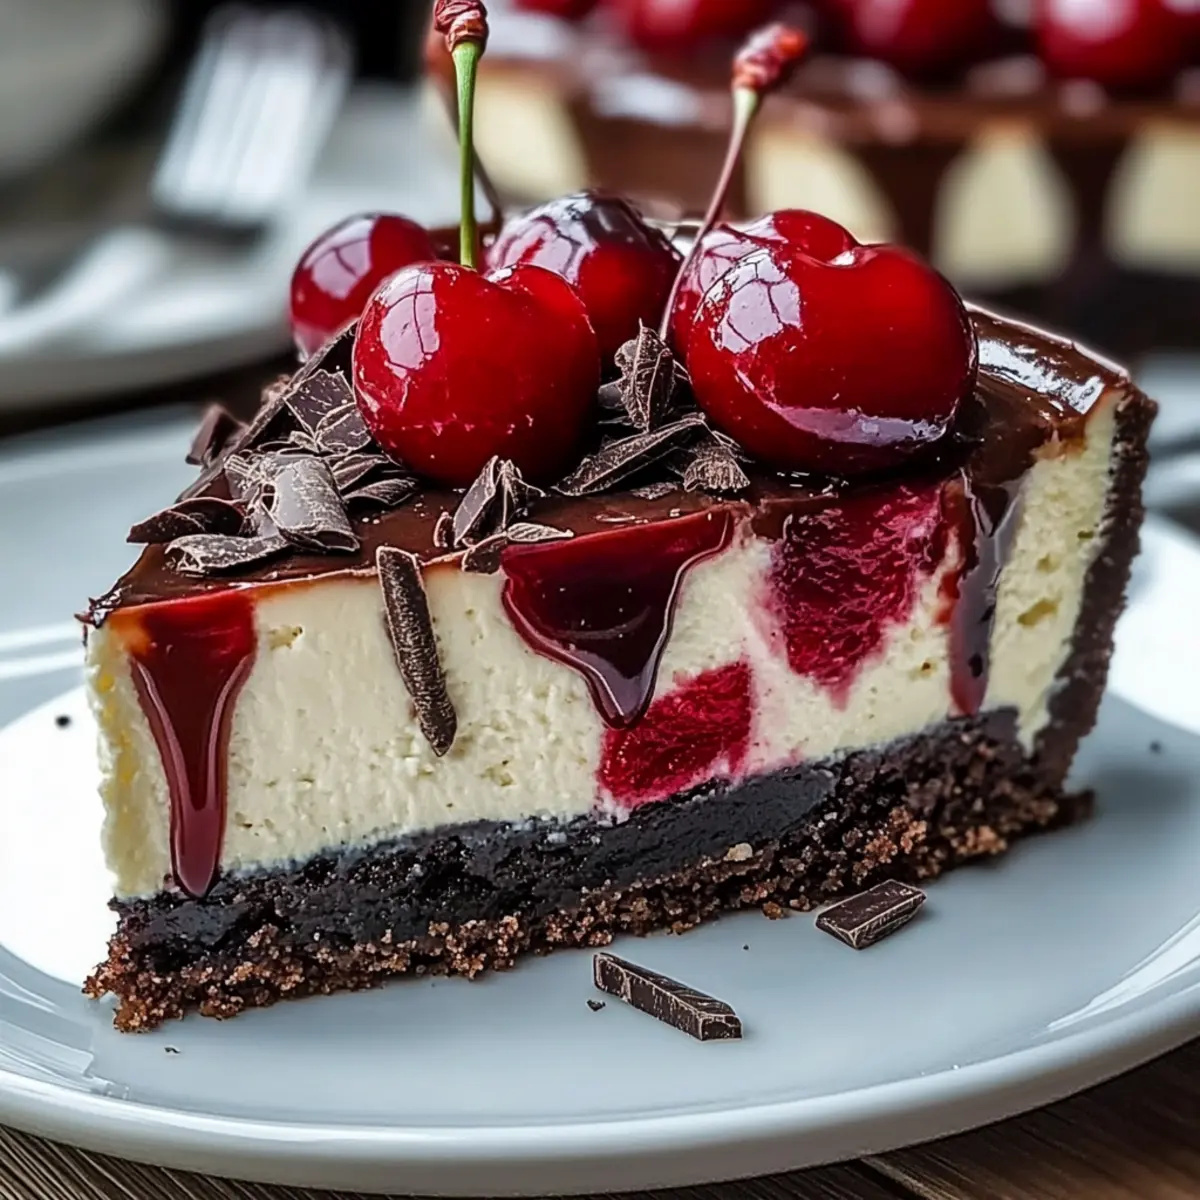
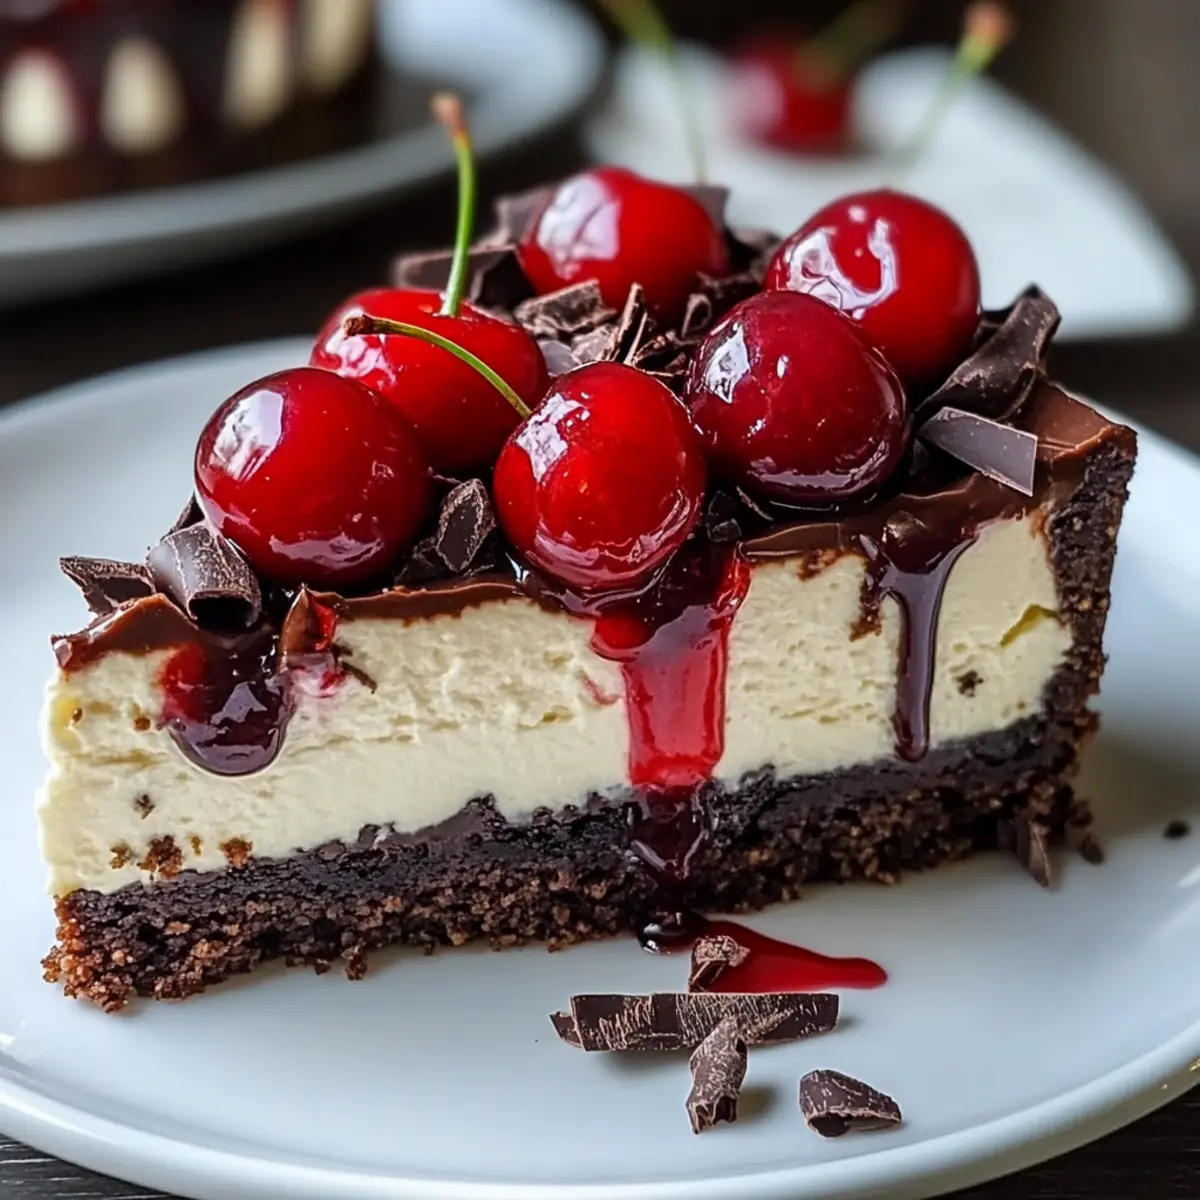
The aroma of dark chocolate and cherries wafting through the kitchen can instantly elevate any gathering. My latest creation, a Black Forest Cheesecake, beautifully blends these flavors into a decadent dessert that’s both impressive and approachable. Perfect for special occasions, this cheesecake is not just a feast for the eyes; it’s also a crowd-pleaser thanks to its rich cream cheese filling, balanced by a crunchy chocolate cookie crust. Plus, it offers a delightful surprise for those seeking gluten-free options without compromising on taste. Whether you’re celebrating a birthday or simply want to indulge after a long week, this cheesecake promises to turn an ordinary moment into something truly memorable. Ready to whip up this delightful masterpiece?
Why is Black Forest Cheesecake a Must-Try?
Decadent flavors await you! This Black Forest Cheesecake dazzles with rich dark chocolate and tart cherries, making it a showstopper at any event. Versatile options are available, as you can easily substitute for gluten-free ingredients without sacrificing flavor. Simplicity at its core, the recipe is straightforward, perfect for both beginners and seasoned chefs. Crowd-pleaser status is guaranteed, as its creamy filling and crunchy crust will leave everyone craving more! Pair it with a side of warm cherry sauce or enjoy it alongside a slice of Caramel Brownie Cheesecake for double the decadence!
Black Forest Cheesecake Ingredients
Ready to create a delectable dessert?
For the Crust
• Chocolate Cookie Crumbs – The foundation that adds delicious depth; opt for gluten-free chocolate cookies for a lighter version.
• Unsalted Butter – Melts into the crumbs to bind them; ensure it’s melted for easy mixing.
For the Cheesecake Filling
• Cream Cheese – The star of the show! Choose full-fat for the creamiest texture.
• Granulated Sugar – Sweetens and balances the tartness of the cherries; adjust to taste.
• Vanilla Extract – A splash enhances the overall flavor of the cheesecake.
• Eggs – Provide structure; incorporate them one at a time for a smooth filling.
• Sour Cream – For creaminess and a tangy kick; can be swapped with Greek yogurt if needed.
For the Topping
• Heavy Cream – Whip to stiff peaks for a luscious topping; it’s a crucial element for that iconic finish.
• Fresh Cherries – Adds a burst of flavor and freshness; feel free to use other berries for a twist.
• Chocolate Shavings – For decoration and a little extra chocolate indulgence.
This Black Forest Cheesecake recipe is sure to impress and satisfy everyone at your table!
Step‑by‑Step Instructions for Black Forest Cheesecake
Step 1: Preheat the Oven and Prepare the Pan
Begin by preheating your oven to 325°F (160°C). While it warms up, take a 9-inch springform pan and generously grease it with butter or cooking spray to prevent sticking. This step is crucial for a clean release once your Black Forest Cheesecake is baked and cooled.
Step 2: Make the Chocolate Crust
In a mixing bowl, combine chocolate cookie crumbs with melted butter until the mixture resembles wet sand. Press this mixture evenly into the bottom of your prepared springform pan, ensuring it’s firm and compact. This crust will provide a strong foundation for the rich cream cheese filling.
Step 3: Prepare the Cream Cheese Filling
In a large mixing bowl, beat together the cream cheese, sugar, and vanilla extract using an electric mixer on medium speed. Mix until the batter is creamy and smooth, which should take about 3-5 minutes. Be sure to scrape down the sides of the bowl to fully incorporate all the ingredients into the Black Forest Cheesecake filling.
Step 4: Incorporate the Eggs
Add the eggs to the cream cheese mixture one at a time, mixing well after each addition until fully combined. This gradual incorporation helps achieve a silky and even texture in your cheesecake. Once all the eggs are blended in, stir in sour cream gently until just combined to avoid overmixing.
Step 5: Pour the Filling and Level It Out
Carefully pour the cream cheese filling over the prepared chocolate crust. Using a spatula, spread the mixture evenly and smooth the top. This step ensures that your Black Forest Cheesecake bakes into a lovely, uniform shape, setting the stage for a beautifully finished dessert.
Step 6: Bake the Cheesecake
Place the filled springform pan in the preheated oven and bake for 60-70 minutes. The cheesecake should be set around the edges but still slightly jiggly in the center. Keep an eye on it towards the end to prevent overbaking, which could dry out the Black Forest Cheesecake.
Step 7: Cool Gradually
Once baked, turn off the oven and crack the oven door open, letting the cheesecake cool inside for an hour. This gradual cooling process helps prevent cracks on the surface. Afterward, transfer it to a wire rack to cool completely before refrigerating.
Step 8: Chill the Cheesecake
Cover the cooled cheesecake with plastic wrap or aluminum foil and refrigerate for at least four hours, or overnight if possible. This chilling time allows the flavors to meld together beautifully and ensures that your Black Forest Cheesecake sets perfectly.
Step 9: Prepare the Whipped Topping
Just before serving, pour heavy cream into a mixing bowl and beat with an electric mixer on high speed, adding powdered sugar gradually. Continue whipping until stiff peaks form, creating a light and fluffy topping. This whipped cream adds an irresistible contrast to your decadent cheesecake.
Step 10: Garnish and Serve
Spread the whipped cream generously over the chilled Black Forest Cheesecake, and top with fresh cherries and chocolate shavings for a stunning presentation. Cut into slices and serve chilled, allowing your loved ones to savor the rich flavors and textures of this delightful dessert.
Make Ahead Options
These Black Forest Cheesecake options are perfect for busy home cooks looking to save time! You can prepare the chocolate cookie crust up to 3 days in advance; simply press it into the springform pan and store it tightly wrapped in the fridge. The cream cheese filling can also be mixed up to 24 hours ahead—just keep it covered in the refrigerator to maintain its creamy texture. When you’re ready to serve, bake the cheesecake and allow it to cool gradually to prevent cracking. Finish by whipping the cream and garnishing with cherries shortly before serving, ensuring your Black Forest Cheesecake stays just as delicious as if it were made fresh that day!
Black Forest Cheesecake Variations
Feel free to personalize your Black Forest Cheesecake with these exciting twists that tantalize the taste buds!
-
Gluten-Free: Use gluten-free chocolate cookies instead of regular ones for the crust to adapt to dietary needs.
-
Berry Toppings: Try swapping fresh cherries for strawberries or raspberries, adding a different fruity flair to every slice. The sweetness of strawberries pairs beautifully with cream cheese.
-
Nut Crust: For a unique flavor twist, opt for a hazelnut or almond crust instead of the chocolate cookie base for extra crunch and taste.
-
Dark Chocolate Swap: If you crave a richer taste, use dark chocolate chips in the cream cheese filling. This enhancement will add an intense chocolate flavor, beautifully contrasting with the sweet cherries.
-
Cheesecake Swirl: Create a marbled cheesecake by swirling in a raspberry or cherry sauce before baking. It not only looks stunning but also elevates the fruity sweetness.
-
Dairy-Free: Substitute the cream cheese with a dairy-free alternative, such as tofu-based cream cheese. This option keeps the cheesecake creamy while catering to those avoiding dairy.
-
Boozy Boost: Add a splash of cherry liqueur for an adult twist. Just be sure to balance it with a little more cream cheese to maintain the filling’s texture.
-
Chocolate Ganache Drizzle: Top your cheesecake with a warm chocolate ganache for a decadent finish. The rich chocolate dripping down the sides turns every bite into sheer indulgence.
Feel free to experiment and find what you love! And if you’re interested in more delightful desserts, check out my recipes for Cheesecake Stuffed Chocolate Chip Cookies or Pumpkin Cheesecake Truffles for even more sweet inspiration!
What to Serve with Black Forest Cheesecake?
Elevate your cheesecake experience with these delightful pairings that perfectly complement its rich, chocolatey flavors.
- Vanilla Ice Cream: A classic pairing! The creamy and sweet vanilla ice cream balances the richness, adding a soft, cool contrast.
- Cherry Compote: Bring out the cherry flavors with a homemade compote, drizzled on top or served on the side for a juicy burst.
- Chocolate-Covered Strawberries: The sweet tang of strawberries dipped in chocolate adds a refreshing element and a touch of romance to your dessert table.
- Espresso or Coffee: A warm cup of coffee enhances the dark chocolate and cherry notes, making for a cozy ending to the meal.
- Whipped Cream: Light and fluffy, this staple topping adds an airy contrast, making each bite lighter and more enjoyable—don’t forget the extra chocolate shavings!
- Cheese Platter: Offer a variety of cheeses, like sharp cheddar or creamy brie, that contrast the dessert’s sweetness for a sophisticated touch.
- Almond Biscotti: This crunchy delight offers a textural contrast and adds a nutty flavor that pairs beautifully with the creamy cheesecake.
- Sparkling Wine: Celebrate with a glass of bubbly! The delicate effervescence refreshes the palate and complements the dessert’s richness.
- Fruit Salad: A refreshing bowl of mixed fruits can cut through the cheesecake’s density, providing a light and zesty balance to end on a wholesome note.
Expert Tips for Black Forest Cheesecake
-
Cooling Method: Allow your cheesecake to cool gradually in the oven with the door slightly ajar, preventing cracks caused by sudden temperature changes.
-
Egg Incorporation: Add eggs one at a time and ensure they are fully mixed before adding the next. This promotes a smooth, creamy filling for your Black Forest Cheesecake.
-
Watch the Bake: Keep a close eye on the cheesecake during baking. Overbaking can lead to dryness; it should be slightly jiggly in the center when done.
-
Springform Pan Use: Always use a properly greased springform pan for easy removal. This is key for maintaining the integrity of your Black Forest Cheesecake.
-
Whipped Cream Perfection: Beat the heavy cream until stiff peaks form for the best topping. This adds an airy contrast to the dense cheesecake.
-
Chill Time: Don’t rush the chilling process! Refrigerate for at least four hours, or overnight, to let the flavors meld and the texture set beautifully.
How to Store and Freeze Black Forest Cheesecake
Fridge: Keep the Black Forest Cheesecake covered with plastic wrap or aluminum foil in the refrigerator for up to 5 days. This preserves its creamy texture and flavor.
Freezer: To freeze, wrap the cheesecake tightly in plastic wrap and aluminum foil, then store in the freezer for up to 3 months. Thaw in the fridge overnight before serving.
Portioning: Consider slicing the cheesecake before freezing, which makes it easier to defrost individual pieces whenever you’re craving a sweet treat!
Reheating: There’s no need to reheat; simply enjoy your chilled Black Forest Cheesecake straight from the fridge or let it sit at room temperature for about 20 minutes before serving for a softer texture.

Black Forest Cheesecake Recipe FAQs
Which cherries are best for Black Forest Cheesecake?
Absolutely! Use fresh, ripe cherries for the best flavor and visual appeal. Look for cherries that are vibrant and firm, avoiding those with dark spots or bruising. However, if fresh cherries aren’t available, frozen ones can work too! Just make sure to thaw and drain them well to prevent excess moisture.
How should I store my Black Forest Cheesecake?
It’s easy! Keep your Black Forest Cheesecake covered with plastic wrap or aluminum foil in the refrigerator for up to 5 days. This will help maintain its creamy texture and delightful flavors. If you’re not serving it all at once, individual slices can be kept fresh by wrapping them separately.
Can I freeze Leftover Black Forest Cheesecake?
Certainly! To freeze, wrap the cheesecake tightly in plastic wrap and then in aluminum foil to protect it from freezer burn. This method allows it to last up to 3 months. When you’re ready to enjoy, simply thaw it in the fridge overnight for the best texture.
What if my cheesecake cracks during baking?
Very! Cracking can occur if the cheesecake cools too quickly or is overbaked. To prevent this, always cool it gradually—turn off the oven and leave the door slightly ajar for an hour after baking. A water bath can also help retain moisture and regulate baking temperature for a smoother finish.
Are there gluten-free options for the crust?
Absolutely! You can create a gluten-free Black Forest Cheesecake by swapping out regular chocolate cookies for gluten-free chocolate cookie alternatives. Just ensure you’re checking that all your other ingredients, like cream cheese and vanilla extract, are also gluten-free!
Can I make this cheesecake in advance?
Definitely! In fact, I often recommend preparing your Black Forest Cheesecake a day in advance. This allows flavors to meld beautifully as it chills in the fridge overnight, resulting in a richer taste and a perfect texture when it’s time to serve. Just make sure it’s well-covered to maintain freshness!
Rich and Creamy Black Forest Cheesecake You’ll Adore
Ingredients
Equipment
Method
- Preheat the oven to 325°F (160°C) and grease a 9-inch springform pan.
- Combine chocolate cookie crumbs and melted butter, then press into the bottom of the springform pan.
- Beat cream cheese, sugar, and vanilla extract until creamy, about 3-5 minutes.
- Add eggs one at a time, mixing well after each addition, then stir in sour cream.
- Pour the filling over the crust and smooth the top.
- Bake for 60-70 minutes until the edges are set but the center is slightly jiggly.
- Cool the cheesecake gradually in the oven with the door ajar for an hour.
- Refrigerate for at least four hours, or overnight.
- Whip heavy cream and sugar until stiff peaks form.
- Spread whipped cream on top and garnish with cherries and chocolate shavings.
Leave a Reply