
As I stood in the kitchen, the enticing aroma of sweet caramel wafted through the air, pulling me back to my childhood memories of summer fairs. That familiar scent reminds me of those moments, where salty pretzels mingled with buttery caramel creations. Today, I’m excited to share my No-Bake Salted Caramel Pretzel Bars—a delightful blend of flavors that are not only super easy to whip up in just 15 minutes but also crowd-pleasers for any gathering! These bars feature a crunchy pretzel base, a smooth caramel layer, and a chocolate topping that brings it all together. The best part? They’re make-ahead and perfect for those busy days when you crave something homemade without the fuss of baking. Who wouldn’t want to indulge in a treat that offers sweet and salty bliss? Let’s dive into this quick gourmet snack that’s bound to impress!
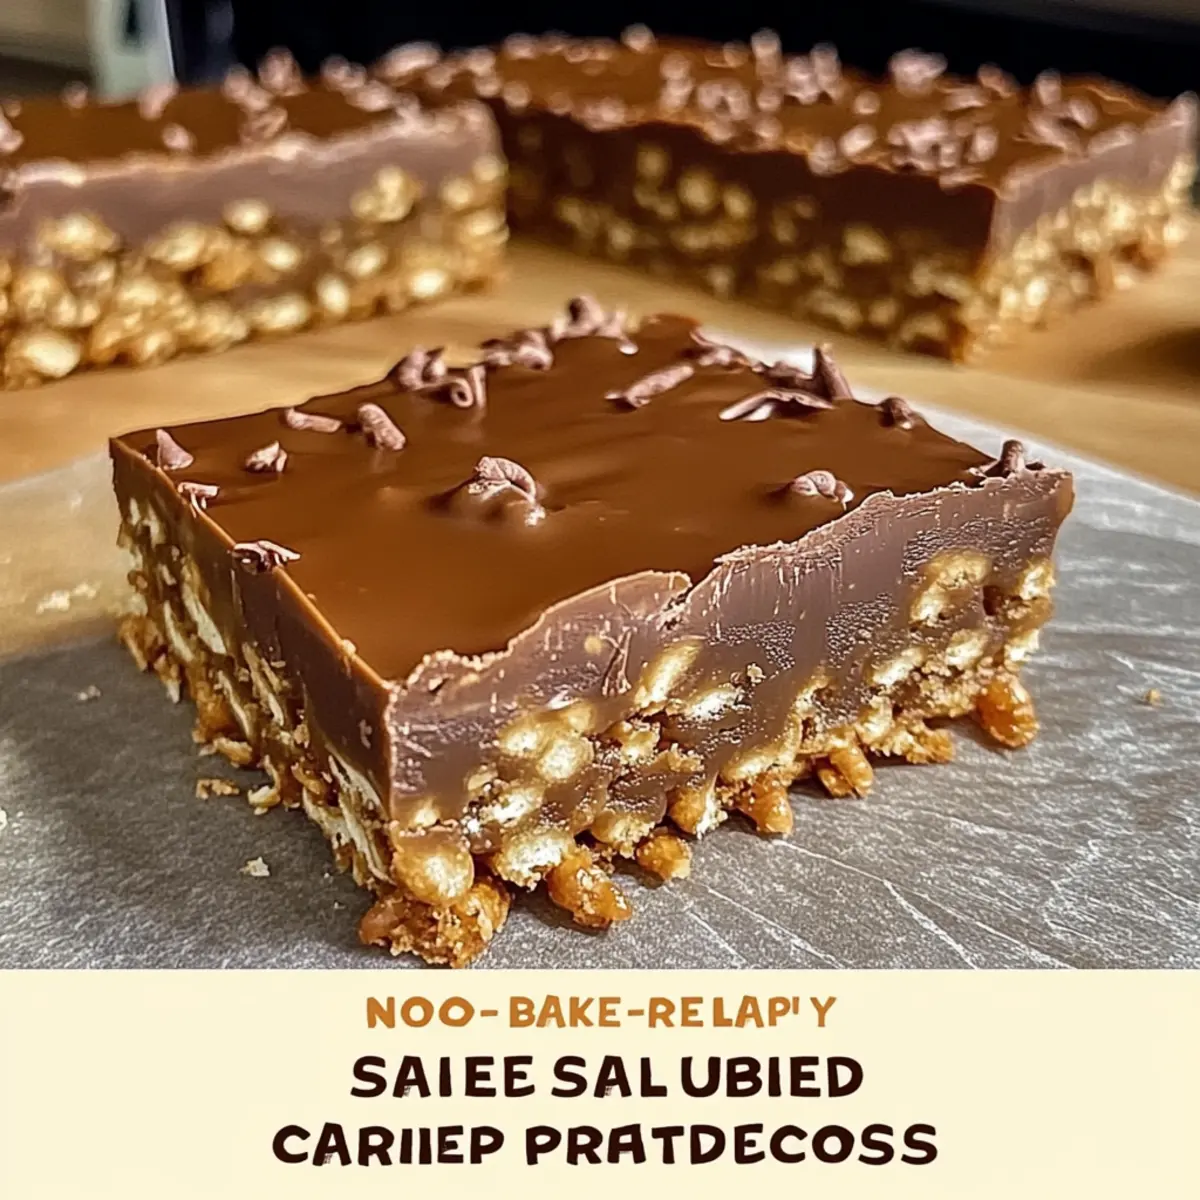
Why Are These Bars So Irresistible?
Simplicity at Its Best: You can create these No-Bake Salted Caramel Pretzel Bars in just 15 minutes! Minimal prep time means more time to enjoy with friends and family.
Perfectly Balanced Flavors: The sweet caramel partnered with the crunchy, salty pretzel base makes every bite a delightful experience.
Versatile for Everyone: Customize your bars with different types of chocolate or try adding a touch of peanut butter for a tasty twist!
Make-Ahead Magic: These bars store well in the fridge, perfect for busy days or spontaneous gatherings.
Crowd-Pleasing Delight: Whether it’s a birthday party or a cozy movie night, these bars are sure to impress! You might also enjoy making Salted Caramel Bars or the rich Caramel Brownie Cheesecake for more sweet treats that will satisfy your cravings!
Salted Caramel Pretzel Bars Ingredients
• Whip up these delightful Salted Caramel Pretzel Bars with just a few key ingredients!
For the Crust
- Pretzels – Adds a crunchy base and salty flavor; go for traditional sticks or twists to mix up the texture.
- Butter – Provides richness and binds the pretzel crust; opt for unsalted to control your desired saltiness.
- Brown Sugar – Contributes sweetness and depth to the crust; coconut sugar can be a healthier swap without losing taste.
For the Caramel Layer
- Sweetened Condensed Milk – Creates that luscious caramel texture; if you’re looking to lighten it a bit, evaporated milk is a suitable substitute.
- Butter – Enhances the caramel’s richness; you can use slightly less if you prefer a lighter option.
For the Topping
- Semi-Sweet Chocolate Chips – Forms a delightful, sweet top layer; feel free to switch it up with dark or white chocolate for varied flavor profiles.
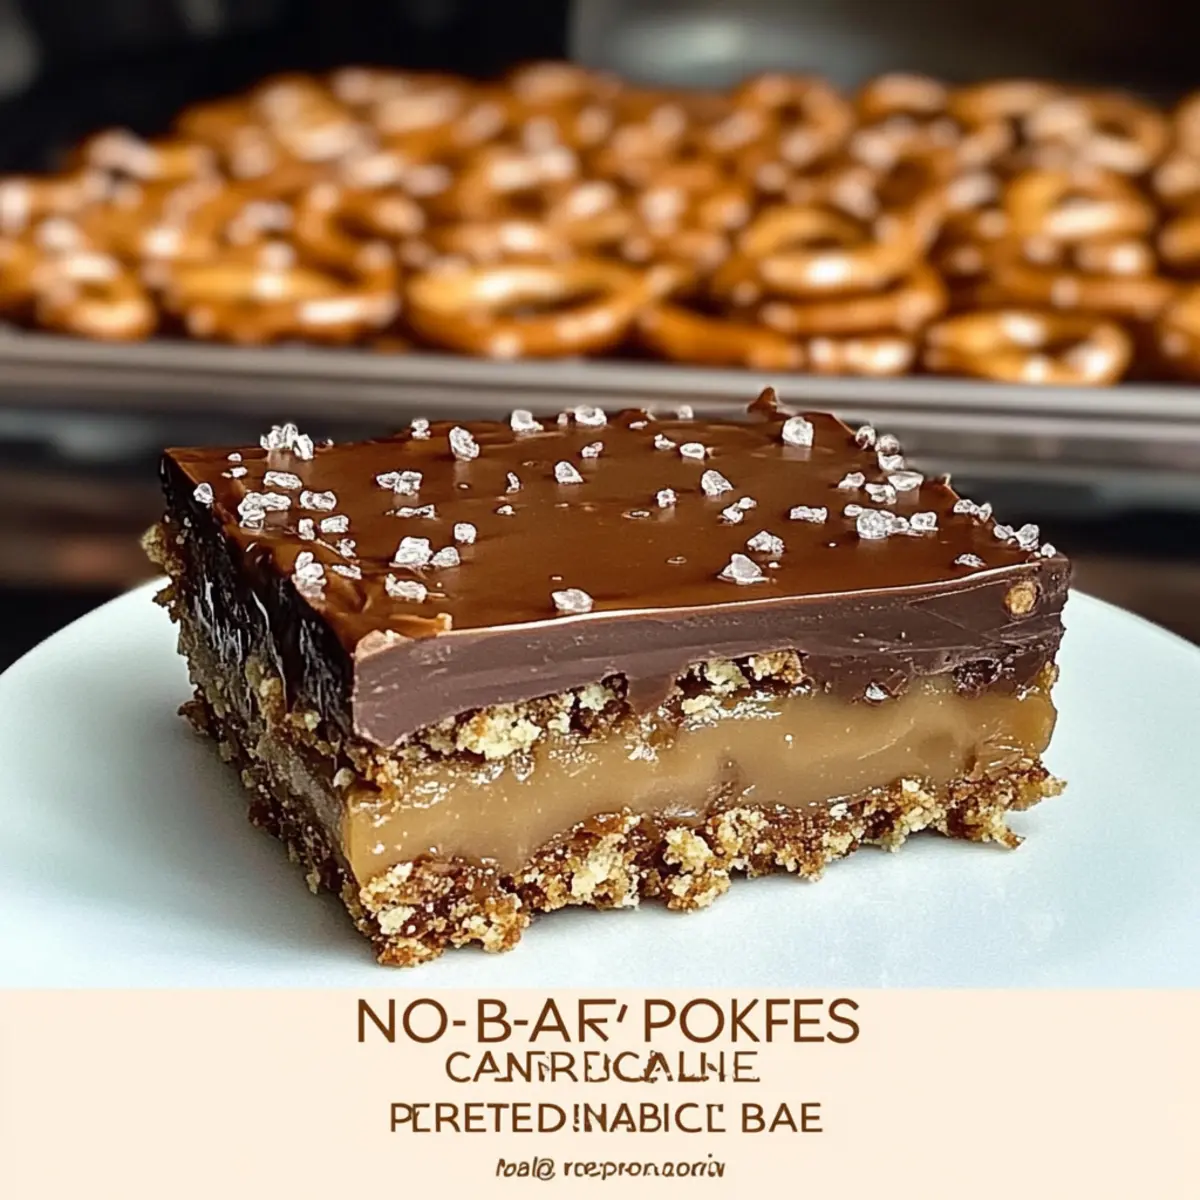
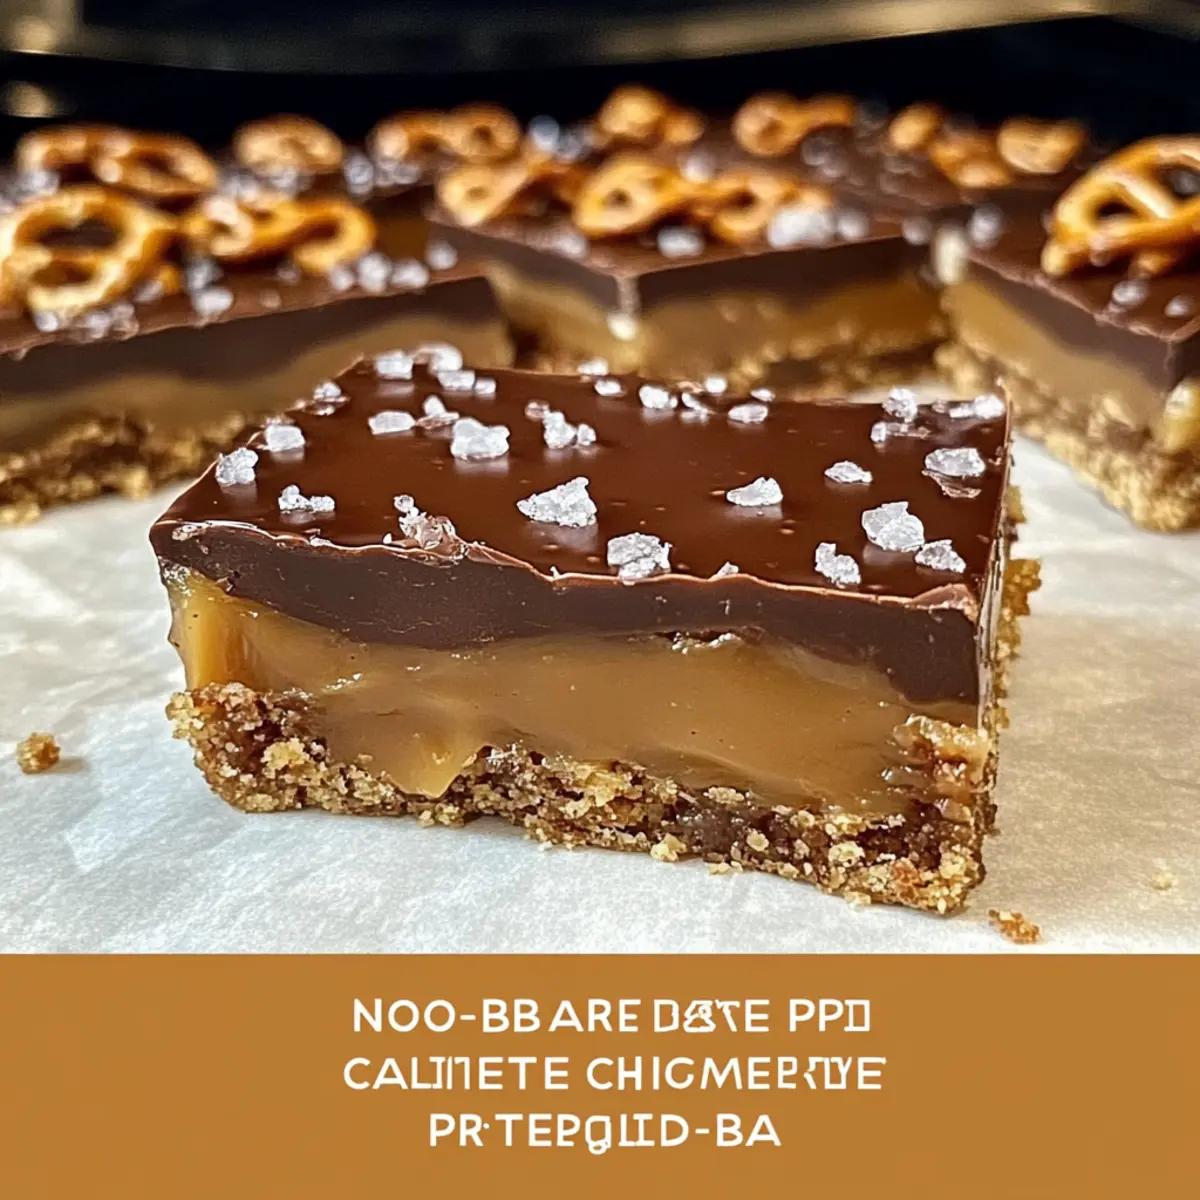
- Sea Salt (optional) – A sprinkle on top enhances the sweet and salty contrast, taking your bars to the next level!
Enjoy gathering these ingredients, and let’s make some memories with these delicious Salted Caramel Pretzel Bars!
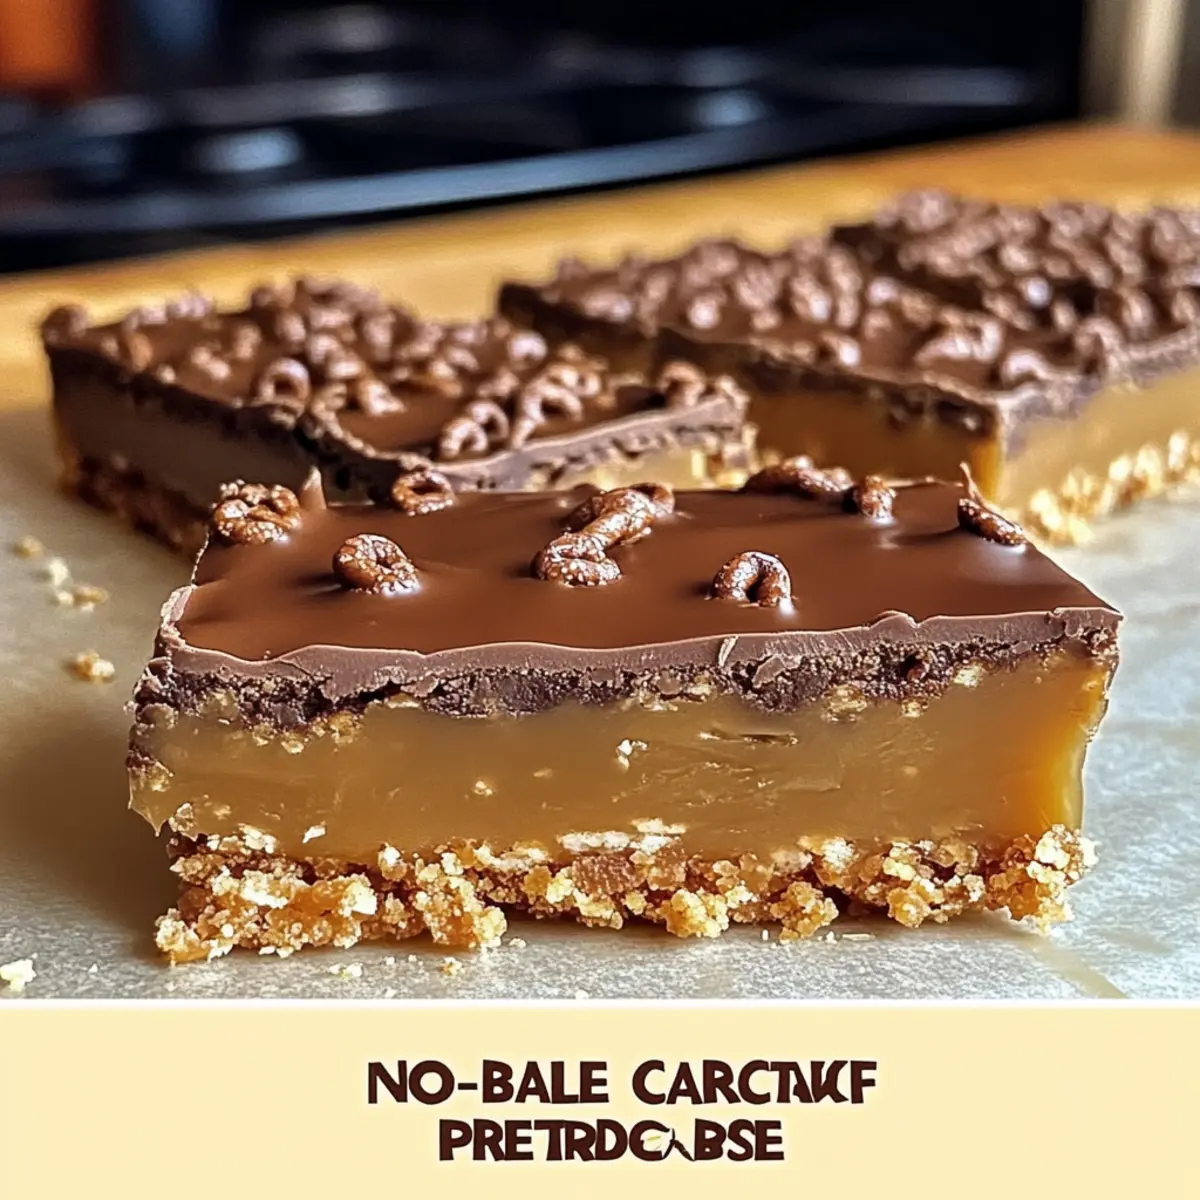
Step‑by‑Step Instructions for No-Bake Salted Caramel Pretzel Bars
Step 1: Prepare the Crust
Begin by crushing about 2 cups of pretzels into a coarse crumb. In a mixing bowl, combine the crushed pretzels with ½ cup of melted unsalted butter and ⅓ cup of brown sugar. Mix until the pretzels are fully coated, and the mixture holds together. Press this mixture firmly into the bottom of a prepared 9×9-inch baking dish, creating an even layer.
Step 2: Make the Caramel Layer
In a medium saucepan over low heat, combine 1 can of sweetened condensed milk, ¼ cup of unsalted butter, and ¾ cup of brown sugar. Stir frequently for about 5–7 minutes until the mixture is smooth and begins to bubble gently. Once bubbling, pour the caramel layer evenly over the pretzel crust, using a spatula to spread it out, and allow it to cool slightly before transferring it to the refrigerator to set for at least 30 minutes.
Step 3: Add Chocolate Topping
While the caramel is chilling, melt 1 cup of semi-sweet chocolate chips in a microwave-safe bowl. Heat in 30-second increments, stirring in between, until the chocolate is fully smooth and melted, usually taking about 1–2 minutes. Remove the caramel-filled dish from the refrigerator and pour the melted chocolate over the set caramel layer, spreading it evenly.
Step 4: Chill Until Firm
Return the dish to the refrigerator and let the chocolate layer set for at least 30 more minutes until it’s firm. The combination of the salty pretzel base, creamy caramel, and rich chocolate should be nicely melded together by now, giving your No-Bake Salted Caramel Pretzel Bars a beautiful finish.
Step 5: Cut and Serve
Once fully chilled and set, take the bars out of the refrigerator. Using a sharp knife, cut them into equal-sized bars or squares, approximately 2 inches wide. Serve immediately or store them in an airtight container in the refrigerator for up to a week, allowing family and friends to savor this delightful salty-sweet treat!
Expert Tips for Salted Caramel Pretzel Bars
-
Press Firmly: Ensure the crust is pressed tightly into the dish to maintain the bar’s shape after chilling. A loose crust may crumble when cut.
-
Cooling Chocolate: If you find the melted chocolate difficult to spread, let it cool for a few minutes in the refrigerator until it firms up slightly for easier application.
-
Flavor Enhancements: For an extra burst of flavor, try adding a sprinkle of sea salt on top of the chocolate layer just before it sets. It beautifully enhances the sweet and salty contrast of the bars.
-
Make-Ahead Wonder: Prepare your Salted Caramel Pretzel Bars a day in advance. This waiting period allows the flavors to meld beautifully and improves texture.
-
Storage Tips: Store the bars in an airtight container in the fridge. They keep well for up to a week and make for a perfect treat during busy days!
Storage Tips for Salted Caramel Pretzel Bars
-
Fridge: Keep your Salted Caramel Pretzel Bars in an airtight container in the refrigerator for up to 1 week. This will help maintain their freshness and flavor.
-
Freezer: These bars freeze beautifully! Wrap them tightly in plastic wrap and store in a freezer-safe container for up to 3 months. Thaw in the fridge before serving.
-
Reheating: Enjoy them cold, or let them sit at room temperature for about 15 minutes before serving for a softer texture.
-
Resting Period: Ideally, let the bars rest for a few hours after making and before slicing. This allows the layers to set perfectly, enhancing both flavor and texture!
What to Serve with No-Bake Salted Caramel Pretzel Bars
Indulge in a sweet journey of flavors and textures that perfectly complement these no-bake delights!
-
Creamy Vanilla Ice Cream: A classic pairing! The cool creaminess of vanilla ice cream balances the rich caramel and enhances the overall dessert experience.
-
Fresh Berries: Brighten your plate with vibrant strawberries or raspberries. Their tartness cuts through the sweetness, adding a refreshing contrast.
-
Chocolate Drizzle: Elevate your bars with an extra layer of melted chocolate drizzled on top. It adds luxury and enhances chocolate lovers’ delight!
-
Salted Caramel Sauce: For the ultimate treat, drizzle additional salted caramel sauce over the bars before serving. The extra flavor enriches the sweet-salty vibe!
-
Nutty Trail Mix: Serve a side of nutty trail mix for a crunchy texture and a wholesome twist. The mix of flavors and crunch will keep everyone satisfied!
-
Coffee or Espresso: Pair these bars with a cup of rich coffee or a shot of espresso. The warmth and bitterness complement the sweet caramel, creating balance in every bite.
-
Sparkling Water: A refreshing, bubbly drink provides a light contrast to the heaviness of the bars, helping cleanse the palate for more indulgence!
Make Ahead Options
These No-Bake Salted Caramel Pretzel Bars are perfect for meal prep enthusiasts! You can prepare the crust and caramel layer up to 24 hours in advance, ensuring you have a scrumptious treat ready to go anytime. To do this, press the crust mixture into your dish and let it chill, then make the caramel layer and pour it over the crust. Once chilled, cover tightly with plastic wrap to maintain freshness and prevent any odors from your fridge seeping in. When you’re ready to enjoy your bars, simply melt the chocolate and spread it on top, chill for an additional 30 minutes, and then slice into bars. This way, you can enjoy homemade decadence with minimal effort on busy days!
Variations & Substitutions for Salted Caramel Pretzel Bars
Feel free to mix and match with these ideas to make your Salted Caramel Pretzel Bars even more delightful and tailored to your taste!
-
Chocolate Types: Switch up the flavor by using dark chocolate or white chocolate instead of semi-sweet chocolate chips. Each type offers its own unique taste, making your bars versatile!
-
Nutty Twist: Peanut Butter: Replace some or all of the butter in the caramel with creamy peanut butter for a nutty flavor. This simple swap adds a delicious depth to the bars that nut lovers will adore.
-
Coconut Delight: Coconut Sugar: For a healthier alternative, swap brown sugar with coconut sugar. It gives a rich caramel flavor without the refined sugars!
-
Add a Crunch: Nuts: Toss in some chopped nuts like pecans or almonds into the pretzel crust for added crunch and texture. This variation brings an extra layer of deliciousness to every bite.
-
Sea Salt Garnish: For an enhanced sweet and salty contrast, sprinkle a bit of sea salt on top of the chocolate layer before it sets. This finishing touch elevates the taste and appearance of your bars.
-
Dairy-Free Option: Coconut Milk: Use coconut milk instead of sweetened condensed milk for a dairy-free caramel layer. This creates a rich, tropical vibe that pairs beautifully with the pretzels.
-
Spicy Kick: Cayenne Pepper: Add a pinch of cayenne pepper to the chocolate layer for those who crave a little heat with their sweet. The spice creates an exciting balance against the sweetness.
Consider pairing your bars with a rich dessert like Caramel Brownie Cheesecake or some delightful Salted Caramel Bars for a dessert spread that will leave everyone wanting more! Dive into your creativity and enjoy crafting these tasty variations!
Salted Caramel Pretzel Bars Recipe FAQs
What type of pretzels should I use?
I recommend using traditional pretzel sticks or twists for a great texture and flavor. Look for pretzels that are crunchy and not too soft, as they provide the best base for your salted caramel pretzel bars.
How should I store the salted caramel pretzel bars?
Keep your bars in an airtight container in the refrigerator, where they will stay fresh for up to 1 week. If you’re making them ahead of time, this method works wonders to maintain their deliciousness!
Can I freeze salted caramel pretzel bars?
Absolutely! To freeze, wrap the bars tightly in plastic wrap and place them in a freezer-safe container. They can be frozen for up to 3 months. When you’re ready to enjoy, just thaw them in the fridge overnight, and you’re good to go!
What should I do if my bars are too crumbly?
If your salted caramel pretzel bars are crumbly, it may be because the crust wasn’t pressed firmly enough into the dish. Next time, use a flat object or your hands to press down evenly and firmly to create a cohesive base.
Are there any dietary considerations for these bars?
Yes! If you have allergies, be cautious with ingredients like butter and chocolate, as they may contain allergens. You can switch to dairy-free butter and chocolate for a vegan option without losing flavor!
What if I can’t find sweetened condensed milk?
No worries! If you’re unable to find sweetened condensed milk, substituting it with evaporated milk will work, but keep in mind that the caramel will be less sweet. You may want to add a bit of extra sugar to compensate for that sweetness!
Irresistible Salted Caramel Pretzel Bars You’ll Love to Make
Ingredients
Equipment
Method
- Crush pretzels into coarse crumbs and mix with melted butter and brown sugar. Press into the bottom of the baking dish.
- Combine sweetened condensed milk, butter, and brown sugar in a saucepan and cook until smooth and bubbling. Pour over the crust and refrigerate for 30 minutes.
- Melt chocolate chips and pour over the caramel layer. Spread evenly.
- Refrigerate again for at least 30 minutes until chocolate is firm.
- Cut into bars and serve, or store in an airtight container in the refrigerator.
Leave a Reply