
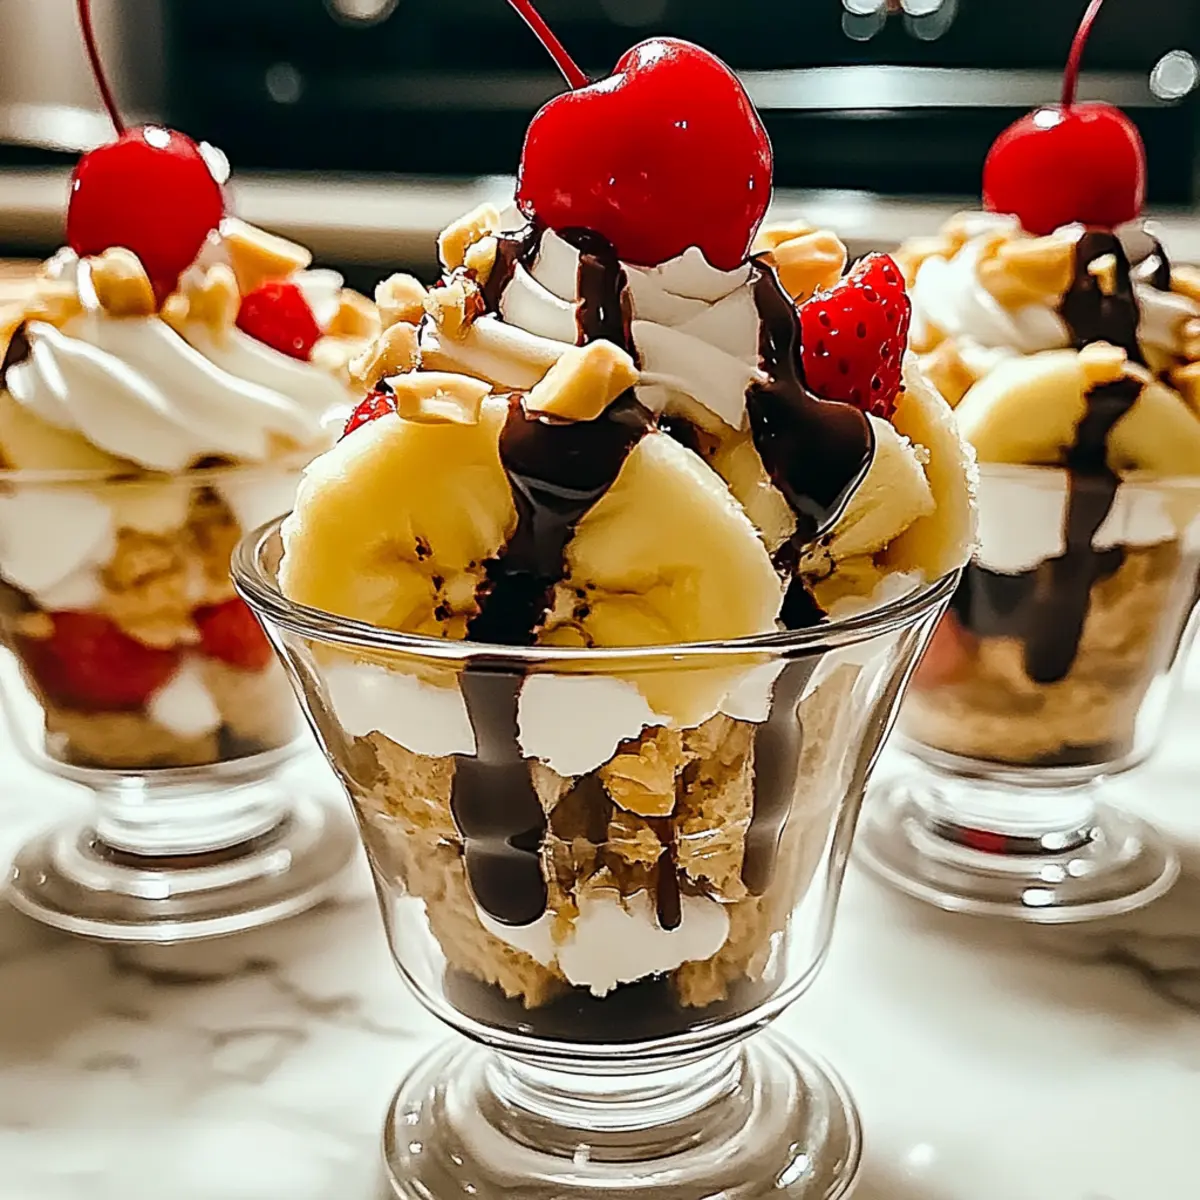
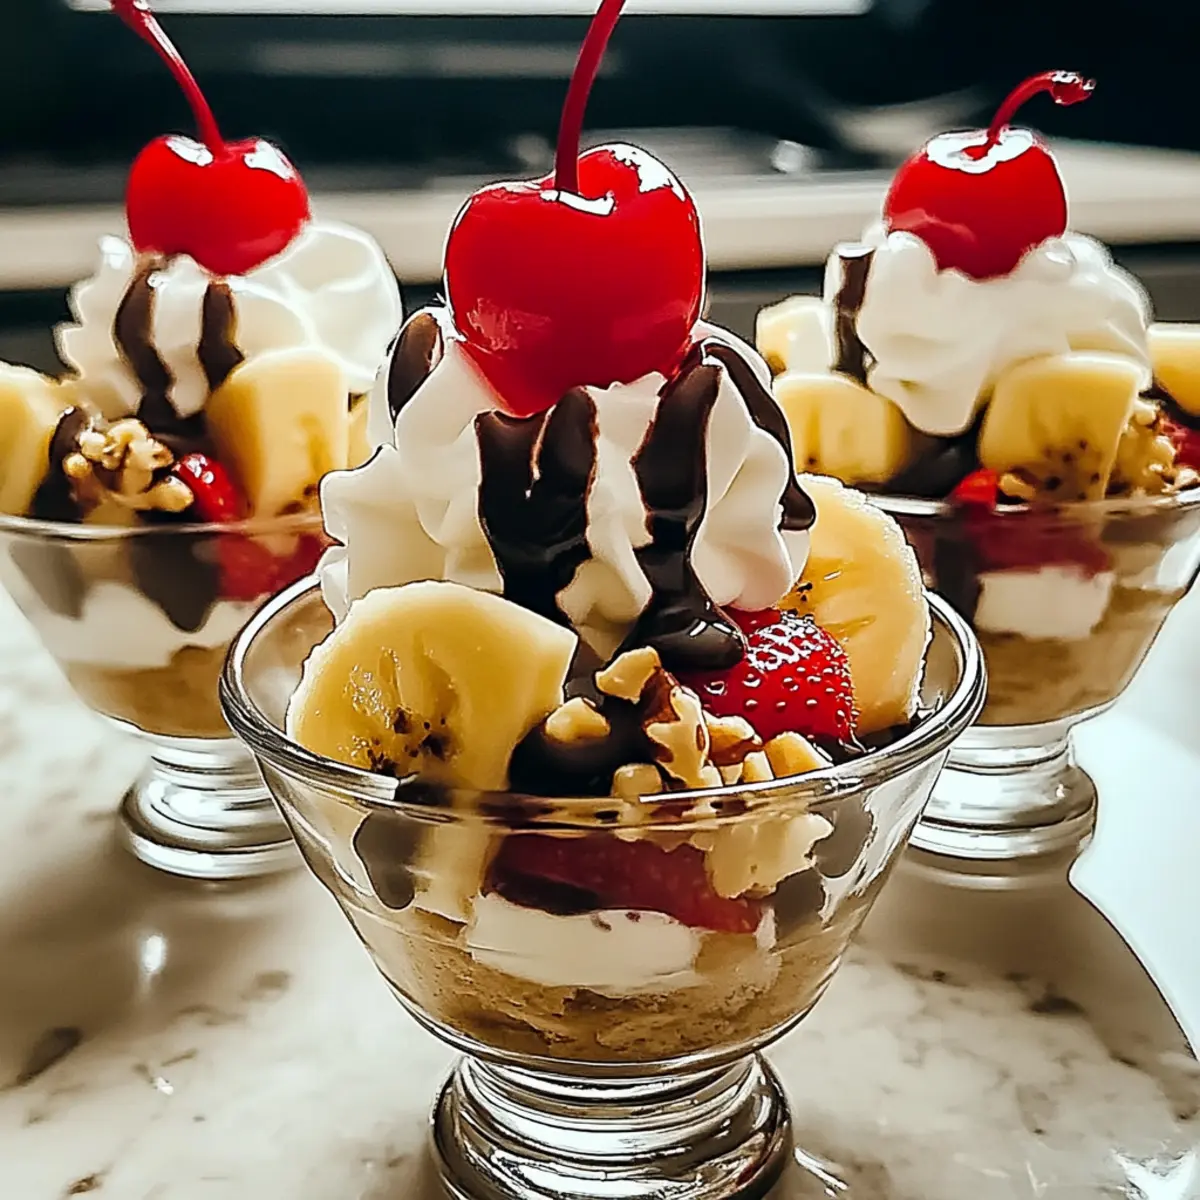
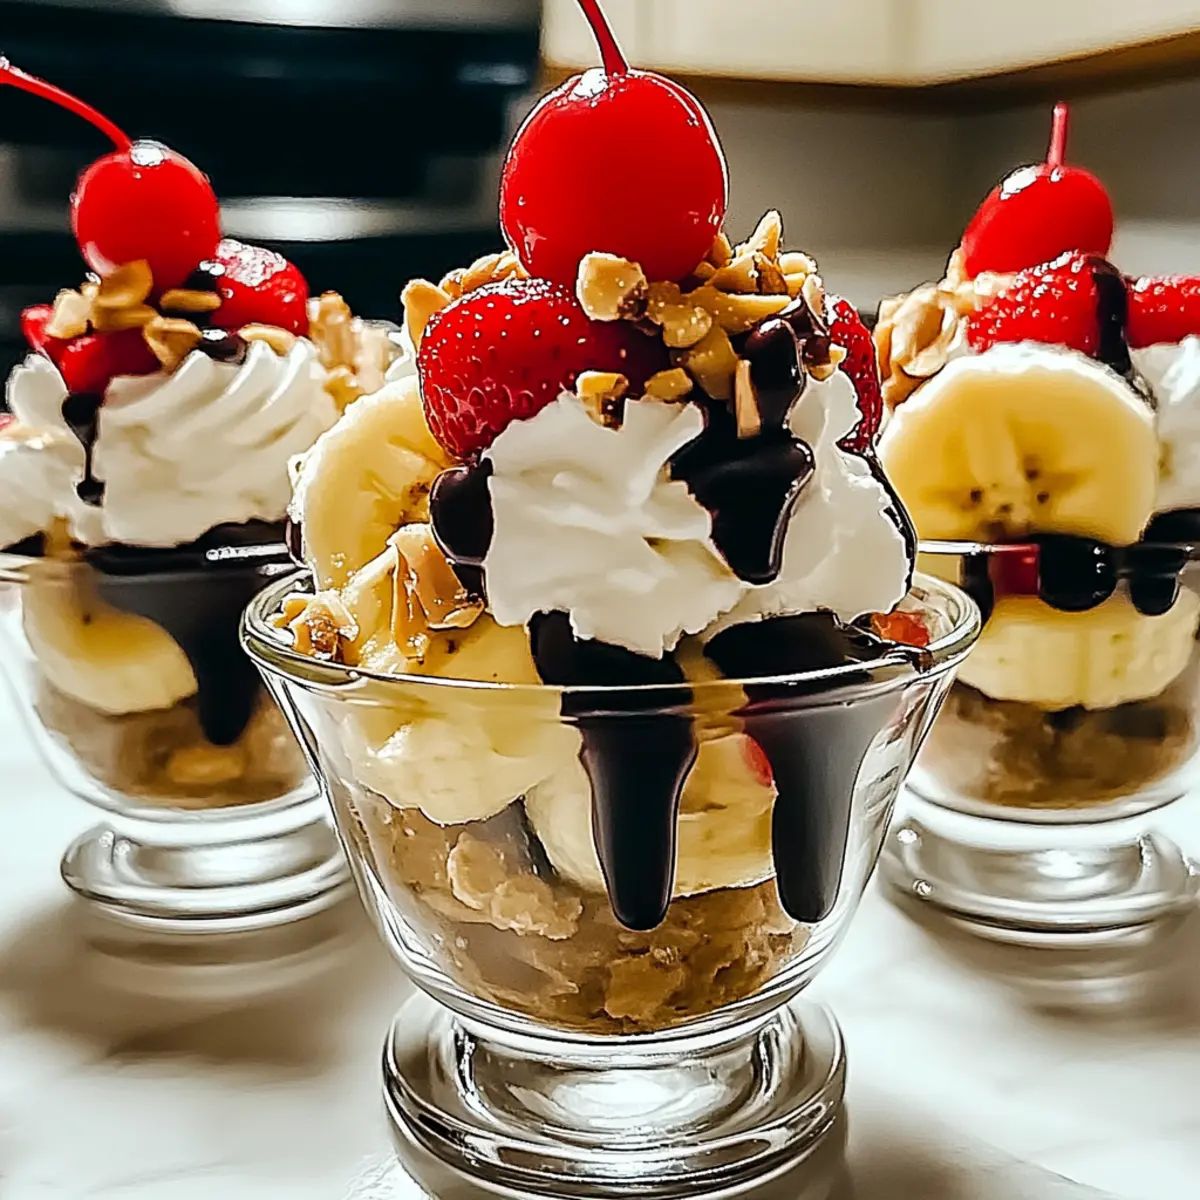
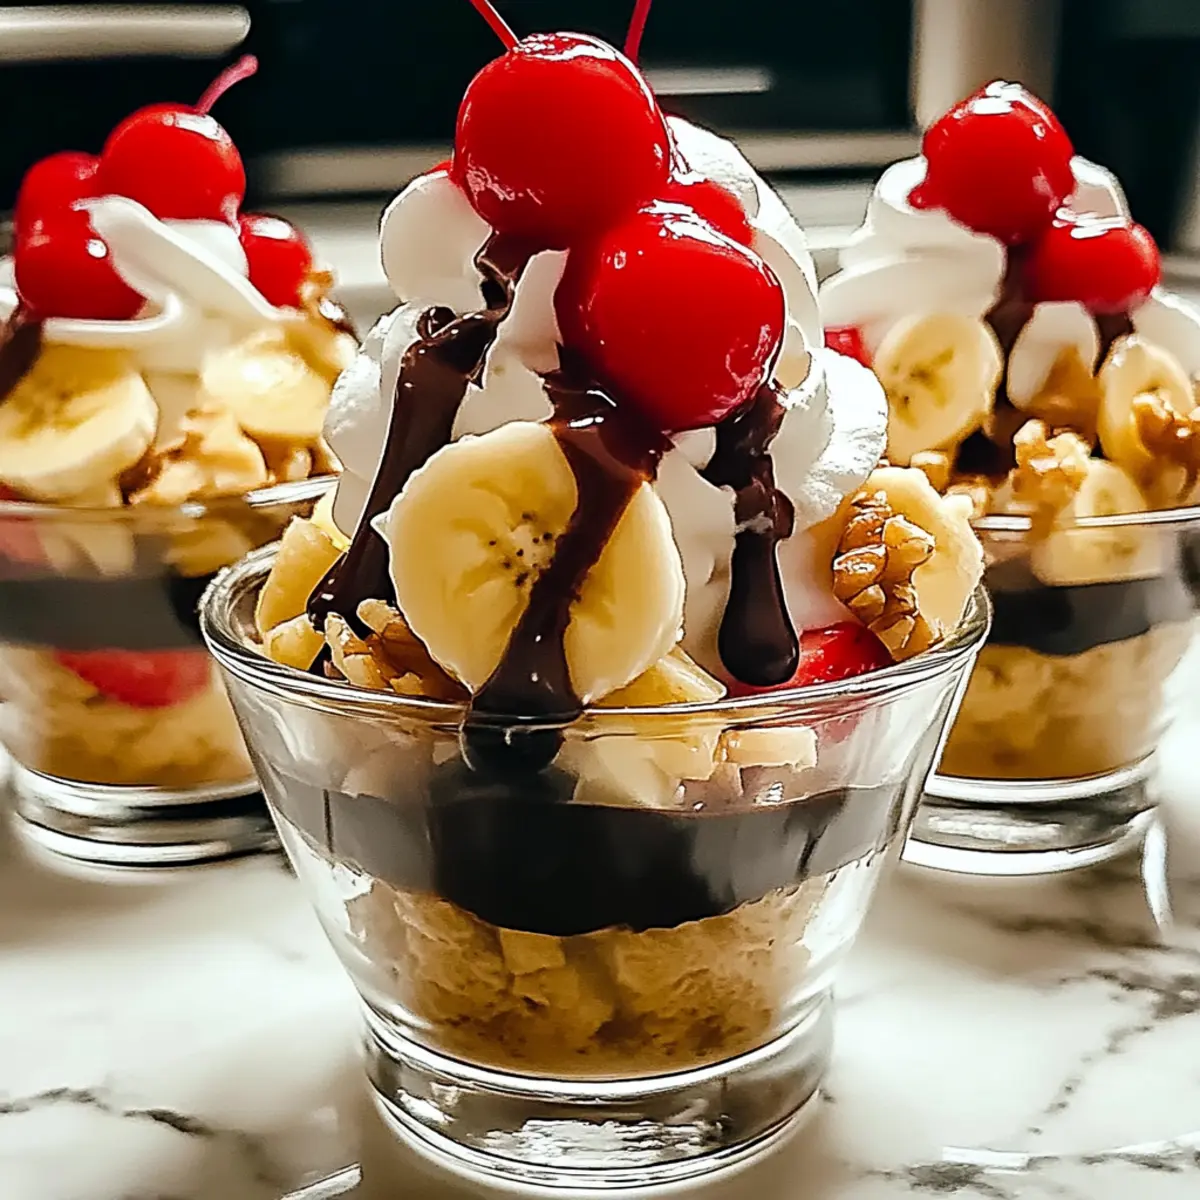
There’s something undeniably nostalgic about the first scoop of a classic banana split, isn’t there? Now, imagine enjoying that beloved treat without firing up the oven or spending hours in the kitchen. That’s where these No-Bake Banana Split Cups come in! This quick and easy dessert is a delightful combination of creamy vanilla ice cream, perfectly ripe bananas, and vibrant, fresh toppings. Plus, they’re customizable, so you can mix and match your favorite ingredients for a personal twist that’s sure to please everyone. Whether you’re hosting a gathering or simply treating yourself after a long day, these delightful cups are a guaranteed crowd-pleaser and incredibly simple to whip up. Ready to create a sweet masterpiece? Let’s dive into the deliciousness!
Why are No-Bake Banana Split Cups a Must-Try?
Effortless Preparation: With no baking required, these cups come together in just minutes, making them perfect for unexpected guests or cravings.
Endless Customization: Swap in your favorite fruits or ice cream flavors, like using coconut ice cream or incorporating blueberries for a personal touch.
Fun for All Ages: Kids love layering their own ingredients, making this dessert a hit at parties or family gatherings.
Decadent Yet Guilt-Free: Enjoy a classic dessert without the guilt, as it’s lighter than traditional banana splits. Each serving weighs in at around 250 calories!
Pair these with a batch of Cauldron Cookie Cups for a fun dessert table or enjoy them alongside some Banana Baked Oatmeal for a delightful meal experience!
No-Bake Banana Split Cups Ingredients
• Get ready to layer deliciousness!
For the Cups
- Ripe Bananas – Provides natural sweetness and creaminess; choose firm, yellow bananas for the best texture.
- Vanilla Ice Cream – Offers a rich, creamy base; if desired, substitute with chocolate or strawberry for a different flavor profile.
For the Toppings
- Strawberries – Contributes freshness; use fresh, hulled strawberries, or frozen ones if you’re in a pinch.
- Pineapple Chunks – Adds a tropical twist; both fresh and well-drained canned pineapple work perfectly.
- Chocolate Syrup – Delivers a luscious drizzle; warming it slightly makes it easier to pour.
- Chopped Nuts (Walnuts/Pecans) – Introduces a satisfying crunch; for a nut-free version, substitute with seeds.
- Whipped Cream – Adds a light, fluffy element; both homemade and store-bought options are equally delightful.
- Maraschino Cherries – A fun, classic garnish that enhances presentation; optional but definitely recommended!
Get ready to assemble your No-Bake Banana Split Cups and enjoy a scrumptious dessert everyone will love!
Step‑by‑Step Instructions for No-Bake Banana Split Cups
Step 1: Prepare Bananas
Begin by peeling and slicing the ripe bananas into 1/4-inch rounds. Layer these banana slices at the bottom of each individual cup, creating a soft and sweet base. Make sure to use firm bananas to maintain their shape and avoid browning. This essential first step sets the foundation for your No-Bake Banana Split Cups.
Step 2: Add Ice Cream
Next, scoop about 1/2 cup of creamy vanilla ice cream on top of the banana layer in each cup. Use a small ice cream scoop or spoon for easy serving. Allow the ice cream to soften slightly for smoother scooping if needed, and ensure it covers the bananas completely for the perfect blend of flavors and textures in your dessert.
Step 3: Layer Fruits
Now, it’s time to distribute the vibrant toppings! Evenly place fresh strawberry slices and pineapple chunks over the ice cream layer in each cup. Aim for a delightful balance of fruit, adding color and freshness to the No-Bake Banana Split Cups. The fruits will provide a lovely contrast to the creamy ice cream and soft bananas below.
Step 4: Drizzle Syrup
For a touch of decadence, warm the chocolate syrup in the microwave for 10-15 seconds until it becomes pourable. Carefully drizzle the syrup over the fruit layer in each cup, allowing it to cascade beautifully. This step adds a rich, chocolaty flavor that complements the fruity toppings perfectly, making your dessert even more irresistible.
Step 5: Add Nuts
Sprinkle a handful of chopped nuts, such as walnuts or pecans, over the chocolate syrup layer for an added crunch. If you’re going nut-free, feel free to substitute with sunflower or pumpkin seeds. This step not only enhances the texture of your No-Bake Banana Split Cups but also brings a delightful nuttiness to each bite.
Step 6: Top and Serve
Complete your delightful creation by generously topping each cup with fluffy whipped cream. A dollop of homemade or store-bought whipped cream makes for a perfect finishing touch. If desired, crown each dessert with a maraschino cherry for that classic banana split presentation. Serve immediately and enjoy the smiles on everyone’s faces!
How to Store and Freeze No-Bake Banana Split Cups
Fridge: Keep assembled cups in the refrigerator and consume within 2-3 hours for the best texture. The ice cream may melt if stored longer.
Make-Ahead Tips: Pre-slice bananas and prepare whipped cream up to 24 hours in advance, storing them separately to maintain freshness until assembly.
Freezer: While not typically recommended, if you must freeze leftovers, cover them tightly in plastic wrap and foil. They can last up to 2 weeks, but texture will change upon thawing.
Reheating: No reheating is necessary, as these No-Bake Banana Split Cups are best enjoyed chilled or at room temperature!
What to Serve with Quick Banana Split Cups
Elevate your dessert experience with a delightful pairing that enhances every sweet bite of these charming cups.
-
Chocolate Chip Cookies: The rich, buttery flavor and soft texture of warm cookies complement the refreshing elements of the cups beautifully.
-
Fresh Berry Salad: A mix of strawberries, blueberries, and raspberries adds a refreshing and fruity contrast, balancing the creaminess of the dessert.
-
Coconut Macaroons: These chewy, sweet treats harmonize with the tropical notes of pineapple in your banana split, bringing a lovely texture variety.
-
Sparkling Lemonade: A bubbly, citrusy beverage cuts the sweetness of the dessert, offering a refreshing sip between each indulgent layer.
-
Homemade Ice Cream: Serve alongside a scoop of your favorite flavor for an ice cream lover’s dream—it’s an extra creamy match made in heaven!
-
Mini Cheesecakes: These delightful tangy treats provide a rich yet balanced flavor, making every bite of dessert layered and indulgent.
-
Caramel Sauce Dipping: A drizzle of warm caramel over the cups is an irresistible addition, enhancing sweetness while adding a luxurious touch.
-
Coffee or Espresso: A cup of rich coffee balances out the sweetness perfectly, offering a cozy finish to your no-bake banana split experience.
Expert Tips for No-Bake Banana Split Cups
-
Choose the Right Bananas: Use firm, yellow bananas to prevent browning and ensure a creamy texture. They’re key to achieving perfect No-Bake Banana Split Cups.
-
Keep It Fresh: Assemble the cups right before serving to avoid sogginess. Storing components separately helps maintain the crispness of your toppings.
-
Soften Ice Cream: Allow your ice cream to soften for a few minutes before scooping. This makes it easier to layer beautifully without crushing the bananas.
-
Customize Wisely: Feel free to mix and match fruits, syrups, and nuts! Choose your favorites to create unique variations of these delightful No-Bake Banana Split Cups.
-
Mind Portion Sizes: Scoop in even portions to ensure everyone gets a delightful balance of bananas, ice cream, and toppings in each serving.
No-Bake Banana Split Cups Variations
Feel free to get creative and personalize your No-Bake Banana Split Cups to suit your taste!
-
Berry Bliss: Swap strawberries for blueberries or raspberries for a vibrant twist. The burst of flavors from the berries brings a delightful freshness to each bite.
-
Coconut Delight: Use coconut ice cream instead of vanilla, and top with shredded coconut for that tropical vibe. It’s like a vacation in every scoop!
-
Caramel Indulgence: Drizzle warm caramel sauce instead of chocolate syrup for an extra sweet and rich flavor. This delightful switch can make your dessert feel indulgent yet light.
-
Yogurt Boost: Layer in Greek yogurt for added creaminess and a protein boost. It balances nicely with the sweetness and makes it a bit healthier.
-
Nut-Free Crunch: Substitute chopped nuts with sunflower seeds or pumpkin seeds for a nut-free option that still packs a satisfying crunch. Everyone can enjoy without worry!
-
Chocolate Chip Kick: Sprinkle mini chocolate chips on top of the whipped cream for an added layer of chocolatey goodness. They provide that extra hint of decadence you might be craving.
-
Frozen Twist: For a frosty treat, freeze the assembled cups for about 30 minutes before serving. This creates a fun slushy texture that’s perfect for hot days!
-
Festive Fun: Add colorful sprinkles on top for birthdays or special occasions to bring a festive flair to your No-Bake Banana Split Cups. It’s all about making dessert fun!
These variations are just the beginning! Try mixing things up and creating your own unique combinations, just like in your favorite Banana Chocolate Chip recipe. If you’re looking for a breakfast version, check out the delightful Banana Baked Oatmeal!
Make Ahead Options
These No-Bake Banana Split Cups are perfect for meal prep, allowing you to save time during busy weeknights. You can slice the bananas and mix the whipped cream up to 24 hours in advance; just be sure to store the bananas in an airtight container to prevent browning and keep the whipped cream refrigerated for freshness. To assemble, simply layer the prepped bananas and ice cream, followed by the fresh fruit and toppings, right before serving. This way, you’ll have delicious, ready-to-enjoy cups that maintain their delightful texture and flavor, giving you restaurant-quality results with minimal effort!
No-Bake Banana Split Cups Recipe FAQs
How do I choose ripe bananas for this recipe?
Absolutely! For the best flavor and texture, select firm, yellow bananas with minimal blemishes. Avoid bananas with dark spots all over, as they may be overripe. Aim for bananas that give a slight squeeze but are not mushy, ensuring a creamy base that holds well in your cups.
How should I store leftover Banana Split Cups?
It’s best to keep assembled cups in the refrigerator and consume them within 2-3 hours for optimal texture. The ice cream may begin to melt and affect the overall experience if stored longer. If you need to store components separately, place sliced bananas in an airtight container and whipped cream in another container, both in the fridge.
Can I freeze No-Bake Banana Split Cups?
While it’s not a common practice, you can freeze leftovers if absolutely necessary. Wrap the cups tightly in plastic wrap, followed by aluminum foil to prevent freezer burn. They can be stored for up to 2 weeks, but keep in mind that the texture of bananas and ice cream will change upon thawing, potentially becoming mushy.
What if my banana slices start to brown?
The more the merrier when it comes to prevention! If you notice your banana slices browning, you can dip them in a mixture of lemon juice and water (1:1 ratio) for a minute before assembling. This will help keep them looking fresh and vibrant, adding to the visual appeal of your No-Bake Banana Split Cups.
Are there any dietary considerations I should be aware of?
Very! If you’re accommodating allergies, you can substitute nuts with sunflower or pumpkin seeds for a nut-free option. Additionally, be mindful of dietary restrictions regarding ice cream; there are several dairy-free varieties available that can fit the bill. Always check ingredient labels to ensure safety for those enjoying your delicious cups!
No-Bake Banana Split Cups: A Fun, Guilt-Free Treat!
Ingredients
Equipment
Method
- Begin by peeling and slicing the ripe bananas into 1/4-inch rounds. Layer these banana slices at the bottom of each individual cup.
- Scoop about 1/2 cup of creamy vanilla ice cream on top of the banana layer in each cup.
- Evenly place fresh strawberry slices and pineapple chunks over the ice cream layer in each cup.
- Warm the chocolate syrup in the microwave for 10-15 seconds until it becomes pourable, then drizzle it over the fruit layer.
- Sprinkle a handful of chopped nuts over the chocolate syrup layer for added crunch.
- Top each cup with fluffy whipped cream and add a maraschino cherry on top if desired. Serve immediately.
Leave a Reply