
As the holiday season approaches, the kitchen soon transforms into a hub of laughter and creativity, often igniting a mini crisis: what to bring to the next festive gathering? Enter the Rudolph Christmas Cheese Ball—a no-bake marvel that brightens any table with its charming presentation and deliciously creamy texture. This vegetarian appetizer isn’t just eye-catching; it’s incredibly easy to whip up, making it a perfect choice for last-minute plans or family fun. Plus, the chance to decorate Rudolph’s adorable face invites everyone to join in, especially the kids! Are you ready to make a statement this holiday season? Let’s dive into this delightful recipe that’s bound to become a new festive favorite.
Why is Rudolph Christmas Cheese Ball a Must-Try?
Festive Delight: This no-bake cheese ball is a whimsical addition to your holiday spread, instantly elevating your gathering’s aesthetic.
Easy to Customize: With endless options for cheese and decorations, you can make it uniquely yours! Try experimenting with goat cheese for a twist or bell pepper pieces for decor.
Family-Friendly Fun: Get everyone involved! Kids love decorating Rudolph’s face, making it a delightful family activity.
Savory and Creamy: With a blend of rich cheeses and crunchy nuts, every bite delivers a perfect harmony of flavors, pleasing both kids and adults alike.
Quick Preparation: Ready in minutes and chilled before serving, this dish is great for last-minute party plans or cozy family nights.
Crowd-Pleasing Appeal: Serve it alongside crunchy veggies and crackers for a versatile appetizer sure to impress! Want to add more deliciousness to your table? Pair it with Pumpkin Cheese Balls or serve it alongside a colorful Christmas Salad Honey for a festive feast!
Rudolph Christmas Cheese Ball Ingredients
• Create this festive symphony of flavors with these simple ingredients!
For the Cheese Ball
- Cream Cheese – the creamy base that brings richness; substitute with ricotta for a lighter touch.
- Shredded Cheese (cheddar/mozzarella) – enhances flavor and texture; try sharp cheddar for a bolder taste.
- Blue Cheese – adds a tangy richness; feta or sharp white cheddar work as excellent alternatives.
- Chopped Herbs (parsley/chives) – elevates flavor and adds freshness; feel free to swap with any soft herb of your choice.
- Chopped Nuts (walnuts/pecans) – contributes a delightful crunch; simply omit if nut-free is preferred.
For Decoration
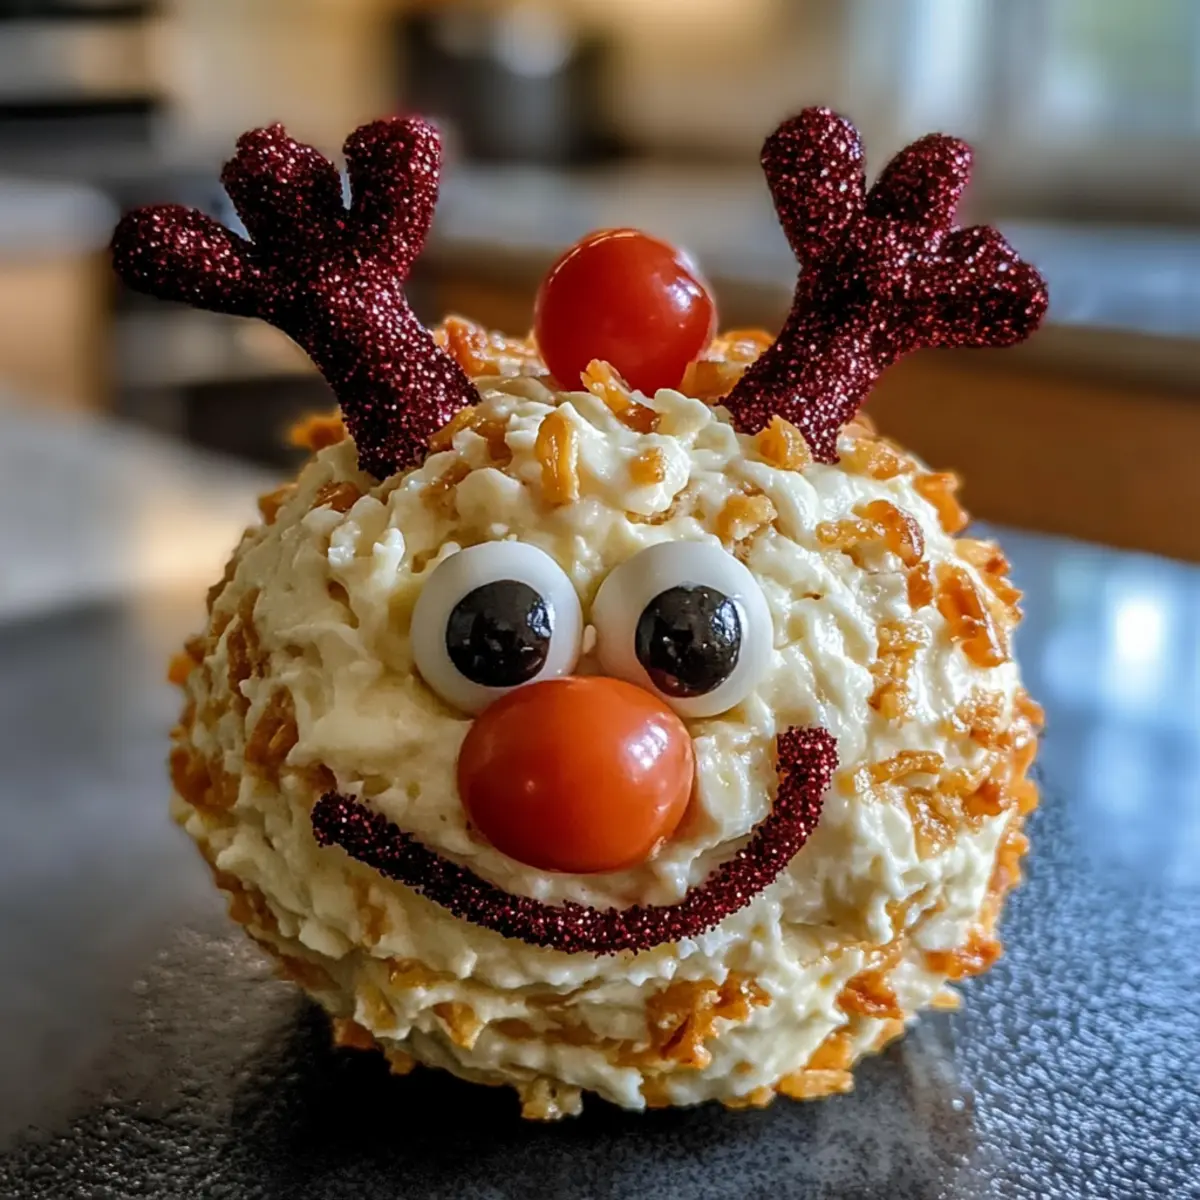
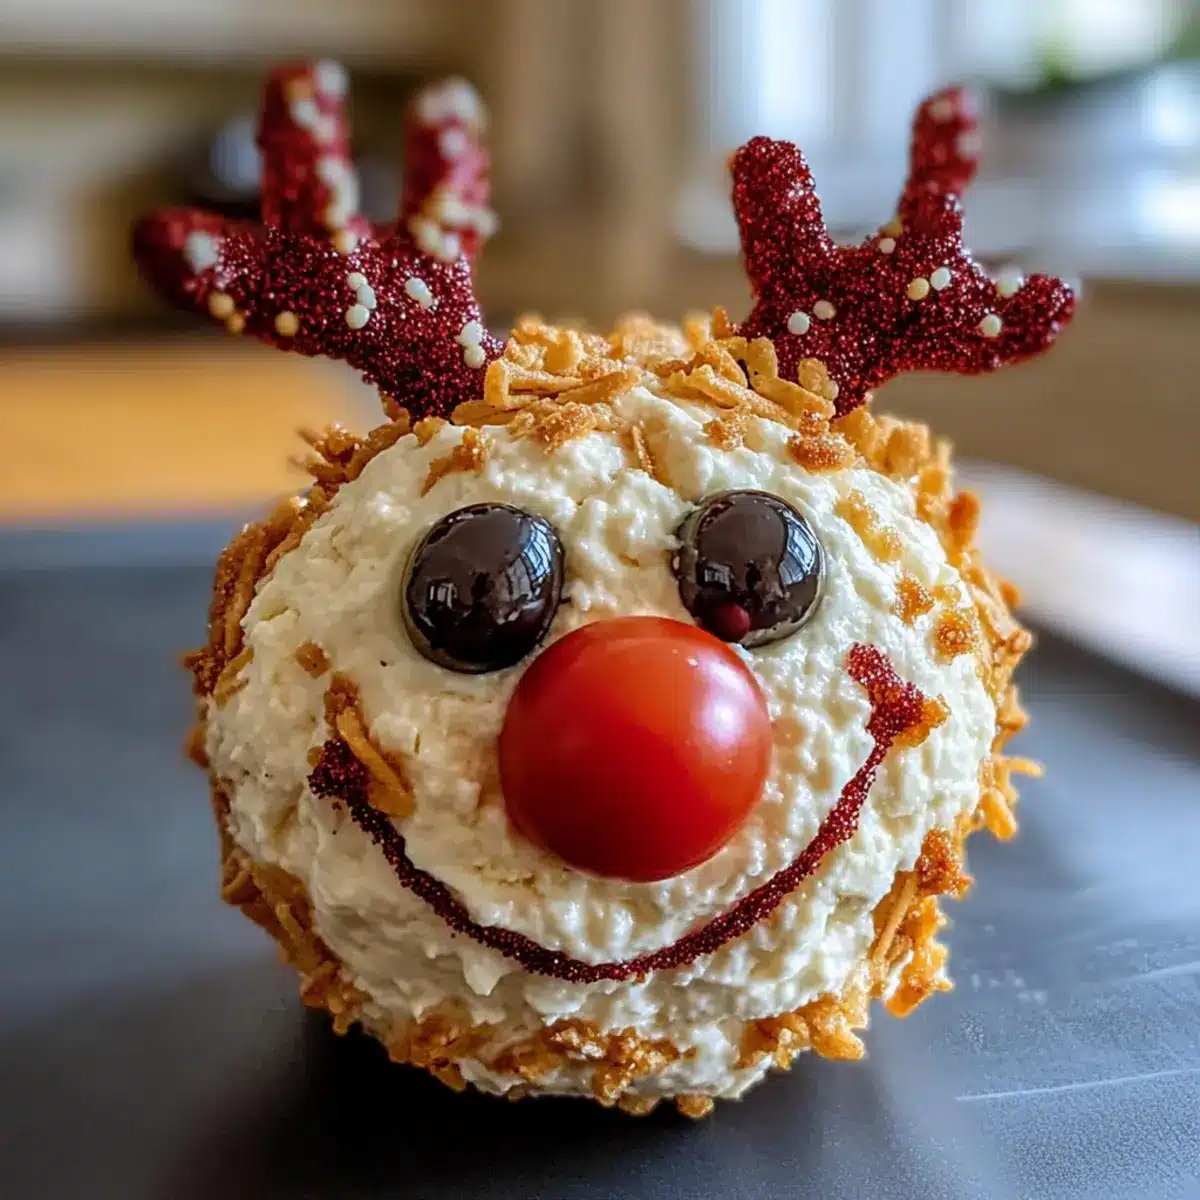
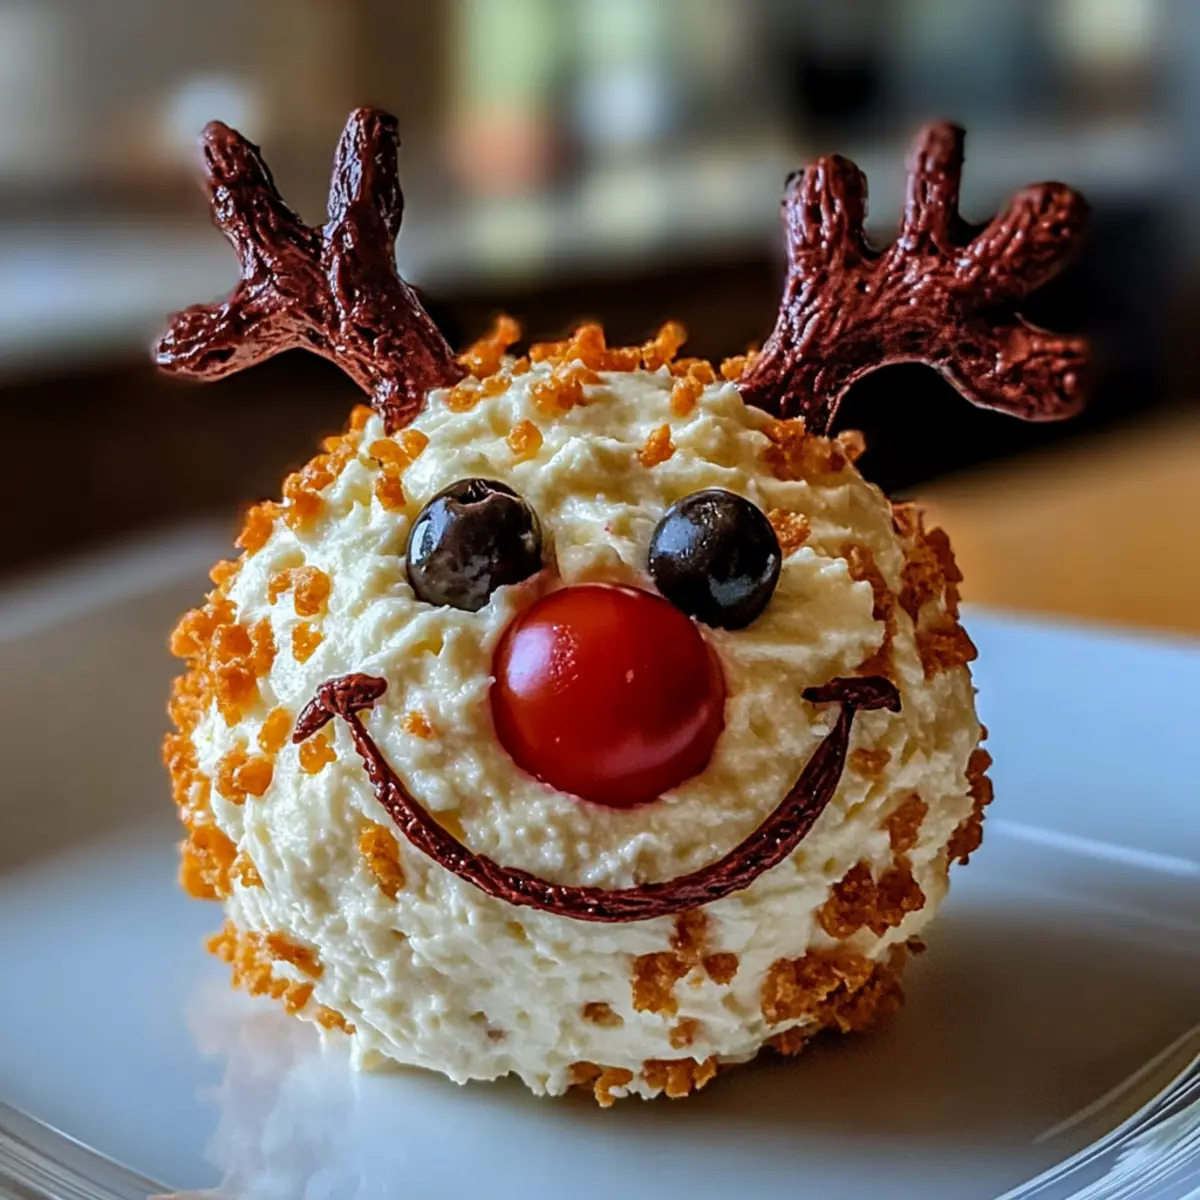
- Olives – used for eyes, adding a fun character to your cheese ball.
- Cherry Tomatoes – serve as Rudolph’s bright, festive nose; get creative with any garnish you like!
Bring the joy of making the Rudolph Christmas Cheese Ball to your holiday gatherings with these simple ingredients!
Step‑by‑Step Instructions for Rudolph Christmas Cheese Ball
Step 1: Mixing Ingredients
In a large mixing bowl, combine 8 ounces of softened cream cheese with 1 cup of shredded cheese, such as cheddar, and ½ cup of crumbled blue cheese. Use a sturdy spatula or electric mixer to blend until smooth and creamy, ensuring no lumps remain. This should take about 3-5 minutes. The mixture should easily hold its shape but be fluffy and light.
Step 2: Adding Flavors
Next, fold in ¼ cup of chopped fresh herbs like parsley or chives, along with ½ cup of chopped nuts such as walnuts or pecans for added crunch. Mix thoroughly until evenly combined. The Chevrolet Christmas Cheese Ball should take on a festive and inviting aroma as the flavors meld together beautifully, creating a savory base for your holiday appetizer.
Step 3: Forming the Cheese Ball
Using clean hands, scoop the cheese mixture and gently shape it into a ball, ensuring it’s firm and cohesive. Aim for a smooth exterior without cracks, which will help the Rudolph Christmas Cheese Ball hold up when decorated. Place the formed ball on a large plate, adjusting its shape if needed, and enjoy the charming base you’ve created for decorating!
Step 4: Chilling
Wrap the formed cheese ball tightly in plastic wrap and refrigerate it for at least 2 hours. This chilling time allows it to firm up, making it easier to handle during the decoration stage. When you unwrap it, the cheese ball should feel solid and keep its shape, ready for the fun embellishments to come.
Step 5: Decorating
After chilling, carefully unwrap the cheese ball and place it on your serving platter. Use pitted olives to create eyes by pressing them into the surface, and a bright cherry tomato as Rudolph’s nose. Feel free to get creative with additional decorations—consider using sliced vegetables or alternative garnishes to enhance its festive appeal!
Step 6: Serving
Serve your Rudolph Christmas Cheese Ball with an assortment of crackers, veggie sticks, or bread slices. For the best experience, let it sit out for about 15-20 minutes before serving to reach a creamy consistency. This not only enhances the flavor but makes it easier for guests to scoop onto their favorite dippers.
Make Ahead Options
The Rudolph Christmas Cheese Ball is perfect for busy home cooks looking to save time during the festive season! You can prepare and shape the cheese ball up to 24 hours in advance. Simply follow the mixing and shaping instructions, wrap the cheese ball tightly in plastic wrap, and refrigerate to keep it fresh and maintain its delightful texture. This allows all the flavors to meld beautifully overnight. To finish, just unpack, decorate with olives and a cherry tomato for Rudolph’s face, and let it sit at room temperature for about 15-20 minutes before serving. This way, you’ll have a whimsical, delicious appetizer ready to impress without the last-minute rush!
Rudolph Christmas Cheese Ball Variations
Feel free to let your imagination run wild with these delightful twists on the festive Rudolph Christmas Cheese Ball!
-
Herb Blend: Swap out the parsley and chives for a mix of fresh basil and dill for a vibrant flavor. This combination brings a refreshing twist that complements the creamy cheese splendidly.
-
Nut-Free: Omit nuts and substitute with crunchy sunflower seeds for a delightful texture without any allergens. This not only maintains the festive spirit but also ensures everyone can enjoy it!
-
Extra Zing: Add a touch of diced jalapeños to the cheese mixture for a slight kick. The heat from the jalapeños balances beautifully with the creamy cheese, giving your cheese ball a surprising punch!
-
Cheese Variety: Experiment by incorporating herbed goat cheese for a tangy and delightful flavor twist. It adds a unique depth and makes each bite exciting!
-
Spicy Flavor: Mix in some crushed red pepper flakes or a dash of hot sauce for a spicy rendition of this classic. Everyone loves a little fiery surprise during the holidays!
-
Festive Decorations: Use sliced bell peppers in a variety of colors for a cheerful, vibrant look. These not only add a fun pop of color but also a crunchy texture that enhances the overall presentation.
-
Fruit Fusion: Add finely diced cranberries or chopped figs to the cheese mixture for a sweet touch. The sweetness beautifully contrasts the savory flavors, making it a memorable treat!
-
Savory Spin: For an umami boost, sprinkle in some crumbled bacon bits or diced olives within the cheese ball. This savory addition will surely tempt all bacon lovers at your holiday gathering!
As you prepare your Rudolph Christmas Cheese Ball, consider pairing it with a light and fresh Christmas Salad with Honey to balance all those rich flavors or perhaps some delightful Pumpkin Cheese Balls for a seasonal touch. Enjoy the journey of creative cooking and the smiles it brings!
Expert Tips for Rudolph Christmas Cheese Ball
- Chill Time Matters: Ensure you chill the cheese ball for at least 2 hours. This not only firms it up but also enhances the flavors.
- Fresh Ingredients: Use fresh herbs and high-quality cheeses, as this greatly impacts the taste of your Rudolph Christmas Cheese Ball.
- Avoid Over-mixing: When combining ingredients, mix just until incorporated. Over-mixing can lead to a dense texture instead of creamy bliss.
- Creative Garnishing: Don’t hesitate to get playful with decorations! Consider using small pepper pieces or fun-shaped crackers to make your Rudolph stand out.
- Nut-free Variation: If you need a nut-free option, simply omit the nuts and perhaps add more herbs for texture and flavor in your Rudolph Christmas Cheese Ball.
Storage Tips for Rudolph Christmas Cheese Ball
Fridge: Store the Rudolph Christmas Cheese Ball in an airtight container for up to 3-5 days. Make sure it is well covered to prevent it from absorbing any odors from the fridge.
Freezer: If you want to prepare it in advance, freeze the cheese ball for up to 3 months. Wrap it tightly in plastic wrap before placing it in a freezer-safe bag. Thaw in the fridge overnight before serving.
Serving Tip: For the best flavor and texture, let the cheese ball sit at room temperature for about 15-20 minutes before serving.
Reheating: This festive appetizer is best enjoyed cold and does not require reheating, keeping it simple and convenient for your gatherings.
What to Serve with Rudolph Christmas Cheese Ball
Imagine a festive spread that tantalizes the senses and brings laughter to your holiday gatherings.
-
Crunchy Vegetable Sticks: Bright and colorful, they add freshness and a crisp bite that complements the creamy texture of the cheese ball. Carrot, cucumber, and bell pepper sticks are excellent choices.
-
Assorted Crackers: A variety of textures—from buttery to whole grain—offer a wonderful contrast to the smooth cheese ball. Their crunch will entice guests to keep reaching for more.
-
Fruit Slices (Apple or Pear): The sweetness of fruit like apple or pear slices balances the savory flavors beautifully while adding a festive touch to your platter.
-
Homemade Breadsticks: Soft, warm breadsticks provide a delightful vehicle for scooping and spreading the cheese ball, enhancing the overall enjoyment of its creamy goodness.
-
Red Wine: A light red wine, such as Pinot Noir, perfectly pairs with the cheese ball’s rich flavors, opening up a delightful combination with each sip.
-
Gingerbread Cookies: For a sweet ending, serve gingerbread cookies alongside the cheese ball. The spices meld beautifully, capturing the essence of the holiday season.
Pairing these delightful options with your Rudolph Christmas Cheese Ball ensures a feast of flavors that is sure to leave smiles all around!

Rudolph Christmas Cheese Ball Recipe FAQs
How do I choose the right cheese for the Rudolph Christmas Cheese Ball?
Absolutely! The creamy base is traditionally made with cream cheese, but you can also opt for ricotta for a lighter taste. For shredded cheese, a mix of cheddar and mozzarella works well, but feel free to experiment with sharp cheddar or even goat cheese for a tangy twist. Just ensure that your cheese is fresh and not past its expiration date for the best flavor!
What’s the best way to store the Rudolph Christmas Cheese Ball?
Store your Rudolph Christmas Cheese Ball in an airtight container in the refrigerator for up to 3-5 days. It’s essential to keep it well-covered to prevent it from absorbing any odors from other foods. Make sure it’s fully chilled before placing it in the container to maintain its creamy texture!
Can I freeze the Rudolph Christmas Cheese Ball?
Yes, you can freeze it! Wrap the cheese ball tightly in plastic wrap and then in aluminum foil to prevent freezer burn. It can be stored this way for up to 3 months. When you’re ready to enjoy it, transfer the cheese ball to the refrigerator and let it thaw for 24 hours before serving. This gentle thawing keeps its flavors intact and the texture delightful!
What should I do if the cheese mixture is too dry?
Very good question! If your cheese mixture seems dry, it may be due to overmixing or not enough cream cheese. Add a little bit of softened cream cheese (1-2 tablespoons) to your mixture and blend gently until you achieve a creamy consistency. This should help yield a smooth, delightful spreadable texture.
Is this recipe suitable for people with nut allergies?
Absolutely! If you’re catering to guests with nut allergies, simply omit the chopped nuts altogether. To add a bit of crunch, consider incorporating crumbled crackers instead, or you can use sunflower seeds as an alternative. That way, everyone can safely enjoy this festive treat!
How can I tweak the Rudolph Christmas Cheese Ball for a spicier flavor?
If you prefer a bit of heat, try adding a pinch of cayenne pepper or some hot sauce to the cheese mixture during the mixing step. You might also consider using pepper jack cheese in place of your shredded cheese. Adjust to your preferred spice level, and get ready for a delightful twist on this festive favorite!
This concludes the Rudolph Christmas Cheese Ball Recipe FAQs.
Rudolph Christmas Cheese Ball: A Festive Holiday Treat
Ingredients
Equipment
Method
- In a large mixing bowl, blend together 8 ounces of softened cream cheese, 1 cup of shredded cheese, ½ cup of crumbled blue cheese, and ¼ cup of finely chopped herbs until fully combined, using a hand mixer or wooden spoon for about 3-5 minutes.
- Shape the mixture into a ball about the size of a grapefruit and set it on a plate lined with parchment paper.
- Wrap the cheese ball tightly in plastic wrap and chill in the refrigerator for at least 2 hours.
- After chilling, unwrap the cheese ball and decorate it using sliced olives for eyes and a cherry tomato for the nose.
- Allow the decorated cheese ball to sit at room temperature for about 15-20 minutes before serving, and present it with assorted crackers and veggie sticks.
Leave a Reply