
The aroma of freshly baked pastries wafting through the kitchen is enough to brighten any dreary morning. That’s why I adore making these Delicious Mini Cheese Danishes—they’re not just a treat but a little moment of joy! With just 30 minutes of prep, these flaky delights are perfect for busy mornings or a relaxed weekend brunch. You can customize each Danish with your favorite toppings, whether you prefer fresh fruit or a sprinkle of cinnamon for a cozy vibe. Plus, they can cater to diverse dietary needs, being adaptable for vegetarians and easily made dairy-free. Are you ready to elevate your breakfast game with these delightful pastries? Let’s get baking!

Why are Mini Cheese Danishes so delightful?
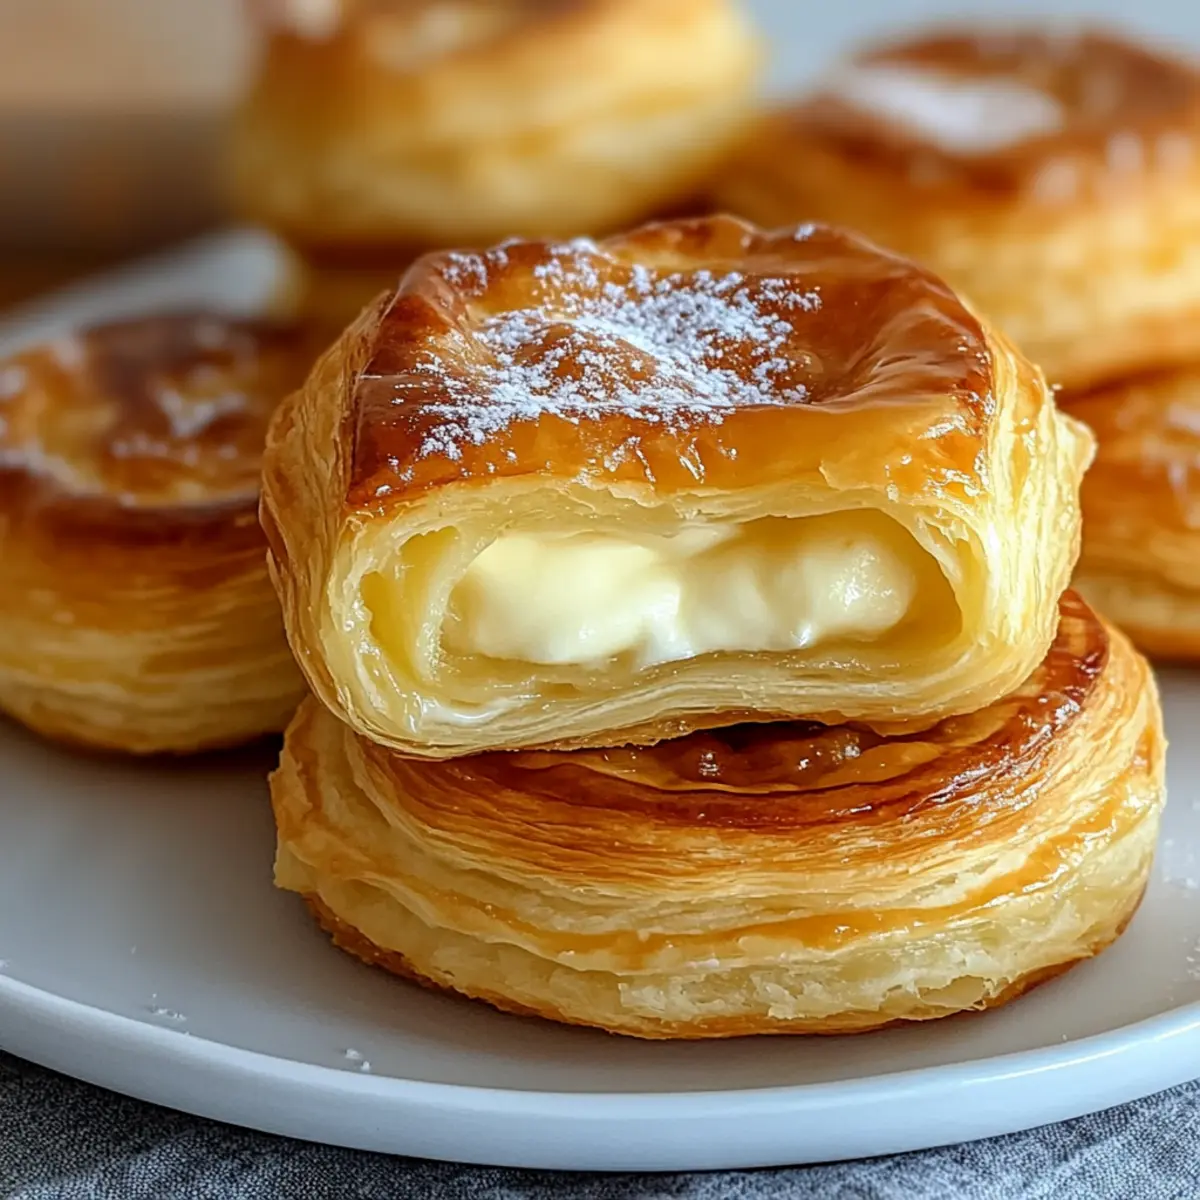
Flaky Perfection: The golden puff pastry creates a delicate, flaky crust that promises a satisfying crunch with every bite.
Quick and Easy: With just 30 minutes from prep to plate, you can whip up these treats even on the busiest mornings.
Fully Customizable: Whether you’re in the mood for sweet fruit toppings or wanting to try a savory twist with cheese, the options are endless!
Diet-Friendly Options: You can easily adapt this recipe to meet dietary preferences, making it suitable for vegetarians and easily converted to dairy-free.
Impress Your Guests: Serve these at brunch or a gathering, and watch as everyone raves about your baking skills! For more delicious breakfast ideas, check out Mini Pumpkin Cheese and Pumpkin Mac Cheese.
Delicious Mini Cheese Danish Ingredients
For the Pastry
• Puff Pastry – The key ingredient for that flaky texture; opt for all-butter for the best taste.
For the Filling
• Cream Cheese – The creamy base that adds richness; ensure it’s softened for easy blending.
• Granulated Sugar – Sweetens the filling beautifully; can be swapped with sugar substitutes if desired.
• Vanilla Extract – Adds aromatic sweetness; using pure extract will elevate the flavor.
• Lemon Juice (optional) – Brightens the filling and balances the creaminess; a splash goes a long way.
For the Glaze
• Egg – Creates a shiny, golden finish; milk can be used for a dairy-free option instead.
• Powdered Sugar – Sweetens the glaze and gives it that perfect finish; no substitutes recommended.
• Milk – Adjusts the glaze consistency; non-dairy alternatives work just as well.
Get ready to bake your Delicious Mini Cheese Danish and experience the joy of homemade pastries!
Step‑by‑Step Instructions for Delicious Mini Cheese Danish
Step 1: Preheat Oven
Begin by preheating your oven to 400°F (200°C) while you prepare your ingredients. Line a baking sheet with parchment paper to prevent sticking and ensure an easy cleanup later. The aroma of baking pastries will soon fill your kitchen, setting the stage for your Delicious Mini Cheese Danish!
Step 2: Prepare Pastry
Unroll the thawed puff pastry onto a floured surface, ensuring it’s easy to handle. Using a sharp knife or pizza cutter, cut the pastry into 3×3 inch squares. This light and flaky pastry will form the perfect base for your Danish, providing a beautiful texture and structure when baked to golden perfection.
Step 3: Make Filling
In a mixing bowl, combine the softened cream cheese, granulated sugar, vanilla extract, and optional lemon juice. Blend these ingredients together until smooth and creamy, ensuring there are no lumps. This filling will create a rich and decadent experience within your Delicious Mini Cheese Danish, so make sure it’s well mixed!
Step 4: Fill Pastry
Take each pastry square and spoon about 1 tablespoon of the cream cheese filling into the center. Be careful not to overfill, as this could cause the filling to spill during baking. With this step, you’ll be one step closer to crafting your delightful breakfast pastries.
Step 5: Shape Danish
To create your Danish shape, fold the corners of each pastry square toward the center, or leave them open for a rustic finish. Feel free to get creative here—each Danish can look different, adding personality to your baking tray. This step highlights the beauty of homemade treats!
Step 6: Apply Egg Wash
In a small bowl, beat an egg until well combined. Using a pastry brush, gently apply the egg wash to the edges of each Danish. This will give your pastries a gorgeous golden color when baked, enhancing their visual appeal and making your Delicious Mini Cheese Danish utterly irresistible.
Step 7: Bake
Transfer the prepared pastries onto the lined baking sheet, spacing them apart to allow for puffing. Pop them in the oven and bake for 15-18 minutes, watching closely until they’re puffed and golden brown. The intoxicating aroma will signal that your pastries are nearly ready to devour!
Step 8: Cool and Glaze
Once baked, remove your Delicious Mini Cheese Danishes from the oven and let them cool slightly on a wire rack. In a separate bowl, whisk together the powdered sugar and milk until smooth to create a glaze. Drizzle this sweet finishing touch over the warm pastries for a delightful shine.
Step 9: Serve
Your Delicious Mini Cheese Danish are now ready to be enjoyed! Serve them warm alongside a cup of coffee or tea, and watch as your family and friends delight in these flaky, creamy treats. Savor this moment of homemade goodness, delivering joy straight to your breakfast table!
Make Ahead Options
These Delicious Mini Cheese Danishes are perfect for meal prep enthusiasts! You can prepare the puff pastry up to 24 hours in advance by cutting it into squares and storing it in the refrigerator, covered with plastic wrap to maintain freshness. The cream cheese filling can also be mixed ahead of time and stored in the fridge for up to 3 days. When you’re ready to bake, simply fill the pastry squares with the chilled filling and follow the baking instructions. This way, you’ll enjoy warm, flaky danishes straight from the oven with minimal morning hassle—making your busy schedule a bit sweeter!
Delicious Mini Cheese Danish Variations
Feel free to personalize these Mini Cheese Danishes according to your taste and creativity!
-
Fruit Toppings: Add fresh berries or sliced apples on top before baking for a burst of natural sweetness. This twist brings a refreshing vibe, perfect for breakfast or brunch!
-
Spiced Filling: Mix in cinnamon or nutmeg for a cozy flavor enhancement. You’ll love the warm aroma it creates while baking, inviting everyone to come to the table.
-
Nutty Crunch: Try adding chopped nuts like pecans or almonds to the filling for extra texture. This will elevate both the flavor and mouthfeel, making each bite a delightful surprise.
-
Savory Version: Replace the sugar in the filling with savory cheeses like feta or goat cheese for a unique appetizer option. These can bring a great twist to your dinner parties!
-
Dairy-Free Alternative: Swap out the cream cheese for dairy-free cream cheese and use non-dairy milk for the glaze. This way, those with lactose intolerance can enjoy these delicious treats too!
-
Chocolate Drizzle: For a sweet twist, melt some dark chocolate and drizzle it on top after glazing. The richness of chocolate adds a decadent appeal to these pastries.
-
Herb-Infused: Mix in fresh herbs like basil or thyme into your cheese filling for a unique savory experience. This unexpected combination will surely impress your guests!
-
Zesty Lemon: Incorporate a little lemon zest into the filling for a bright and refreshing flavor. It adds a nice contrast to the creaminess of the cheese, making it a delightful treat!
For more inspiration, check out these delightful recipes like Pumpkin Cheesecake Truffles for a sweet finish or Goat Cheese Walnut for a fantastic savory bite!
Expert Tips for Delicious Mini Cheese Danish
-
Chill Pastry: Make sure your puff pastry is very cold when you start—this helps achieve a flaky texture during baking.
-
Avoid Overfilling: Use just 1 tablespoon of filling per square to prevent spillage while baking. This keeps your pastries looking perfect!
-
Creative Toppings: Customize with fresh fruit or spices before baking. Berries give a refreshing twist, while cinnamon adds a cozy flavor.
-
Glaze Consistency: Adjust the glaze with milk until it reaches your desired thickness; it should drizzle smoothly without being too runny.
-
Serve Fresh: For the best taste and texture, enjoy your Delicious Mini Cheese Danish fresh out of the oven or on the same day.
How to Store and Freeze Delicious Mini Cheese Danish
Room Temperature: Keep your baked Mini Cheese Danish in an airtight container for up to 2 days to maintain their delicious freshness.
Fridge: For longer storage, place the pastries in the refrigerator for up to 4 days. Reheat in a 350°F (175°C) oven for 5-10 minutes to restore their crispiness.
Freezer: If you’d like to freeze your pastries, unbaked Danish can be stored in the freezer for up to 2 months. Bake from frozen at 400°F (200°C) for 20-25 minutes, and enjoy fresh, warm treats whenever you desire!
What to Serve with Easy Mini Cheese Danish
The delightful aroma of freshly baked pastries invites a full meal experience that brings joy to every bite.
- Fresh Berries: Juicy strawberries or blueberries add a refreshing burst of flavor that complements the creamy filling beautifully.
- Scrambled Eggs: Fluffy, buttery scrambled eggs create a savory contrast, making for a balanced brunch plate that satisfies.
- Crispy Bacon: The salty crunch of bacon pairs wonderfully with the sweetness of the Danish, delivering a delightful flavor combination.
- Yogurt Parfait: Layered yogurt with granola and fruit offers a creamy and crunchy texture, enhancing your breakfast spread.
- Coffee or Tea: A warm cup of coffee or herbal tea complements the sweetness of the Danish, perfect for sipping with each bite.
- Mimosa: For a festive touch, serve with a bright mimosa. The citrus notes elevate your meal and make it celebratory.
- Vanilla Ice Cream: Serve a warm Mini Cheese Danish with a scoop of vanilla ice cream for a heavenly dessert experience!
- Cinnamon Sugar Dusting: A light sprinkling of cinnamon sugar creates an aromatic finish that enhances the overall flavor.
- Savory Cheese Platter: Pair with a selection of cheeses for a delightful array of tastes—perfect for entertaining guests!
- Fruit Compote: A dollop of warm fruit compote adds a sweet and tangy note, enhancing the creamy sweetness of the Danish.

Delicious Mini Cheese Danish Recipe FAQs
How do I choose the best puff pastry?
Absolutely! When selecting puff pastry, look for high-quality options, preferably all-butter varieties, as they offer the best flavor and texture. Ensure the pastry is cold when you work with it, as this helps it achieve that nice flaky layer when baked. Check the packaging for any additives if you prefer a more wholesome ingredient, and remember to thaw it properly in the fridge overnight rather than at room temperature for optimal results.
How should I store my leftover Mini Cheese Danishes?
To keep your baked Delicious Mini Cheese Danishes fresh, store them in an airtight container at room temperature for up to 2 days. If you’d like to extend their flavor, refrigerate them for up to 4 days. When ready to enjoy, simply reheat them in an oven preheated to 350°F (175°C) for about 5-10 minutes until they’re warm and crispy again. Enjoy the delightful texture just like when they were first made!
Can I freeze unbaked Mini Cheese Danishes?
Of course! Freezing unbaked Mini Cheese Danishes is a great way to have quick treats ready for any occasion. After filling and shaping the pastries, place them on a baking sheet to freeze until solid. Once frozen, transfer them to a freezer-safe container or bag for up to 2 months. When you’re ready to bake them, simply remove from the freezer and bake straight from frozen at 400°F (200°C) for 20-25 minutes until puffed and golden. There’s nothing like the smell of fresh pastries!
What if my cream cheese filling is too runny?
Very! If your cream cheese filling ends up too runny, don’t worry; it happens! To remedy this, you can add a little more softened cream cheese until you reach a thicker consistency. Additionally, chilling the filling for about 30 minutes in the fridge before using it can also help firm it up, making it easier to spoon into the pastry. Always ensure your cream cheese is well-blended without lumps, as a smooth filling will keep your beautiful pastries intact.

Delicious Mini Cheese Danish: Your Quick Morning Delight
Ingredients
Equipment
Method
- Preheat your oven to 400°F (200°C) and line a baking sheet with parchment paper.
- Unroll the thawed puff pastry onto a floured surface and cut into 3x3 inch squares.
- In a bowl, combine softened cream cheese, granulated sugar, vanilla extract, and optional lemon juice. Blend until smooth.
- Spoon about 1 tablespoon of cream cheese filling into the center of each pastry square.
- Fold the corners of each pastry square toward the center or leave them open.
- Beat an egg and apply the egg wash to the edges of each Danish.
- Transfer the pastries onto the lined baking sheet and bake for 15-18 minutes until golden brown.
- Remove from oven and let cool, then whisk together powdered sugar and milk to create glaze.
- Drizzle glaze over the warm pastries and serve.
Leave a Reply